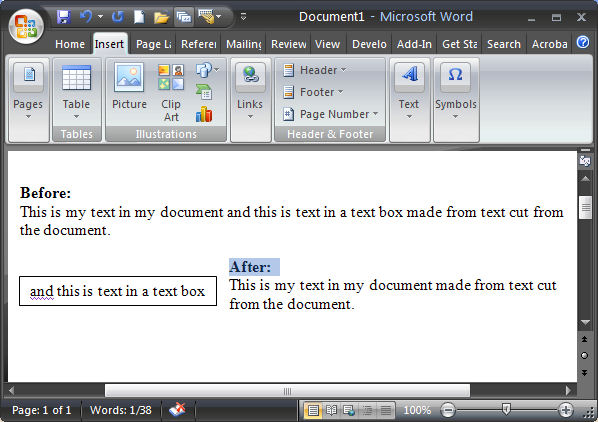
Word does not contain any option for automatically numbering a series of documents with a consecutive number - the type of thing you might want to do if you are using Word to create invoices or numbered purchase orders. The solution is to create a macro to do the work for you.
Start with a template that has a macro that runs when ever the template is used for a new document. The macro should read a number stored in a file on your drive, add it to your document and then, to prepare the number for the next time it's required, the number should be incremented by one and be written back into the file.
To create the solution, create a new document (or open an existing one to use as a template) and click where you want the sequential number to appear, and choose Insert, Bookmark, type docNum in the Bookmark name area and click Add.
Save this file as a template by choosing File, Save As, from the Files as type list choose Document Template (*.dot), give the file a name and click Save. With the file still open, choose Tools, Macro, Macros and type the name of the macro docNum and, from the Macros In list choose the template file name for the file you just saved and choose Create.
Type this macro as shown, the sub and end sub lines should be there already:
Sub docNum()
Dim MyString, docNumber
FileToOpen = "c:\windows\docNumfile.txt"
Open FileToOpen For Input As #1
Input #1, docNumber
Close #1 ' Close file
ActiveDocument.Bookmarks("docNum").Select
Selection.InsertAfter Text:=docNumber
docNumber = docNumber + 1
Open FileToOpen For Output As #1
Write #1, docNumber
Close #1 ' Close file.
End Sub
Now choose File, Close and Return to Microsoft Word. With the template on the screen, choose File, Close and answer Yes when prompted to save your changes.
Now open Notepad and type a number 4 or 5 numbers less than the number of the first quote you want to use. So, if you want to start numbering at 200, type 195 so you have a few numbers to use to test the process. Choose File, Save As and save the file as a text file, calling it docNumfile.txt and save it to this folder: C:\windows. Close Notepad
To test the process, choose File, New, choose the template file and click OK. Now run the macro by choosing Tools, Macro, Macros, docnumb, Run. If you have everything right the document number will be inserted in the document.
When this is working fine, alter the macro so this process of inserting the document number happens automatically whenever you create a new document based on this template. To do this, choose Tools, Macro, Macros, click on docnumb and click Edit. Change this macro's procedure name by altering this line of code:
Sub docnumb()
to read
Sub AutoNew()
Choose File, Close and Return to Microsoft Word. With the template on the screen, choose File, Close. Say No to saving your changes to this file but answer Yes to save the changes to your template file.
Now test again by creating a new file using File, New, choose your template and click OK. The document number should be added automatically to the new document.
If, in the process of testing you find you go past your starting document number, open Notepad and open the file docnumfile.txt, type a new starting number and save it again.
Labels: AutoNew, autonumber, document numbering, macro, Microsoft Word, Word
 So, you've finished designing your presentation in PowerPoint and it's time to you’re your final preparations.