Articles | Photoshop blog | Photography blog | about me | e-mail

Helen Bradley - MS Office Tips, Tricks and Tutorials

I'm a lifestyle journalist and I've been writing about office productivity software for a long time. Here you'll find handy hints, tips, tricks, techniques and tutorials on using software as diverse as Excel, Word, PowerPoint, Outlook, Access and Publisher from Microsoft and other applications that I love. My publishing credits include PC Magazine, Windows XP mag, CNet, PC User mag, SmallbusinessComputing.com, Winplanet and Sydney Morning Herald.

Thursday, February 25, 2010

Windows Vista – Missing Mail icon

controlpanel

Things have moved in Windows Vista 64 bit and sometimes it’s hard to find things you know should be there.

One item that is hard to find is the Mail icon that you need to use to add profiles for Outlook, for example. You’ll find it in the Control Panel but not alongside all the other icons. Instead, click the View 32-bit Control Panel Items View 32-bit Control Panel Items group. There you will find Mail alongside other options like Java, QuickTime and some others.

Labels: ,

Add to Technorati Favorites

Thursday, February 18, 2010

Word 2007 - Picture styles

Word 2007 comes with a range of styles you can use when inserting images into your document.

To see them at work, insert a picture into your document, click the image and choose Picture Tools > Format on the Ribbon.

The Picture Styles are formats you can apply to your image and they include some very attractive looking options.

Once you’ve selected a picture style you can adjust things like the Effects which are attached to it.

For example, you can create a picture reflection by selecting the picture and then choose the Picture Effects > Reflection option to create a reflected edge.

You can also recolor the picture border if desired by using the Picture Border option. If you have a picture inserted in a document and formatted the way you like it but determine that you don’t like the picture and want to replace it, choose Picture Tools > Format and click the Change Picture option and choose an alternate picture to use. The format will remain and only the picture itself will change.

Labels: , , , ,

Add to Technorati Favorites

Thursday, February 11, 2010

Word 2007 Quick Tables

New to Word 2007 is the Quick Tables feature.

To see what is available, click the Insert tab, choose Table > Quick Tables and choose from a range of preconfigured tables such as calendars and tables with sub headings and other features.

Once the table is inserted into the document, you can replace the text in it with your own text such as the dates for your desired calendar month.

Most of the elements that you're used to selecting from the Tables menu in previous versions of Word can be found on the Tables Tools > Layout tab and these include the ability to repeat header rows at the top of the table and options for adjusting the text direction and inserting and deleting rows.

Once you have a table formatted in the way you want it to look you can add that particular format to the Quick Tables Gallery so you can use it anytime.

To do this, click inside the table and choose Table Tools > Layout tab. Click Select > Select Table so the entire table is selected. Now, from the Ribbon, choose Insert > Table and click on the Quick Tables option.

Choose Save Selection to Quick Tables Gallery and the Create New Building Block dialog will appear. Complete it as you would for a regular Building block element with the exception that this time, leave the Gallery option set to Tables so the table will appears in the Quick Tables Gallery.

Click Ok when you're done. In future, your custom designed table will be selectable from the Quick Tables Gallery.

Labels: , , ,

Add to Technorati Favorites

Tuesday, February 9, 2010

Controlling Images in Word 2010


For many years now Microsoft has made it hard for new users to control inserted images in their documents.

Unfortunately, Word 2010 is no exception and, by default, images are inserted into a new Word document as inline images. This means that they cannot be moved or easily positioned on the page without you needing to first change the image’s wrap settings.

This leaves hapless new users with absolutely no clue that this feature is available or needed much less where to find and set it.

To change the way that images are inserted into Microsoft Word documents to make it a one-step process that never needs to be tweaked, in Word 2010 choose File > Options and select the Advanced tab. Locate the Cut, Copy and Paste options and set the Insert/Paste Pictures As setting to Square, Tight, Behind Text, In Front Of Text, Through or Top And Bottom - in fact anything other than the default Inline With Text.

Once you’ve done this, when you insert an image into a document it will be inserted with the setting that you determined. This makes it easy to move the image around the screen and position it exactly where you want it to be.

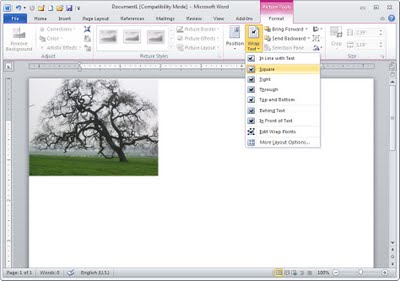
If you have images in your document and if you need to change their wrapping so that you can work with them, click the image, click Picture Tools > Format and from the Wrap Text dropdown list, select Square or another setting (other than Inline with Text).

Microsoft, this default setting earns you a score of -10 it’s not the typically required setting and it doesn’t make good sense as a default.

Labels: , ,

Add to Technorati Favorites

Thursday, February 4, 2010

Tables in Word 2007

The table options in Word 2007 allow you to create quite sophisticated tables more easily than you’ve been able to in the past.

Click the Insert tab and click the Table button and drag over the number of cells you want for your table.

With the table selected, choose Table Tools > Design tab and choose a Table Style from the dropdown list.

Many of the styles are linked to theme colors so you can create a table with an attractive style which like other Word objects changes color to match the theme when it changes.

When you have a table style selected you can configure other options for it by, for example, selecting the Banded Rows checkbox in the Table Style Options group and adjusting the look of the first and last columns and header row using the checkboxes.

Labels: , , , ,

Add to Technorati Favorites

Tuesday, February 2, 2010

Excel VBA: What Sheet is that?

When you’re working in Microsoft Excel Visual Basic for Applications, you may need to refer to a worksheet by name. This can be confusing because the sheet names are not necessarily what are displayed in the sheet tabs at the bottom of the screen.

There is only one way to know exactly what a sheet’s name is so you can refer to it by that name regardless of what the tab says. That is to view the Visual Basic Editor and select your project in the Project Explorer. Here you will see each sheet listed by name with the sheet tab name in brackets after it.

If you want to refer to a sheet by name in your VBA code use the sheet name at the left (not the one in brackets) in the Project Explorer.

This will ensure that you always use the exact sheet that you expect to be using in your Visual Basic application.

Labels: , ,

Add to Technorati Favorites