Articles | Photoshop blog | Photography blog | about me | e-mail

Helen Bradley - MS Office Tips, Tricks and Tutorials

I'm a lifestyle journalist and I've been writing about office productivity software for a long time. Here you'll find handy hints, tips, tricks, techniques and tutorials on using software as diverse as Excel, Word, PowerPoint, Outlook, Access and Publisher from Microsoft and other applications that I love. My publishing credits include PC Magazine, Windows XP mag, CNet, PC User mag, SmallbusinessComputing.com, Winplanet and Sydney Morning Herald.

Tuesday, February 9, 2010

Controlling Images in Word 2010
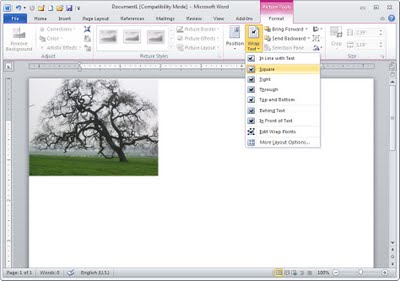


For many years now Microsoft has made it hard for new users to control inserted images in their documents.

Unfortunately, Word 2010 is no exception and, by default, images are inserted into a new Word document as inline images. This means that they cannot be moved or easily positioned on the page without you needing to first change the image’s wrap settings.

This leaves hapless new users with absolutely no clue that this feature is available or needed much less where to find and set it.

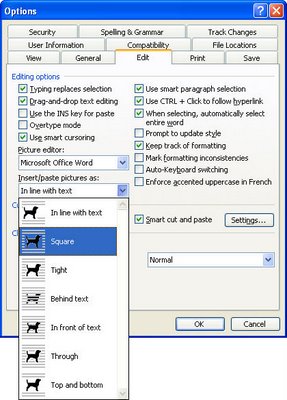
To change the way that images are inserted into Microsoft Word documents to make it a one-step process that never needs to be tweaked, in Word 2010 choose File > Options and select the Advanced tab. Locate the Cut, Copy and Paste options and set the Insert/Paste Pictures As setting to Square, Tight, Behind Text, In Front Of Text, Through or Top And Bottom - in fact anything other than the default Inline With Text.

Once you’ve done this, when you insert an image into a document it will be inserted with the setting that you determined. This makes it easy to move the image around the screen and position it exactly where you want it to be.

If you have images in your document and if you need to change their wrapping so that you can work with them, click the image, click Picture Tools > Format and from the Wrap Text dropdown list, select Square or another setting (other than Inline with Text).

Microsoft, this default setting earns you a score of -10 it’s not the typically required setting and it doesn’t make good sense as a default.

Labels: , ,

Add to Technorati Favorites

Thursday, March 15, 2007

Inserting Images in Word


In recent implementations of Word they broke the image insertion tool. When you insert an image it comes in as "Inline with text" which means it won't move, it breaks up lines and, in general, looks awful.

Luckily it's fixable and permanently so. To do this, choose Tools, Options, Edit tab. From the Insert/Paste pictures as dropdown list choose something like Square or In front of Text (in fact anything other than In line with text). Click Ok and the change will be permanent. Although you can, of course, always change the setting for any inserted image if you really do want to put it inline with text by selecting the option from the Picture toolbar on an image by image basis. My bet is you won't ever do it though!

Labels: , ,

Add to Technorati Favorites

Friday, March 2, 2007

Add a picture to a Visio Stencil

When you repeatedly use an image in Visio, you can add it to a Stencil so it's ready for use at any time. This is handy for your company logo, for example.

Step 1
To do this, save your logo as a file capable of being imported into Visio such as GIF, BMP or Tif. Open a new blank Drawing and choose Insert, Picture, From File and locate and open your picture. Use the sizing handles to size it to the size you want it to default to when you insert it into a drawing in future.

Step 2
To create the stencil that will contain your logo, choose File, Shapes, New Stencil (metric) or open an existing stencil from your My Shapes collection to use. If the icon to the left of the stencil name does not show a red asterisk in its top left corner, right click the icon and choose Edit Stencil. It will now show a small asterisk indicating it is able to be edited.

Step 3
To add the image to the Stencil, hold the Control key and drag and drop the image onto the stencil. Click in the name area below it and type a name for it descriptive of what the image contains. Right click the Stencil's icon and choose Save As and give it a name (or, if you're adding to an existing stencil, choose Save). Again, right click the icon to the left of the stencil name and disable the Edit Stencil option.

Step 4
In future, to locate and use your image, choose File, Shapes, My Shapes and open the stencil containing the shape to use. Drag the shape from the stencil and add it to your document. Create stencil shapes in this way containing your company logo, address details and other objects you repeatedly use on your drawings.

Labels: , , ,

Add to Technorati Favorites

Tuesday, February 13, 2007

Make room for graphics in Publisher

When you're working on a Publisher document, chances are you may not have all the final images in hand. If you're waiting on graphics, you can add a placeholder for each image to your Publisher file so you can allocate the space for the images and so everything else can be finalized in the meantime.

To do this, click Picture Frame and choose Empty Picture Frame then drag a frame into your document. Size it to the size required. Later, when the image comes in, you can add it to your placeholder by right clicking the placeholder and choose Change Picture, From File and locate the file to use.

Labels: , , ,

Add to Technorati Favorites