Articles | Photoshop blog | Photography blog | about me | e-mail

Helen Bradley - MS Office Tips, Tricks and Tutorials

I'm a lifestyle journalist and I've been writing about office productivity software for a long time. Here you'll find handy hints, tips, tricks, techniques and tutorials on using software as diverse as Excel, Word, PowerPoint, Outlook, Access and Publisher from Microsoft and other applications that I love. My publishing credits include PC Magazine, Windows XP mag, CNet, PC User mag, SmallbusinessComputing.com, Winplanet and Sydney Morning Herald.

Saturday, December 26, 2009

Outlook 2007 Display Saturday and Sunday

If your weekends are as full of activities as your weekdays are, you may want Saturday and Sunday to display in the Outlook 2007calendar all the time.

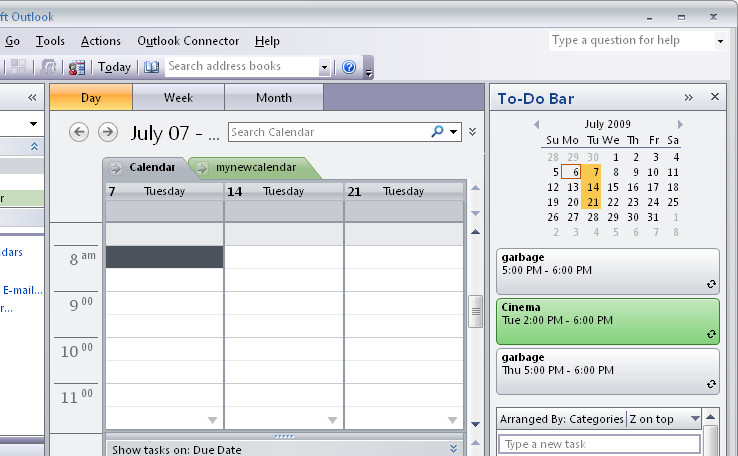
To permanently display Saturday and Sunday, choose Tools > Options > Preferences tab and click the Calendar Options button.

From the dialog select the checkboxes for both Saturday and Sunday and click Ok.
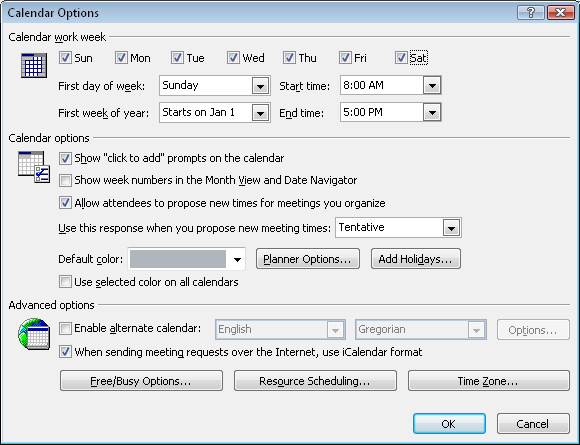
This dialog is also useful for setting a non traditional work week. If you, like my friend Frank, work from Sunday to Thursday, you can set up your work week by selecting checkboxes for those days you actually work and disabling them for other days that are your "weekend" days.

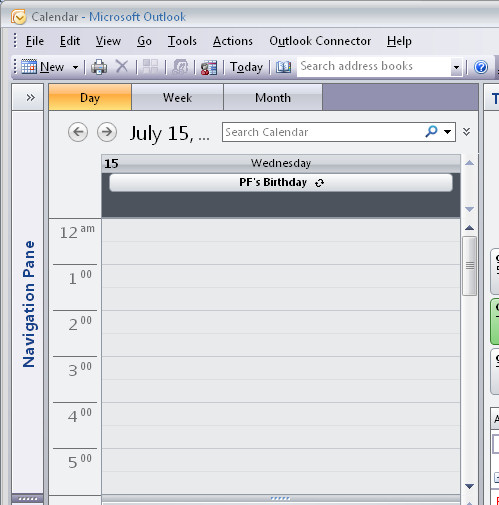
Only these days of the week will now appear in your Outlook 2007 calendar display when you have Show Word Week selected.

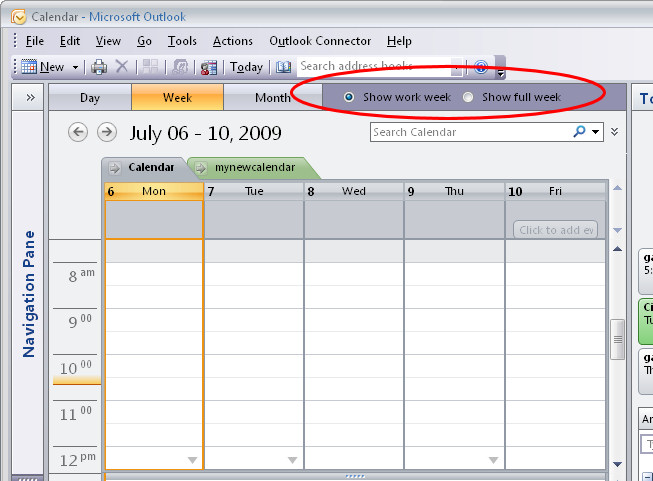
To toggle between viewing the Work week and the full week click the appropriate buttons on the Calendar toolbar.

If you have come to Outlook 2007 from an earlier version of Outlook, you should know that the old Compress Weekend Days option for showing Saturday and Sunday compressed into a single column is now no longer an option in Outlook 2007.

If you need to print calendars so that weekend days share a column, download and install the Calendar Printing Assistant for Outlook 2007 from here:
http://office.microsoft.com/en-us/outlook/HA101687211033.aspx

Labels: , , ,

Add to Technorati Favorites

Thursday, December 17, 2009

Outlook - Edit Received E-mail

Occasionally you might have a need to edit a message that you have received in Outlook 2007.

The message will be already in your Inbox so, to do this, open the message.

Now click the Message tab on the Ribbon and, from the Actions group, select Other Actions > Edit Message.

You can now edit the message and, to send it back to the sender, click Reply and to send it on to someone else, click Forward, type the recipient's address and click Send.

Labels: , , ,

Add to Technorati Favorites

PowerPoint: Create handouts in Word

So, you've finished designing your presentation in PowerPoint and it's time to you’re your final preparations.

One thing you will need is handouts for your participants. It is easy to use Microsoft Word to create custom handouts for your PowerPoint presentation.

First complete the presentation so the slides are all is complete select the Office button and choose Publish > Create Handouts in Microsoft Office Word.

When the Send to Microsoft Office Word dialog appears, select the layout for the slides and text. There are various combinations of slides, notes and blank lines that you can choose from.

Select either the Paste or the Paste Link button depending on whether you want to embed the slides in the Microsoft Word document or simply link to them.

When you are done, click Ok and wait as Microsoft Word opens and the slides, notes and blank lines are created automatically for you in a new Word document.

Once the handouts are complete, you can format the document as you wish and add a cover page, headers and footers as desired and then print your slide handouts for distribution at presentation time.

Labels: , , , , ,

Add to Technorati Favorites

Tuesday, December 15, 2009

Vista

Oh, I love Vista (Not!)

Ok, here's my dilemma. I'm an administrator and I uninstall a program. It tells me during the uninstall that it has left bits and pieces behind in my Application Data folder. Ok, so I'd like to get rid of these. Problem is I can't see the folder and when I opt to see hidden system folders, I can't open it.

Yikes? Well not totally a problem. You see your

C:\Users\\Application Data

folder really isn't a folder - it's a shortcut - that's why its icon has the bent arrow on it. It is really a shortcut to a real folder - called:

C:\Users\\AppData\Roaming

and that folder is totally accessible just by clicking on it.

So, you can clean up after programs if you know where to look!

Labels: , , ,

Add to Technorati Favorites

Saturday, December 12, 2009

Outlook 2007 Calendar display your way

You already know you can look at your Outlook calendar by viewing one day, one week or a month at a time.

Did you know you can also view the calendar in other ways? So, for example, if you need to see your plans for the next three Tuesdays you can do this.

Make sure the To-Do Bar is visible and switch to Day view so you are seeing only one day. Click on the first day to view in the Calendar in the To-Do bar and then Control + Click on each other day to view and it will open up in the same display.

Labels: , , ,

Add to Technorati Favorites

Thursday, December 10, 2009

Outlook 2007 Remembers important Birthdays

If you’re one of those people who occasionally forgets important birthdays or anniversaries, then get Outlook to help you remember them.

To do this, add the person whose birthday or anniversary you need to remember as an Outlook contact in your Contacts list.

Click the Contact tab, from the Show group, click Details to display the details area of their contact data and type their birthday or anniversary in the place provided.

When you do this, these dates are automatically added to your calendar as events so you won't forget them.

If you need to set a reminder for the event, locate the day it happens on and double click the event and choose Open Series. On the Recurring Event tab set the Reminder to whatever suits you - if you need to organize presents and restaurant bookings then set the reminder to a few days before the event.

Labels: , , , ,

Add to Technorati Favorites

Thursday, December 3, 2009

Get Smart with SmartArt

Oh yum! You just have to love the new SmartArt tool in Office 2007. It is part of Excel, Word and PowerPoint it will probably be most used in PowerPoint because this is where you will most need to display large scale diagrams.

SmartArt objects are great to use to illustrate processes, lists and the flow of information or product. In fact most business graphics can be created as SmartArt objects improving their look and readability.

In PowerPoint 2007, SmartArt objects can be created two ways either by converting a list or text selection into a SmartArt object or by creating the SmartArt object from scratch.

If you have an existing list or text you want to display as a SmartArt object, select the text and, from the Paragraph group on the Home tab in PowerPoint 20007, select the Convert to SmartArt Graphic button.

Select a graphic object to use for the text – you can preview what the graphic will look like by holding the mouse pointer over the graphic and see how the text will display in it on the slide underneath.

If none of the SmartArt designs listed are what you want, click the More SmartArt Graphics button to see more options. Right now, just look for a basic layout for your SmartArt graphic as the actual look of the graphic can be adjusted later on.

Edit the text
When you convert text into a SmartArt graphic you can edit the text by clicking on the SmartArt graphic, and select the double pointing arrows on the right hand border of the object to open the text dialog. Here you can type different text if desired or add additional entries each of which will become another element in the SmartArt design.

Once you have the text in place use the SmartArt Tools > Design tab on the ribbon to format the shape. The SmartArt Styles collection gives you a range of styles that you can choose from to apply to the graphic. If you find a style that you like but the color is not correct, apply the style and then click the Change Colors button and choose a different color scheme for the shape.

Create SmartArt from scratch
It is also possible to create a SmartArt graphic from scratch using the Insert tab. Click the SmartArt button and then choose a SmartArt design to use and you can then enter your text and format it to suit your needs. This is the same option you have in Excel and Word.

You can change the look of the text inside a SmartArt object by selecting the SmartArt object and, for example, change the text format to one of the WordArt styles in the WordArt styles list.

Having chosen a WordArt style you can then change the color of the style using the Text Fill options. Notice too that when you resize a SmartArt object the text inside the object automatically resizes to fit it.

Graphics in SmartArt
You will see that many SmartArt objects include containers into which you can insert graphics. To do this, click on the graphic icon in the SmartArt element and a dialog will open allowing you to select a graphic to use for that element.

Labels: , , , ,

Add to Technorati Favorites

Tuesday, December 1, 2009

Word 2007 - Add a Date Picker control

Word 2007 has a cool Date Picker control you can use to insert a date into a document.

To insert one into your document first display the Developer tab by selecting the Office button, click Word Options and from the Popular category choose the Show Developer tab in the Ribbon option.

Now click the Developer tab and, in the Controls area you'll find entries for the Building Block Gallery and for elements such as a Date Picker and a Text Box which you can use in your documents.

Select Design Mode, click the Date Picker control to add it and then click Design Mode again to exit that mode.

The user will see a Click here to enter a date option and, when they click the content control, a dropdown date picker will appear allowing them to select a date to insert into the document.

To ensure the date is formatted in a particular way, with Design Mode enabled click the Date Picker and choose Properties from the Ribbon. From the Properties dialog select a date format to use from the list.

You can use content controls like these to create memo and fax cover sheets complete with prompts to your user as to the details required.

Labels: , , , ,

Add to Technorati Favorites