Articles | Photoshop blog | Photography blog | about me | e-mail

Helen Bradley - MS Office Tips, Tricks and Tutorials

I'm a lifestyle journalist and I've been writing about office productivity software for a long time. Here you'll find handy hints, tips, tricks, techniques and tutorials on using software as diverse as Excel, Word, PowerPoint, Outlook, Access and Publisher from Microsoft and other applications that I love. My publishing credits include PC Magazine, Windows XP mag, CNet, PC User mag, SmallbusinessComputing.com, Winplanet and Sydney Morning Herald.

Thursday, December 17, 2009

PowerPoint: Create handouts in Word
So, you've finished designing your presentation in PowerPoint and it's time to you’re your final preparations.

One thing you will need is handouts for your participants. It is easy to use Microsoft Word to create custom handouts for your PowerPoint presentation.

First complete the presentation so the slides are all is complete select the Office button and choose Publish > Create Handouts in Microsoft Office Word.

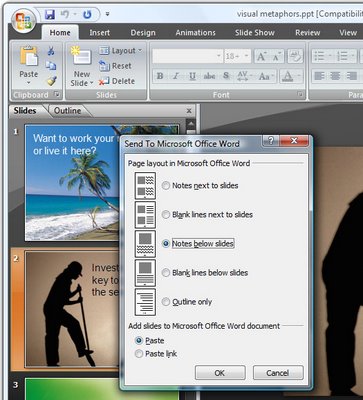
When the Send to Microsoft Office Word dialog appears, select the layout for the slides and text. There are various combinations of slides, notes and blank lines that you can choose from.

Select either the Paste or the Paste Link button depending on whether you want to embed the slides in the Microsoft Word document or simply link to them.

When you are done, click Ok and wait as Microsoft Word opens and the slides, notes and blank lines are created automatically for you in a new Word document.

Once the handouts are complete, you can format the document as you wish and add a cover page, headers and footers as desired and then print your slide handouts for distribution at presentation time.

Labels: , , , , ,

Add to Technorati Favorites

Wednesday, April 8, 2009

Accessing the Clipboard contents in Word 2007


In previous incantations of Word it was fairly easy to see, and therefore to know, that the Office clipboard contains more than just the most recently copied or cut item. In Word 2007 this is not the case and you need to know where the clipboard is and to understand that it contains much more of your document history than you might think it does.

How it works is that it retains everything you copy and cut to the clipboard during the current session. As you copy or cut something, all the other items are moved further down the stack leaving the current item at the top. This is the item that is pasted in if you choose the Paste option. However, you can paste anything that is on the clipboard, provided you can find it.

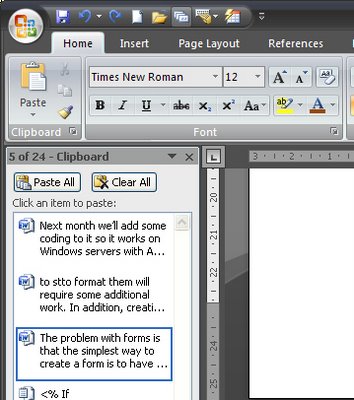
In Word 2007 click the Home tab and, below the Paste button you will see a small entry for the Clipboard and a flyout indicator. Click it and the clipboard will appear and all the items in it will be listed. The clipboard stores up to 24 items and as each additional one is added the one at the bottom is lost. You can paste any of the items that display in the list into your document by just clicking on it.

So, next time you know you cut or copied something a while ago and you need it back, check the Clipboard, chances are it's there waiting.

Labels: , ,

Add to Technorati Favorites