Articles | Photoshop blog | Photography blog | about me | e-mail

Helen Bradley - MS Office Tips, Tricks and Tutorials

I'm a lifestyle journalist and I've been writing about office productivity software for a long time. Here you'll find handy hints, tips, tricks, techniques and tutorials on using software as diverse as Excel, Word, PowerPoint, Outlook, Access and Publisher from Microsoft and other applications that I love. My publishing credits include PC Magazine, Windows XP mag, CNet, PC User mag, SmallbusinessComputing.com, Winplanet and Sydney Morning Herald.

Wednesday, January 30, 2008

Outlook: Managing Blocked Senders


I'm sure you've had that "that was a dumb thing to do" feeling before. You do something that you thought was smart but ends up being very silly indeed.

I got that recently when I added someone to my Outlook Blocked senders list. Yikes! they were so not supposed to go there!

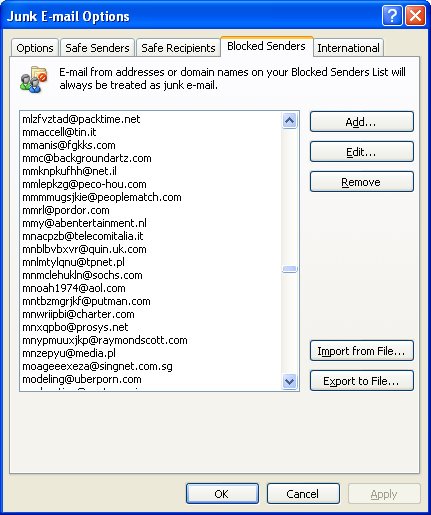
Luckily it's fairly easy to undo the damage. In Outlook choose Tools > Options > Preferences tab and under the E-mail options click Junk E-mail. Click the Blocked Senders tab and locate the email address that shouldn't be there and click Remove. Simple!

Now, if you need to go in reverse and add someone, here's how (believe me, I'm astonishingly good at this step): In Outlook choose Tools > Options > Preferences tab and under the E-mail options click Junk E-mail. Click the Blocked Senders tab. This time click Add, type the email address or an entire domain name (but be sure you really want to do this!) and click Ok.

If you have an email from the person in your inbox there is an even easier solution. Right click the email, choose Junk E-mail > Add Sender to Blocked Senders List.

There you have it.. get someone onto the Blocked senders list and get them off again. Better still, it works in Outlook 2002, Outlook 2003 and Outlook 2007.

Labels: , , ,

Add to Technorati Favorites

Friday, January 25, 2008

Excel 2007 makes Lovely Lists


Lists were a big addition to Excel 2003 as they allowed you to work with list data in Excel more easily than ever before. One key plus was that they let you create charts that expanded automatically as the data in the list grew. This was something you simply couldn't do before very easily.

Now in Excel 2007 lists are called tables and they are simple to create using the Format As Table option on the Home tab on the Ribbon. One gotcha is that you shouldn't use a table format if you don't want to create a list, instead use the much more cumbersome and much less pretty Cell Styles options.

When you create a list you automatically get Filter buttons for the list. If you don't like or want them, disable them by clicking to disable the Filter button on the Data tab - just make sure your cell pointer is somewhere in the list when you do this. Like in Excel 2003, if you create a chart based on your table, it expands when you add new data to it.

Labels: , , ,

Add to Technorati Favorites

Wednesday, January 16, 2008

Multiple Paragraphs of text in an Excel cell

Multiple paragraphs of text in an Excel cell sound good, they look good but how the heck do you create them? If you press the Enter key you enter the current text into the cell and move away from it - obviously, pressing the Enter key isn't the answer.

The solution is to press Alt + Enter to create a new line of text in the current cell. Do this as often as you need to. You might have to make the row taller to fit the text if Excel doesn't make the adjustment for you.

Labels: , ,

Add to Technorati Favorites

Monday, January 14, 2008

Setting tabs in Word

If you only ever use the toolbars in Word you are missing out on a lot of functionality. One thing you can't do using the toolbar that you can do with menus is to set a dot leader tab.

Choose Format > Tabs and not only can you select the type of tab and its exact position on the ruler but you can select from one of four leader styles. These leader characters appear before the tab stop, so they extend from the last character on the line to the tab position and they are the tool to use when creating lines for users to handwrite text into, for example.

Labels: , , ,

Add to Technorati Favorites

Friday, January 11, 2008

Freeze your titles

When a worksheet exceeds one screen it can be difficult to work as the title row disappears off the screen. Solve this by freezing the titles in place so they don't move but you can still move around your worksheet - it's the best of both worlds.

To do this, place your cell pointer below and to the right of the row and column containing your column and row titles. Not choose Windows > Freeze Panes to fix these rows. These titles are saved with your worksheet.

If you need to undo them at a later date, choose Window > Unfreeze Panes to undo the effect.

Labels: ,

Add to Technorati Favorites

Thursday, January 10, 2008

Format alternate rows in a worksheet


When you're working with a large worksheet where the data appears in rows across the sheet, you may find it difficult to keep track where you are as your eye moves across a row. You can solve this problem by formatting each alternate row in the worksheet a different colour.

Select the entire worksheet, or just the area containing the data, and choose Format, Conditional Formatting. From the first dialog choose Formula Is and, in the text area to its right, type =mod(row(),2)=1. Click the Format button and set the format to use for each alternate row in your worksheet (a light pastel colour is a good choice). Click Ok twice and each alternate row in your worksheet will be formatted accordingly.

You can apply the same concept to formatting alternate columns if this is the way you view the worksheet. In this case use -=mod(column(),2)=1.

This formula uses the MOD function which calculates the remainder when the current row number is divided by 2 and then tests to see if it is equal to 1. If it is, then the row is formatted, if not, it isn't. For the first row, the remainder when the row number (1) is divided by 2 is 1 and that is equal to 1 so the answer is true and the format is applied to the first row. The same result happens for each odd numbered row (any odd number divided by 2 gives a remainder of 1). For even numbered rows, there is no remainder so 0=1 is a false statement and the format is not applied.

Labels: , ,

Add to Technorati Favorites