Articles | Photoshop blog | Photography blog | about me | e-mail

Helen Bradley - MS Office Tips, Tricks and Tutorials

I'm a lifestyle journalist and I've been writing about office productivity software for a long time. Here you'll find handy hints, tips, tricks, techniques and tutorials on using software as diverse as Excel, Word, PowerPoint, Outlook, Access and Publisher from Microsoft and other applications that I love. My publishing credits include PC Magazine, Windows XP mag, CNet, PC User mag, SmallbusinessComputing.com, Winplanet and Sydney Morning Herald.

Monday, June 29, 2009

Flash files in PowerPoint 2007 Presentations

It's easy to add Flash movies to your PowerPoint presentations and to configure them to play. Here's how:


Step 1
Start by loading the Developer tab which provides access to the objects that you need to do this. Click the Office button, choose PowerPoint Options > Popular group and enable the 'Show Developer tab in the Ribbon' checkbox.

Step 2
Switch to the slide that will be used to play the Flash video. Select the Developer tab on the Ribbon, click the More Controls button and locate and select the Shockwave Flash Object entry in the list. Click Ok and drag a shape onto your slide.

Step 3
Right click the shape and choose Properties. Set the Playing property to True, the Embed Movie property to True and set the Movie property to the full filename and path of the Shockwave movie file. Click Ok. You must run the presentation to preview the movie file.

Labels: , ,

Add to Technorati Favorites

Friday, June 26, 2009

Wrap text over an image in Publisher


Wrapping text around and over an image works differently in Microsoft Publisher to the way it works in Microsoft Word, and confusingly so. It is not possible to wrap text around an image in Publisher in such a way as to have your text actually overlap the image. You can do it in Word but not in Publisher - Go figure!

In Microsoft Word you can use the edit wrap points feature on an image to wrap text over an image so the text appears over the image. If you try to make Publisher work like Word and try to wrap text using the Edit Wrap Points feature, portions of the image will be cropped away when you move the wrap points inside the image. Frankly the process is stupid and it really shouldn't work this way, particularly in a DTP program.

There is, however, a workaround for this limitation in Microsoft Publisher. So, if you need to wrap text across an image, insert your image into your publication and insert a freeform shape over the top of it. This shape should be the shape that you want the text to wrap along.

Then configure the shape's wrapping option so that the text wraps tightly around it. Configure the image so that text doesn't wrap it at all – so use an option like None. Then position the image so it appears under the text, set the fill for the text box to No Fill so you can see through it to the image underneath. Set the Fill and Line Color for the freeform shape to No Fill and No Line.

Note that text wrapping can be controlled this way in print publications but it does not work with web publications because of the limitations of HTML code.

Labels: , , ,

Add to Technorati Favorites

Thursday, June 25, 2009

Automatic thank you for following software for Twitter


I got an automatic thank you from someone I followed on Twitter the other day and it felt neat and personal. I thought it would be a good idea to do this for my new followers too.

So, I headed over to http://twitterdmer.com and did the deed. You simply sign up with your twitter ID and password and select one of the custom thank yous or create your own.

I made my own with a link to my blog since most folks who follow me are interested in Photoshop and Photography so I want them to be able to easily find my blog too.

Click Enable and you're done. It takes around 30 seconds and it's personal and very cool!

Labels: , , , , ,

Add to Technorati Favorites

Wednesday, June 24, 2009

Publisher: Keep lines neat


If you look at just about any magazine you'll see that the lines of text line up along the bottom of the page. Even if there are images in some columns and not in others, everything lines up very neatly along the bottom of the page.

Publisher 2003 included a new feature which has been carried forward into Publisher 2007 and which lets you create baseline guides so you too can get professional looking results with your text.

In Publisher, these baselines let you position text so that the baseline of the text in one column of text lines up with the baseline of the text in the columns adjacent to it.

To configure the baseline guides for a series of columns, choose Arrange > Layout Guides > Baseline Guides and set the spacing and offset for your baseline. While you can create both horizontal and vertical baselines, horizontal baselines are those you're most likely to use.

To get the best results, the Spacing setting which controls the spacing between lines of text aligned to the guides should be the same or larger than the line spacing between your lines of text. So, for example, if you are using 12 point text set the baseline to 14 points or more (typically line spacing is set to 2 points more than font point size).

Then, when you have created your text, select it and choose Format > Paragraph > Indents and Spacing tab and, under the Line Spacing options, select the Align text to baseline guides checkbox. This will re-align the selected text so that it lines up with the baseline guides throughout your paragraph.

Labels: , , ,

Add to Technorati Favorites

Sunday, June 21, 2009

Twitter: Managing following and followers in bulk


There are limits on Twitter as to how many people you can follow before you’re stopped from following any more. The limit is reached when you are following 2,000 people if you don’t have enough followers of your own. When you reach this number you won’t be able to follow any new people.

This is a limit that you might encounter if you're involved heavily in social marketing using Twitter. To cull your accounts so that people who you are following and who do not also follow you can be removed check out http://huitter.com/mutuality/.

At Huitter.com you can type your Twitter user name and password and select from one of the options to unfollow all who do not follow you back, to unfollow everyone (if you’re having a bad day - but be careful, tomorrow you might be disappointed you did this), and to follow everyone who follows you. This later option is handy if you suddenly decide that instead of being picky about who you follow you now want to follow everyone who is following you.

Using the exclude list you can list specific people by user name from the task so you still follow some people, for example, even if they don't follow you.

When you click Go the program goes ahead and performs the task for you. This way you can make bulk changes to your Twitter account in a very short time and painlessly. This is something which you cannot do otherwise on Twitter short of doing it all manually.

For people interested in social marketing, http://huitter.com/mutuality/ is a great tool because it lets you determine instantly who is not following you so that you can weed them out of your list freeing you up to find more Twitter followers in future.

Labels: , , ,

Add to Technorati Favorites

Friday, June 19, 2009

Cool excel printing options

Excel offers some cool options for printing worksheets. Here are six of my favorite techniques:

1 Printing grid lines (or not)


To print grid lines on your final printout, choose File, Page Setup, Sheet tab and enable the Gridlines checkbox. This prints horizontal and vertical lines much like you see on the screen in editing view.

2 Printing row and column headings


To print the letters A, B, C etc above the columns on your worksheet and the row numbers choose File, Page Setup, Sheet tab and enable the Row and column headings checkbox. This works particularly well when combined with printing Gridlines but can be used without gridlines too.

3 Setting your own page margins


You can configure the margins around the page by choosing File, Page Setup, Margins tab. Set the margin values and use the Horizontal and/or Vertical checkboxes to centre a small worksheet on a larger page.

4 Drag a margin into place


You can also control margins from the Print Preview screen. Click Margins to turn the margin indicators on. You can now move these into new positions by simply dragging on them.

5 Select an area to print


When a print area is set, this will print by default regardless of how big the worksheet is. Drag over the area to use and choose File, Print Area, Set Print Area to configure it. To clear the print area, so you can print the entire worksheet, choose File, Print Area, Clear Print Area.

6 Print a chart


When you click a chart on a worksheet to select it and choose File, Page Setup, the page setup dialog shows no longer contains the Sheet tab and, instead, contains a Chart tab. This shows options for sizing and printing charts. When you click Print, only the chart will print.

Labels: , , , , ,

Add to Technorati Favorites

Thursday, June 18, 2009

Word 2007 - smart date entry


Word 2007 has some totally cool new tools for entering data in your documents. Trouble is they are hidden so most folks don't know they are there.

To start, display the Developer tab by clicking the Office button > Word Options > Popular > Show Developer tab in the Ribbon.

Now click the Developer tab and, in the Controls area you'll find entries for a range of tools including the Date Picker. To insert the date picker into your document click Design Mode and then click the Date Picker button. Click Design Mode again to exit that mode.

Now your user will see a Click here to enter a date option and, when they click the content control, a dropdown date picker will appear allowing them to select a date to insert into the document.

To ensure the date is formatted in a particular way return to the Developer tab, click Design Mode and click the Date Picker in the document. Click the Properties button on the Ribbon and from the Properties dialog select a date format to use. Make sure to deselect Design Mode before you return to your document.

Labels: , , ,

Add to Technorati Favorites

Monday, June 15, 2009

Word 2007 working with boilerplate text


One typical use for Microsoft Word is in offices where documents and letters are created by assembling a series of standard paragraphs from a range of alternatives. In the past Microsoft Word included the AutoText and AutoCorrect features and, like many users, you may have adapted AutoCorrect to use in creating boilerplate documents. Some other users tweaked the AutoText tool so they could use it to insert content, such as graphics and text.

The AutoText tool no longer appears in Word 2007 and it has been replaced by a Quick Parts Gallery which makes saving, organizing and assembling documents from stored paragraphs, aka Building Blocks, much easier to achieve.

Boilerplate text with Quick Parts
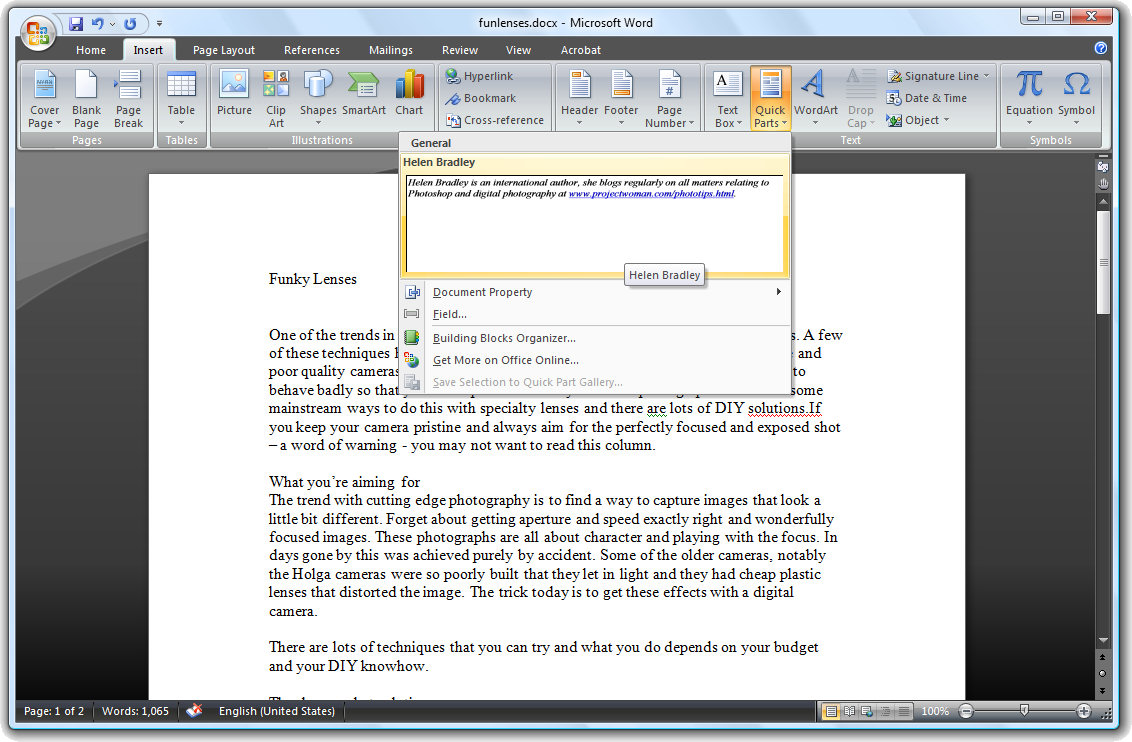
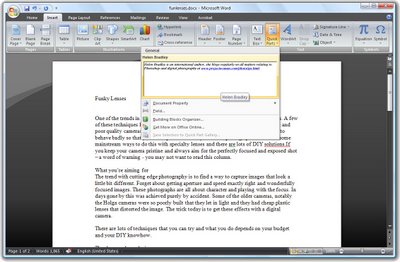
Find the Quick Parts tool on the Insert tab and click the down pointing arrow to open the Quick Parts Gallery. Here you have a number of options including Document Property which lets you insert some of the common document properties into your document by clicking on the one to insert. The Field option lets you insert fields much as you could in earlier versions of Microsoft Word.

The Building Blocks Organizer is the newest feature and this is a repository of text blocks which you can add to your Word documents. These Building Blocks can be sorted by Name, Gallery or Category. Some of the Building Blocks come built-in to Microsoft Word and others are legacy AutoText entries from earlier installations of Microsoft Word. You can insert a Building Block into a document by selecting the entry in the list and click Insert.

Create you own entries
To add your own paragraphs to the gallery, type the paragraph or open a document which contains it and select it. Click the Quick Parts button and choose Save Selection to Quick Part Gallery and, when the Create New Building Block dialog appears, type a name for the Building Block. This will be the name you'll use to identify it in the list so make it self-explanatory of what the Quick Part contains. Select the Gallery to add it to, in most cases this will be the Quick Parts Gallery.

Select a Category from the list or click the Create New Category option to create your own subcategory of the Quick Parts Gallery. By creating sub categories you can organize your Quick Part entries so that they are easier to find. Type a description of the Quick Part, if one is needed to identify it, and, from the Save In list, choose buildingblocks.dotx which is the default setting. From the options dropdown list you can select to Insert Content Only, or insert the content in its own paragraph or its own page depending on how the content should be used. Click Ok when you are done.

In future you can insert the Quick Part into a document by clicking the Quick Part button and then select it from the dropdown list. If it does not appear in the list, click the Building Blocks Organizer and select the Building Block by name. You can locate building blocks in the organizer by sorting on the Gallery column and locate the Quick Part area which is where your building blocks will appear. Click the one to insert and click Insert.

Labels: , , ,

Add to Technorati Favorites

Friday, June 12, 2009

Formatting pictures in Word 2007


The picture formatting tools in Word 2007 are far more sophisticated than those in earlier versions of Word.

To see them at work, insert a picture into your document, click the image and choose Picture Tools > Format on the Ribbon. The Picture Styles are formats you can apply to your image and they include some attractive looking options including wide and narrow black or white borders and rotated options.

Once you have selected a picture style to use you can adjust other characteristics of the format such as the Effects which it are applied to it. So, for example, you can create a reflection by selecting the picture and choose the Picture Effects > Reflection to add a reflected edge.

You can recolor the picture border using the Picture Border option.

If you have formatted a picture to look the way you want it to look and you change your mind about the image to use, don't panic. Choose Picture Tools > Format > Change Picture and choose an alternate image leaving your formatting unchanged.

Labels: , ,

Add to Technorati Favorites

Tuesday, June 9, 2009

Multi colored Excel charts


It isn't always the case that you want to chart multiple series of data on a single chart. Sometimes you only have a single series and Excel, by default, plots all the bars or columns so they are colored identically. Boring!

Luckily, in Excel 2007 a solution is at hand. Simply select and right click the series and choose Format Data Series > Fill > Vary Colors by Point. Excel colors each bar a different color. Best of all, the colors are linked to themes so you can change the colors by changing the Theme - the theme tools are on the Page Layout tab.

So, no more boring single color charts - ever - please!

Labels: , , ,

Add to Technorati Favorites