Articles | Photoshop blog | Photography blog | about me | e-mail

Helen Bradley - MS Office Tips, Tricks and Tutorials

I'm a lifestyle journalist and I've been writing about office productivity software for a long time. Here you'll find handy hints, tips, tricks, techniques and tutorials on using software as diverse as Excel, Word, PowerPoint, Outlook, Access and Publisher from Microsoft and other applications that I love. My publishing credits include PC Magazine, Windows XP mag, CNet, PC User mag, SmallbusinessComputing.com, Winplanet and Sydney Morning Herald.

Friday, May 30, 2008

Conditional formatting with Date ranges

One of the other handy features of the new conditional formatting tool in Excel 2007 is that it can handle date formatting. For example, if you have a worksheet with a series of dates in it you can highlight the dates that correspond to a period of time.

Choose Conditional Formatting > Highlight Cells Rules and choose the A Date Occurring option. You can then format cells using rules such as Yesterday, Today, in the last seven days, this month, next month, next week, etc.. When you do this cells containing dates which match this criteria will be coloured appropriately. Better still, when the date changes, the formatting on the worksheet will change accordingly.

Labels: , ,

Add to Technorati Favorites

Wednesday, May 21, 2008

Play Flash movies in PowerPoint 2007

It is possible to play Flash videos from inside your PowerPoint presentations at run time. This gives you additional tools that you can use to add visual effects to your slide shows. To do this you must first display the Developer tab in PowerPoint by choosing the Office button > PowerPoint Options > Popular group and enable the Show Developer tab in the Ribbon checkbox. The Developer tab provides access to the objects that you need to use to insert and play the Flash videos.

To configure a slide to play a Flash video, select the slide so it is visible in the editing area. Click the Developer tab on the ribbon and locate and click the More Controls button. From the list, select the Shockwave Flash object entry and click Ok. Drag a shape onto your slide – this will be the box in which the Flash presentation will play. Right click the shape and choose Properties. You now need to configure certain properties regarding the Flash object. For example, set the Playing property to true and the Embed Movie property to true. To configure the Flash movie that will play in the slide, set the Movie property to the full file name and path of the Shockwave movie (swf) file that you want to play and click Ok. To see the Flash movie play you will need to preview the presentation.

Labels: , ,

Add to Technorati Favorites

Friday, May 9, 2008

Don't tell them I told you how


.
I am not a big fan of all singing all dancing PowerPoint presentations. However, one of the questions I get a lot is how to make a sound track play across multiple slides in PowerPoint.

So, if you're assaulted with bad music next time you attend a PowerPoint driven presentation, don't blame me, I'm just the messenger.

Here's how to do it. First add the sound clip to the slide by choosing Insert > Sound and choose your clip. Select whether the sound should play automatically or only when the icon is clicked. So far so good.

Your sound clip is now in place but it stops when you move to the next slide - not good.

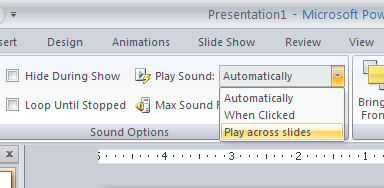
To fix this, click the sound icon and in PowerPoint 2007 click the Sound > Options tab on the ribbon. Now locate the Play Sound entry and change it from Automatically to Play across slides.

This is far from being an intuitive alternative in my mind - since when did Automatically become an alternative to Play Across Slides? Frankly I want both, not either/or. Don't stress over it though because you actually get both options.

< Note to self > - it's Microsoft's world, we just live in it.

Labels: ,

Add to Technorati Favorites

Sunday, May 4, 2008

Excel - reuse chart formats


You've gone to all the trouble to format a chart nicely and you'd like to reuse the format again some time in the future. Instead of recreating the format each time, save it so you can apply it with a single click.

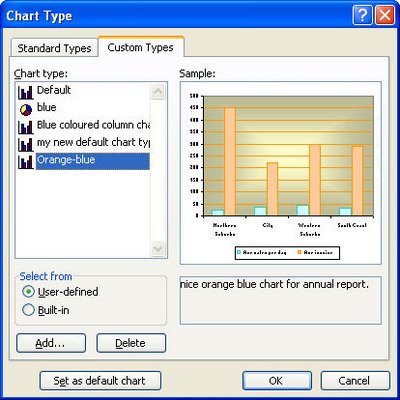
In Excel 2003, right click your chart and choose Chart Type > Custom Types tab and click the User-Defined button. When you do this an Add button appears - click it and type a name and description for your chart when prompted to do so. Click Ok twice when you are done.

Now, in future, when you create a chart you can select this format from the Chart Wizard options or apply it to an existing chart by selecting the chart, right click and choose Chart Type > Custom Types and click User-defined. Select your format and click OK to apply it to the chart.

One word of warning, for some reason, Excel includes chart titles as a format so you'll lose your existing chart title if you have one when you apply the new format to it. It's not a big deal but it helps to know that it's going to happen.

Labels: , , ,

Add to Technorati Favorites