Articles | Photoshop blog | Photography blog | about me | e-mail

Helen Bradley - MS Office Tips, Tricks and Tutorials

I'm a lifestyle journalist and I've been writing about office productivity software for a long time. Here you'll find handy hints, tips, tricks, techniques and tutorials on using software as diverse as Excel, Word, PowerPoint, Outlook, Access and Publisher from Microsoft and other applications that I love. My publishing credits include PC Magazine, Windows XP mag, CNet, PC User mag, SmallbusinessComputing.com, Winplanet and Sydney Morning Herald.

Monday, April 30, 2007

PowerPoint - to fit or not - it's your choice


PowerPoint has a handy tool (or a very annoying one - depending on your perspective) for adjusting text on a slide.


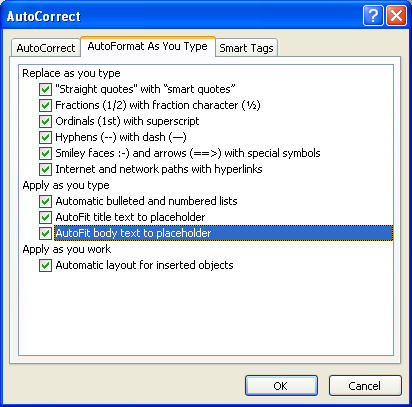
In PowerPoint 2003 and earlier choose Tools > AutoCorrect Options > Autoformat as you Type and you will see that there is an option called Autofit body text to placeholder. Enabled this and all the text that you type on a slide is automatically sized to fit the slide - you can type gobs of text and it just keeps getting made smaller and smaller as PowerPoint shoehorns it in so it fits.


If you disable this option, you get to control the slide's text size yourself - a rough rule of thumb is that if it goes over the edge - it's too much text for one slide so make another one or edit your text.


Autofit is a tool you can disable or enable as you like - once you know it's there - it’s your choice what you do with it.

Labels: , ,

Add to Technorati Favorites

Friday, April 27, 2007

Vale PowerPoint features

Hmm - there is good and bad in everything I presume but I'm particularly bummed by the fact that a couple of the tools that I have grown to love in PowerPoint over the years have been removed from the new PowerPoint 2007. Well, perhaps love is too strong a word, but I liked them a lot and they're gone.

Gone is the AutoContent Wizard but you can find much of its functionality in templates. There's no broadcast feature and no macro recorder (but you can still use macros), and no title master - but there's a new title layout which really makes better sense. All this I could live without, what I'll miss is the Speaker Notes tool which let you record notes while making a presentation which you could save later on. Gone too is the summary slide tool which really is a big omission - summaries were a great way to create an agenda so folks knew what they'd be learning... poor choice of tools to go in my book.

Labels: ,

Add to Technorati Favorites

Thursday, April 26, 2007

PowerPoint Master shortcut


If you’re like me and you use the PowerPoint master view a lot—and you really should because it allows you to control the formatting of all the slides in your presentation from one place—you will know that there’s no quick way to open into master view.

That is unless you read this tip.


To quickly access the slide master view hold Shift and click the Slide View button in the bottom left corner of the PowerPoint screen. This automatically opens master view allowing you to work on the slide master then close it and return to your PowerPoint presentation. Simple, when you know how?

Labels: ,

Add to Technorati Favorites

Wednesday, April 25, 2007

The Ultimate Password


At a guess I have around 50 passwords to remember for sites as diverse as online banking to my NAPP membership. Some stay the same, others I'm forced to periodically change. It's clearly impossible for anyone, to remember all of these - I'm certainly not able to and the price of forgetting is that I can't do the things I do every day.

The practical reality of course is that you (me) either use the same password for everything (bad idea) or you (me) write them down (pretty bad idea). I suffered agonies of guilt over how I handled them until I met Locknote. This tool is a saviour - it's small, it's smart and it works. It is a single executable file that you put wherever you like - it doesn't install, it just is so you can take it with you on a keychain USB drive, for example. You launch it and open it with a password - the only password you ever need to remember! Inside is a plain text document into which you type your password information - or, indeed, anything you want to record and keep secret. When you're done, click the Close (X) button and answer Yes to closing and saving your data. That's it! the data is encrypted into the executable file - its a true "all in one" solution.

In this age of programs trying to do more and more (and in the process, annoying many long time users by providing unwanted features - for this read McAffee Virus scan, for example) this program is smart. It only does one thing and it does it perfectly.

Interested? you should be! find it here: http://locknote.steganos.com/

Oh! And did I say it was free? - Yep, it is... you have no excuse for not using it.

Labels: , ,

Add to Technorati Favorites

Tuesday, April 24, 2007

Excel’s personal.xls


There’s a special file in Excel called personal.xls which is opened automatically every time Excel opens. This makes it a great place to put your Excel macros as they're then accessible to any open workbook.

Unfortunately, a personal.xls workbook is not created until you actually do it yourself so you may not have one. The simplest way to create one is to record a simple macro because then Excel does it for you.

To do this, open Excel and choose Tools > Macro > Record New Macro and type a macro name. From the Store Macro In dropdown list choose Personal macro workbook and click Ok. Record a step or two—it doesn’t have to be an actual macro but it just has to be something and click the Stop Recording button or choose Tool > Macro > Stop Recording. Once you do this your personal.xls macro workbook will be created - ridiculously simple in fact.

If you're prompted to save the file when you close Excel answer Yes to do so. Excel will save it in a location that ensures it will be opened automatically every time you open Excel. In future, store all macros that you want to be accessible to all workbooks in this file and you won't ever have to load them specially.

Labels: ,

Add to Technorati Favorites

Monday, April 23, 2007

Make "My Places" your place...


Until I discovered how to add folders in the list down the left of the Word and other Office program's Save As and File Open dialogs I spent hours navigating to get to the right folder to save a file. Some days it felt like it would be simply easier to dump everthing in the one folder and worry about finding it later on. Ok, I know - bad idea - but it was tempting.

Now I fill my My Places list with all the folders I need long term and short term so saving files in the right folders is simplicity itself. All I do is click the folder in the list on the left and I'm there - just where I want to be.

To do this yourself, from inside Excel or Word, for example, choose File, Save As and notice the My Places bar down the left of the Save As dialog. Navigate to the folder that you want to add to your My Places toolbar and select the folder. Click the Tools menu option in the top right of the dialog and choose Add to My Places. The folder will be automatically added to the bottom of your My Places bar. You can now click it to open the folder anytime you need it and it stays there from one Office session to the next.

Once you no longer need it, you can remove the folder from the list by right clicking it and choose Remove. You can also rename the folder and reorder items in the list by right clicking and choose Delete or Move Up/Move Down as required. You can also switch to small icons if there are too many folders in your My Places bar to see them clearly. The same folders turn up when you choose to open or save a file. Organization is just a click away.

Labels: , , ,

Add to Technorati Favorites

Friday, April 20, 2007

Talking in Excel


Sometimes it’s hard to get your point across in a text message because the nuances of your voice do not display.

When you've got something to say and you need it to be understood by someone viewing your worksheet, why not add a voice message rather than a text comment? It's easy to do.

Choose Insert, Object and click the Create New tab. Click the Wave Sound option and the Window Sound object dialog opens. Click the Record button to record your message and when you are done click the Stop button.

A small sound object icon (it looks like a speaker) appears in your worksheet at the place that you were when you recorded the message - just click and drag it to where you want it to appear. It is saved with the file and can be played by double clicking on it.


Now you’ve got a better chance of people understanding exactly what it is that you’re trying to say to them when they hear you say it - well that's the theory anyway!

Labels: ,

Add to Technorati Favorites

Thursday, April 19, 2007

It's an oldie but a goodie - Adjustable font sizes in Word

This tip has been circulating around the traps for many years but there are still many users who don't know it exists.

It’s a simple technique for increasing the size of the font in a document. To do this select the text and press Ctrl + ] to increase the font or Ctrl + [ to decrease the font size by one point.

To scroll through the range of font sizes available in the font dialog use Ctrl + Shift + > and Ctrl + Shift + <.

If you want a font size that is not in the font dialog, type it in the font size box by clicking on the curretn font size and type the font size that you want, for example 140 and press Enter. This is a quick way of getting a very large font particularly when the options in the font dialog cease at 72 points - the rough equivalent of one inch high characters.

Labels: , ,

Add to Technorati Favorites

Wednesday, April 18, 2007

Configuring Word 2007 options


One hazard of upgrading to a new piece of software such as Microsoft Word 2007 is learning the interface over again. The new Microsoft Word looks so different to the old versions that you can spend hours in the first week or two looking for things that were in one place but have moved or appear to have totally disappeared.

For example, In Microsoft Word one of those features is the Options dialog which used to be obtainable through Tools, Options in Microsoft Word 2003 and earlier. This dialog gives you access to most of the configurable options in Microsoft Word.

To find it in the new Word 2007 click the Office button in the top left corner of the Word 2007 window. From the bottom of this dialog choose Word Options and you will now find many of the configurable preferences that were available in earlier versions of Word now accessible in Word 2007 and some new ones. For example, switch between Silver, Blue and Black color schemes, set your user name and initials, the languages to use, configurations for AutoCorrect etc..

In fact this dialog is a veritable cornucopia of Word configuration tools.

Labels: , ,

Add to Technorati Favorites

Tuesday, April 17, 2007

Decimal alignment in Word


While you may not realize it, we all use the number of characters in a number to determine just how big or small it is. For example 1000000 written like this is harder to determine the magnitude of than 1,000,000. So when you want your users to be able to understand the numbers that you are working with not only is it handy to use commas to separate the digits but aligning the numbers using their decimal points allows a quick check of how big a number is by how far it extends towards the left hand side of the page.

When you are working in a table of figures Word provides a simple way of aligning numbers. Select the column in your table and from the Ruler bar (View, Ruler) click on the tab indicator in the top left corner by the ruler, until you see the Decimal tab option appear. When the Decimal tab indicator shows, click on the ruler where you want the decimal tab to appear in the column of numbers.

Now when you type a number into that column it will be automatically aligned on the decimal tab and there’s no need to insert an actual tab character. Of course if you do want to include a tab character remember that you must hit Ctrl + Tab in a table because the Tab key simply moves you from one cell to the next and doesn’t actually add a tab character.

Labels: , ,

Add to Technorati Favorites

Monday, April 16, 2007

Fixing Subject lines in Outlook

It's just plain annoying when someone types a stupid subject to an email message or worse still who doesn’t include one at all!

When you think about it, finding emails in an inbox is difficult enough without having to work around silly subject lines - at least in Outlook 2003 and earlier versions.

Luckily there is a solution when someone messes with your neatly organized inbox, and it's a fix you can apply yourself. Simply open the Outlook email message and type over the current subject line - it looks like you can't do this but it works just fine.

Then, when you close the message, you’ll be asked if you want to save the changes so select Yes and you’re done - sensible subject lines for all your messages.

Labels: ,

Add to Technorati Favorites

Friday, April 13, 2007

Bring back my Word thesaurus tool, please!


I hate it when Microsoft replaces things I like with tools I don’t like. Of course, one man’s (or should that be woman’s) meat is another’s poison so some folks out there probably like the new thesaurus pane in Word, I dislike it a lot. It just seems to be a lot of effort for precious little result – it practically never provides anything even remotely useful for me.

So, if you’re like me and you like the old Thesaurus in Word more than the task pane version you can still use it. Add it to a toolbar by right clicking a toolbar and choose Customize, Commands tab and, from the Categories list choose Tools. In the Commands list are two Thesaurus entries, you need the first of these. Drag and drop it onto a toolbar and click Close.

To test it, select a word and click the new button and your old Thesaurus dialog will appear. Much nicer in my book.

I guess I should be thankful Microsoft hasn’t made it impossible to customize toolbars - oops - I spoke too soon, in Word 2007 it did just that!


Labels: , ,

Add to Technorati Favorites

Thursday, April 12, 2007

Fixing formulas in Excel


Sometimes you need to convert formulas into fixed figures - not often I admit, but often enough that there is an Excel tool for doing this.
To convert any formula into a fixed value, select the cell or cells to fix and choose Edit > Copy and then immediately choose Edit > Paste Special > Values. Instantly your formulas are converted to fixed figures.

Labels: , ,

Add to Technorati Favorites

Wednesday, April 11, 2007

Outlook - Sharing Contacts


If you’re like me you like to spread the good news around and introduce one contact to another. It just makes for better business.

However it’s a nuisance to have to retype all a person’s contact details just to send them on to someone else. Well it is unless you know this trick:

To forward a contact’s details in Outlook open Outlook in the Contact area and right-click the Contact’s name in the list. Click the Forward button and an email will open automatically with the contact’s details appended as an Outlook readable file. Simply complete the details of the email message and forward on the contact information. At the other end all your contact needs to do is to drag and drop the contact’s details from the email message into their contact’s folder.

Labels: ,

Add to Technorati Favorites

Tuesday, April 10, 2007

Smarter replacement in Word

When what you need to do in Word is to find some text and then add extra text to it there’s a smarter way to do this. In Word choose Edit > Replace and in the Find What box type the text that you want to find.

In the Replace With box type the text to add to the text that you’re searching for, but don’t retype the existing text. Instead, use ^& to refer to the text that you’re searching for. So, for example, to replace Los Angeles with Los Angeles, California search for Los Angeles and replace with ^&, California. It’s faster and smarter.

Labels: ,

Add to Technorati Favorites

Monday, April 9, 2007

No good news - Outlook


Even with the new Outlook 2007 you can still not read newsgroups inside Outlook so you’re stuck with Outlook Express.

To configure Outlook Express as your default news handler open Outlook Express and choose Tools > Options > General tab and enable the Make Default button to make Outlook Express your default email handler.

You can now create a news account by choosing Tools > Accounts > News tab, click Add and then News. Enter the News further details that your ISP will provide you with and click Finish and then Close.

You can now determine which newsletters you want to subscribe to and how they will be handled in future.

Labels: , ,

Add to Technorati Favorites

Friday, April 6, 2007

Smart horizontal lines in Word


My history is as a WordPerfect 5.1 user if any of you can remember that far back!

WordPerfect had a great tool for creating horizontal lines and when I came to Word it took me ages to realize that Word didn’t have a tool anywhere near as useful. However Word can create horizontal lines if you know how to do it. Press the Enter key and then type three hyphens in a row and press Enter again – Voila! (well at least we hope so) - a horizontal line. If it doesn’t work for you choose Tools > AutoCorrect Options > AutoFormat As You Type tab and enable the Border Lines checkbox. Then try again. There are other line styles that you can use for example three asterisks creates a blocky line, three underscores a thick line, three equal signs a double line, three pounds [#] signs, an attractive thin thick thin line combination, and three tildes a squiggly line.

While Word’s lines aren’t as intuitive as those in WordPerfect 5.1 perhaps by giving us six different styles it’s set to win back some friends.

Labels: ,

Add to Technorati Favorites

Thursday, April 5, 2007


Don’t you hate it when you know there’s something wrong but you can’t exactly put your finger on what is happening?

Try this, filter a list in Excel and write an =sum function at the foot of the list to sum the visible data. So far so good? Well, try checking that sum manually – do you still feel confident? Worse still, if you’re using Excel, try to filter the numbers in the column containing the Sum formula and watch as Excel chews up your formula – yikes!

You see, =SUM just doesn’t work on filtered lists. Instead, you have to use SUBTOTAL. Of course, there’s a simpler way. Use the AutoSum button on the Excel toolbar to create your formula and it does the sensible thing and writes a SUBTOTAL function for you. Now, when you filter the data it sums only visible values and it never gets swallowed up.


Labels: , ,

Add to Technorati Favorites

Wednesday, April 4, 2007


Hands up anyone who has ever spent hours trying to juggle a Word table to be evenly spaced. I confess to have dragged on one too many table borders in my time and all in the name of consistency.

In fact, consistency is much more easily obtained. So, I suggest you start by filling your table cells with whatever you need to put in them. Ignore that one looks deeper than the others. I like to finish all my table cell entries with two Enter keys - that prebuilds in a nice buffer of space.

Then, when you're done, go to the bottom of the bottomost cell and drag it down so the bottom cell is lots deeper than the others. Select the table - best way is to click inside it and choose Table, Select, Table. Now choose Table, AutoFit, Distribute Rows Evenly - instantly all your rows are evenly sized. If you haven't made them quite big enough, repeat the process - it's simple because Word does all the fiddly stuff for you.


Labels: , , ,

Add to Technorati Favorites

Tuesday, April 3, 2007

Vertical text in Word


Ever been confused about how to create vertical text in Word. You deserve to be. There is this neat looking Text Direction tool that never seems to be active so you can use it. Fact is - it works on text in a table, but what if you don't have text in a table?

Luckily it works just great on text in a text box. So, to make a vertical block of text, drag a text box (Insert, Text box) onto your page. Now click inside it and type your text. Click in the box and choose Format, Text Direction and choose one of the two vertical options - Voila! instant vertical text.


Labels: , ,

Add to Technorati Favorites

Monday, April 2, 2007

Checkboxes in Word


Stuck and need a checkbox in a Word document? Simple!

Click where the checkbox is to go and choose Insert, Symbol, Symbols tab. From the Font list choose the Wingdings font. You'll see at character positions 113 & 114 are two checkboxes. Click the one you want and choose Insert and then Close. If you'd use it a lot, create an AutoText or AutoCorrect entry for it so it's only a word away.


Labels: , ,

Add to Technorati Favorites

Sunday, April 1, 2007

Snap an Excel range


Did you know you can take a photo of an Excel range? Well you can and it's one cool way to get around the problem of needing to print bits of two worksheets on the one piece of paper, something as smart as Excel is, it just can't do.

To do this, right click a toolbar and choose Customize, Commands tab. From the Categories list choose Tools and from the Commands list click and drag the Camera icon up onto a toolbar. Now select a range on a worksheet and click the camera. Then click where the 'photo' should go.

Repeat this to assemble bits of lots of worksheets onto one page for printing. And the best bit? the photos are 'live' if the data in the worksheets changes, the photo does too!

Labels: , ,

Add to Technorati Favorites