Articles | Photoshop blog | Photography blog | about me | e-mail

Helen Bradley - MS Office Tips, Tricks and Tutorials

I'm a lifestyle journalist and I've been writing about office productivity software for a long time. Here you'll find handy hints, tips, tricks, techniques and tutorials on using software as diverse as Excel, Word, PowerPoint, Outlook, Access and Publisher from Microsoft and other applications that I love. My publishing credits include PC Magazine, Windows XP mag, CNet, PC User mag, SmallbusinessComputing.com, Winplanet and Sydney Morning Herald.

Thursday, November 29, 2007

Help!? WTF?


First up today, a pet peeve of mine. Why do folks head up emails with Help! or Information wanted? It's so damn inconventient to have to open an email just to know you can't help. Is it so difficult to say, Chart formatting issue or Contact details for XYZ needed? Obviously it is for some people. Sheesh!

Ok, rant over.

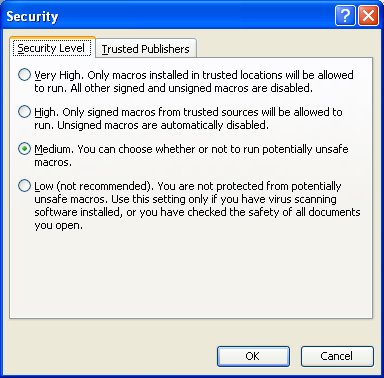
Problem: What do you do if a macro won't run. You've opened a file with a macro in it and you go to run it and nothing happens? Problem is, most likely, that your copy of Word is configured so you can't run macros. It's a security thing but it's no good if you need to run the macro is it?

Solution: Choose Tools > Options > Security, Macro Security and select an option that will let you run macros - go for the most secure option which still lets you do your work. Close and reopen the document and try again. Interestingly enough you might encounter this problem as you're developing your macros. Word lets you create macros by may not let you actually run them.

Labels: ,

Add to Technorati Favorites

Wednesday, November 28, 2007

Do You Undo?


This post is subtitled Undos that Do and Those that Don't

If you're using Excel 2003 or earlier, you have a big problem with the Undo command, you see much of the time, it plain doesn't work.

Curious? Try this: open an Excel file, make some changes to it (minor however, you won't be able to undo these however much you think you can). Check the Undo button - it is enabled. Save the file. Now check the Undo button again. Yikes, it's now disabled. You see, after you save a file in Excel 2003, all the Undo steps are removed - no more Undo. It pays to know this is how it works.

In Excel 2007, things are much better, and the Undo retains the changes even after you have saved the file. Much nicer behavior.

Labels: , ,

Add to Technorati Favorites

Tuesday, November 27, 2007

Preview image in Word

You'll have seen preview images when you open a file in Word. If you choose File > Open and, from the Views option list you choose Preview, you will see either a small image of the full page or some of the text on the page. All this begs the question of what determines what you see?

The full page preview is an option when you save a file in Word. To configure it, choose File > Properties > Summary tab and enable the Save Preview Picture checkbox. Now, when you save the file it will have a preview image saved with it which will show in the preview area.

To ensure the Properties dialog appears everytime you save a file the first time so you can configure the Save Preview Picture option, choose Tools > Options > Save tab and enable the checkbox for Prompt for Document Properties.

Labels: , ,

Add to Technorati Favorites

Monday, November 26, 2007

Remove spaces - Microsoft Word

I'm sure it's happened to you just as it has to me. You copy and paste some text in from the web or an email message and it comes in with leading spaces - on evey line. There are lots of ways to remove the problem starting with hitting the delete key way too many times. Stop already!

There is, however one very smart way to do it without getting a repetitive strain injury. Select the lines of text and press Control + E to center the text. With the text still selected press Control + L to left align it and voila! the spaces are gone.

Labels: , ,

Add to Technorati Favorites

Tuesday, November 20, 2007

Sticky spaces in Word

Picture this, you have a line of type in Word with a phone number in it. But... when ever you type it the first part of the phone number goes on one line and the next part scrolls around to the next line. It just won't 'stick' all together.

What you need is a hard space. This is some thing that looks like a space, prints like a space but sticks things together. To use it, remove the space that is between the two pieces you want to stick together then press Control + Shift + Space Bar and you have your hard space.

Word also has a sticky/hard hyphen. It shows between two words but never splits words across the end of a line. Same thing - Control + Shift + Hyphen.

Labels: , ,

Add to Technorati Favorites

Monday, November 19, 2007

Excel charts - create an overlapping series


Sometimes an Excel chart will look better if your series overlap - this might be the case when you are comparing data from two years and where you want to show how the values have increased from one year to the next.

To make your series overlap in Excel 2007, select one series, right click and choose Format Data Series. Click the Series Options and decrease the Gap Width (it closes the chart up nicely) and incease the Series Overlap. Set the Series Overlap to around 60% and the Gap Width to around 30% for a good result. This is particularly useful when you are using images in place of colors for the bars of your chart but works in almost any situation.

Labels: , , , ,

Add to Technorati Favorites

Friday, November 16, 2007

Paste to a layer mask

Ok, here's the dilemna. You have two images open in Photoshop and you want to add one image as a layer mask into the other.

One solution is to copy the first image, then switch to the second. Click the layer mask and switch to the Channels palette. The layer mask appears as a channel. Select the channel's visibility icon to make it visible, select the channel to make it active, and click Edit, Paste. Deselect its visiblity, reselect the RGB channel to make that one active, switch back to your Layers palette and the pasted selection is in your layer mask. This solution has the advantage that the copied/pasted piece doesn't have to be the same size as the layer mask.

The alternate solution if the two images are the same size, is to use Apply Image. Select the target layer mask, choose Image, Apply Image and, as the Source, select the image to copy from, the layer to copy and click Ok. Now the selected layer (or the merged source) is pasted into the Layer Mask.

Two alternatives, the second is easier to use but it does require two same size images.

Labels: , ,

Add to Technorati Favorites

Wednesday, November 7, 2007

In-cell charting in Excel 2007

For a long time Excel users have wanted a way to plot a bar showing the relative magnitude of a range of numbers without having to resort to a chart or complex formulas to do this.

Now, with Excel 2007 this feature is now built in and dead easy to use. To try it out, first type a series of numbers in a column, then select the series. Click the Home tab and click the Conditional Formatting button.

Select Data Bars and then select the color of the bar to use. The relative length of each colored bar indicates the relative value of the number in that cell.

There is one caution, however. All values - even very small values will be given a minimum bar length of 10% so they can be seen - so, use this feature as a guide and not an accurate measure.

Labels: , ,

Add to Technorati Favorites

Monday, November 5, 2007

Viewing Long Formulas - Excel 2007


If you've ever created a very long formula in Excel 2003 you'll know that it is difficult to see and to edit it - it simply is too big for the formula bar.

In Excel 2007 the problem is resolved, you can make the formula bar as big as you need it to be. Simply drag down on the bottom edge of the formula bar using your mouse, and it becomes as large as you need it to be.

Labels: ,

Add to Technorati Favorites

Friday, November 2, 2007

Any Justification, Any Line

When Microsoft Word first included the Click and Type option it helped a lot of new users who couldn't work out how to type anywhere on the page.

For those of us used to using WordPerfect 5.1 it solved another problem entirely. It lets you include left and right aligned text on the same line. Double click at the left margin of one line and type a word - it aligns to the left. Now, on the same line, double click at the right margin and type a word - it is right aligned - both pieces of text align and work independently of each other. It's something you couldn't do easily without this tool.

Labels: , , ,

Add to Technorati Favorites