Articles | Photoshop blog | Photography blog | about me | e-mail

Helen Bradley - MS Office Tips, Tricks and Tutorials

I'm a lifestyle journalist and I've been writing about office productivity software for a long time. Here you'll find handy hints, tips, tricks, techniques and tutorials on using software as diverse as Excel, Word, PowerPoint, Outlook, Access and Publisher from Microsoft and other applications that I love. My publishing credits include PC Magazine, Windows XP mag, CNet, PC User mag, SmallbusinessComputing.com, Winplanet and Sydney Morning Herald.

Thursday, January 28, 2010

Word 2007 - Formatting with Styles

Microsoft Word 2007 provides styles that you can use to format your documents.

These make it easier for you to change the look of a document very quickly by combining styles with the new Office 2007 themes.

To get started with styles, with a document open on the screen click the Home tab and choose the Change Styles button.

Here you can select a Style Set for your document, for example choose Distinctive or Elegant, Fancy or Formal depending on what you want your document to look like.

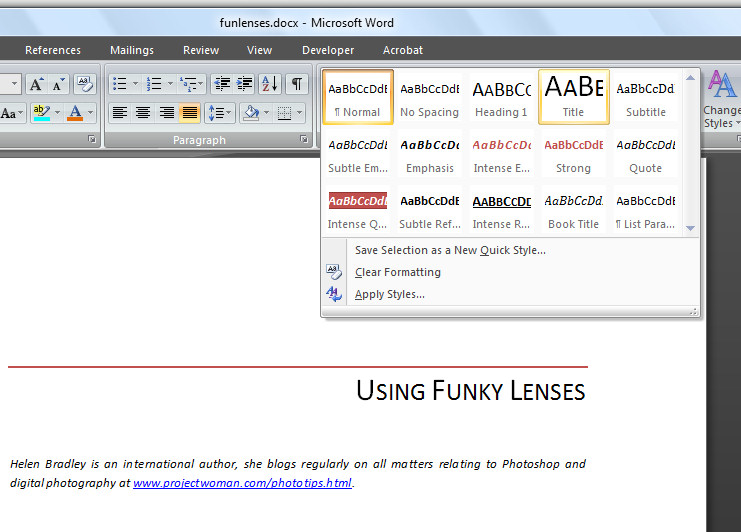
Once you have selected a Style Set, the Styles group on the Home tab will display styles from that set.

To apply a style to text, select the text, for example a title, then in the dropdown Style list and hold your mouse pointer over one of the styles to see how it would look if applied to that text. Select the style that you want to use and click it to apply it.

You can also add your own choice of formats as a selectable style. For example, format a piece of text so it looks the way you want your style to appear and select this text. Open the Style list and choose Save Selection as New Quick Style.

Give the style a name, click Modify to change any of its characteristics and click Ok to save it as a Quick Style. This style now appears in the Style list and you can select it to apply to text in your document at any time.

Labels: , , ,

Add to Technorati Favorites

Thursday, January 21, 2010

Word 2007: Drawing in documents

One technique that has changed with Word 2007 is drawing in documents.

Instead of having a Drawing toolbar you now select shapes from the Shapes dropdown list on the Insert tab.

From this list you can select shapes such as lines and all the AutoShapes that you are used to using in earlier versions.

To create a drawing, for example, you can select and insert the shapes that make up the drawing and then format them using the Drawing Tools > Format options on the Ribbon.

Many of the color options that are available are connected to the theme colors so, provided you use a theme color in your drawn shapes, the colors will change automatically later if a different theme is applied to the document so the drawing stays consistent with the remainder of the document.

Find the shape formatting tools on the Drawing Tools > Format tab on the Ribbon.

What is missing in Word 2007 is the ability to right click a shape and have the format AutoShape dialog appear as it does in Excel and PowerPoint.

The Format tab and the Format Object dialog in Word offer less features than are available in the new graphics engine in the other applications.

Labels: , , , , ,

Add to Technorati Favorites

Monday, January 18, 2010

Restore a file association in Windows Vista


image

Don’t ask me how I did it – it has been one of those weeks! but I somehow associated zip files with Photoshop. So, every time I needed to extract the contents of a zip file Photoshop would open and gag on the file – not unsurprising but very annoying.

A fix was required. The solution is in the Registry but it’s not hard to find or to fix. You do need to have your wits about you and never touch anything you don’t understand. Oh! and back up your registry before you start playing with it.

Choose Start > Run > type REGEDIT and click OK and then, when the warning comes up, click Continue. You have to be an admin to use this tool.

Navigate to find this key:

HKEY_CURRENT_USER\Software\Microsoft\Windows\CurrentVersion\Explorer\FileExts\

and then locate the extension causing issues, in my case zip

Then find the UserChoice option under this, right click and choose Delete. This removes any custom choice and returns your association to what it was when Vista was first installed. Problem solved!

Finally, choose File> Exit to exit the registry editor.

Labels: , , , , ,

Add to Technorati Favorites

Saturday, January 16, 2010

Outlook - create Your own Signature Business Card

Add yourself to your Contacts list in Outlook 2007 so you can create a Business Card to send as an attachment to all your outgoing emails.

Once you have added yourself as a contact, choose Tools > Options > Mail Format > Signatures and chose the signature to attach the card to or create a new one.

Click New if creating a new card, and from the Business Card dropdown list, choose your Contact entry to attach it as a business card to each outgoing message.

Labels: , , ,

Add to Technorati Favorites

Thursday, January 14, 2010

Select a table cell contents in Word 2007

image

Confession time. I had a picture in a table cell in Word and try as I might I couldn’t get the little black angled cursor to appear so I could select the cell’s contents. Frustrating – yep, I’d say so.

image

Nope – wrong arrow, the image is so close to the table cell it’s almost impossible to get the cell select arrow to appear.


imageThis is what it should  look like. 

Then I remembered the new feature in Word 2007 – it’s on the Table Tools >Layout tab (so you have to have a table and click in it to see this option). On the far left is the Select button – new to Word 2007. Click it and you can select what to select. Oh! let’s back up a bit  here - it would be a good idea to click in the cell you want to select before you begin - forgot that bit.

Using this you can select a cell then right click and, as I did, choose Copy to copy its contents. Don't be fooled by the fact that not everything in the cell looks like it is selected - just trust that it is.

There are other options there that include Select Row, Select Column, Select Table – much easier than trying to juggle those little arrows when they just won’t appear.

Labels: , , , , ,

Add to Technorati Favorites

Thursday, January 7, 2010

Outlook 2007 - Empty Deleted Items automatically

If you find you are always emptying your Deleted Items folder in Outlook 2007 before you exit the program, you can have Outlook do this automatically for you.

To do this, choose Tools > Options > Other tab. Enable the 'Empty the Deleted Items folder upon exiting' checkbox and click Ok.

Now you won't have to do this - just choose File > Exit and it will be done automatically.

Labels: , ,

Add to Technorati Favorites