Articles | Photoshop blog | Photography blog | about me | e-mail

Helen Bradley - MS Office Tips, Tricks and Tutorials

I'm a lifestyle journalist and I've been writing about office productivity software for a long time. Here you'll find handy hints, tips, tricks, techniques and tutorials on using software as diverse as Excel, Word, PowerPoint, Outlook, Access and Publisher from Microsoft and other applications that I love. My publishing credits include PC Magazine, Windows XP mag, CNet, PC User mag, SmallbusinessComputing.com, Winplanet and Sydney Morning Herald.

Wednesday, May 6, 2009

What cell is that? Identifying table cells in Word

When you're working with Word and doing math in your tables, you need to know the name of each table cell. In a largish table it can be difficult to keep track of everything.

Back in the days of Word 97 a macro shipped with Word that would tell you the name or cell reference of a given table cell. Here's how to take a step back in time and get that macro, install and use it, with later versions of Word:
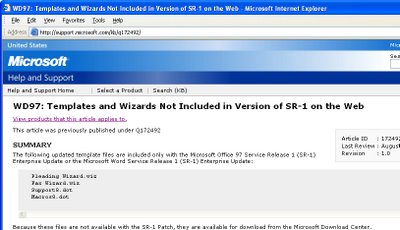

Visit http://support.microsoft.com/kb/q172492/ and download the file Wdtlupd.exe which is referred to on this page. This is a self-extracting zip file which includes various documents, the one we're using is not version specific. Run this file and select a location to save the extracted files into.
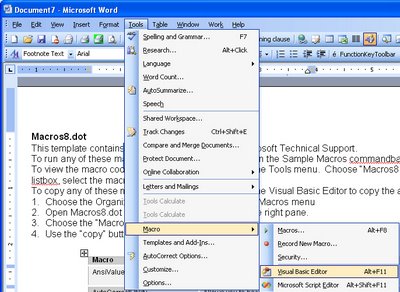

Open the folder containing the extracted files and double click the file macros8.dot to open it in your version of Word. If prompted to do so, click the Enable Macros button and the file will open automatically in Word. Now choose Tools, Macros, Visual Basic Editor if you are using Word 2003 or earlier. In Word 2007, make sure the Developer tab is visible (Office button > Word Options > Popular > Show Developer tab in the Ribbon). Choose Developer tab > Visual Basic.
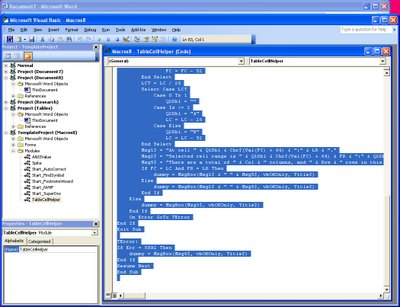

Locate the Macros8.dot file in the Project list on the left of the screen and click to open its Modules collection. Locate the module called TableCellHelper and double click it open the code window. Select the code and copy it by choosing Edit, Copy.
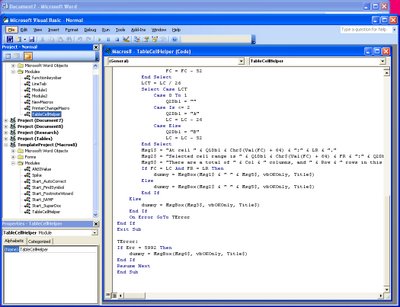

Locate the file Normal in the Project collection and click its Modules collection. Choose Insert, Module to add a new module, double click to open this new module and choose Edit, Paste to paste the copied code into the module. In the Properties area (choose View, Properties Window to display this if needed), alter the module name to TableCellHelper and, when you're done, close the Visual Basic editor and close the file created using Macros8.dot.
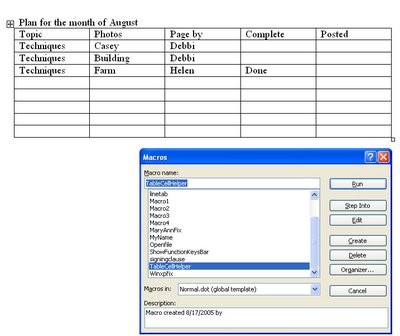

In Word 2003 and earlier, run the macro by clicking somewhere inside a table and choose Tools > Macro > Macros from the Macros in list choose Normal.dot and locate and run the macro called TableCellHelper. In Word 2007 click the Developer tab > Macros and from the Macros in list choose Normal.dotm and locate and run the macro called TableCellHelper. The macro will report the cell address and the total number of rows and columns in the table.
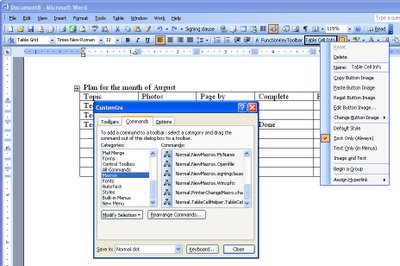

If you'd use this macro repeatedly, add it as a button to your Word 2003 (and earlier), toolbar by right clicking a toolbar and choose Customize. Click the Commands tab, select Macros from the Categories list and locate and drag the macro TableCellHelper on to the toolbar. Right click the new button and edit the name so it is shorter and more helpful. Close the Customize dialog.

Labels: , , , , , , ,

Add to Technorati Favorites

Sunday, March 4, 2007

Autonumbering documents in Word

Word does not contain any option for automatically numbering a series of documents with a consecutive number. The solution is to create a macro to do the work for you. Start with a template that has a macro that runs when ever the template is used for a new document. The macro should read a number stored in a file on your drive, add it to your document and then, to prepare the number for the next time it's required, the number should be incremented by one and be written back into the file.

To create the solution, create a new document (or open an existing one to use as a template) and click where you want the sequential number to appear, and choose Insert, Bookmark, type docNum in the Bookmark name area and click Add.

Save this file as a template by choosing File, Save As, from the Files as type list choose Document Template (*.dot), give the file a name and click Save. With the file still open, choose Tools, Macro, Macros and type the name of the macro docNum and, from the Macros In list choose the template file name for the file you just saved and choose Create.

Type this macro as shown, the sub and end sub lines should be there already:

Sub docNum()
Dim MyString, docNumber
FileToOpen = "c:\windows\docNumfile.txt"
Open FileToOpen For Input As #1
Input #1, docNumber
Close #1 ' Close file
ActiveDocument.Bookmarks("docNum").Select
Selection.InsertAfter Text:=docNumber
docNumber = docNumber + 1
Open FileToOpen For Output As #1
Write #1, docNumber
Close #1 ' Close file.
End Sub

Now choose File, Close and Return to Microsoft Word. With the template on the screen, choose File, Close and answer Yes when prompted to save your changes.

Now open Notepad and type a number 4 or 5 numbers less than the number of the first quote you want to use. So, if you want to start numbering at 200, type 195 so you have a few numbers to use to test the process. Choose File, Save As and save the file as a text file, calling it docNumfile.txt and save it to this folder: C:\windows. Close Notepad

To test the process, choose File, New, choose the template file and click OK. Now run the macro by choosing Tools, Macro, Macros, docnumb, Run. If you have everything right the document number will be inserted in the document.

When this is working fine, alter the macro so this process of inserting the document number happens automatically whenever you create a new document based on this template. To do this, choose Tools, Macro, Macros, click on docnumb and click Edit. Change this macro's procedure name by altering this line of code:

Sub docnumb()

to read

Sub AutoNew()

Choose File, Close and Return to Microsoft Word. With the template on the screen, choose File, Close. Say No to saving your changes to this file but answer Yes to save the changes to your template file.

Now test again by creating a new file using File, New, choose your template and click OK. The document number should be added automatically to the new document.

If, in the process of testing you find you go past your starting document number, open Notepad and open the file docnumfile.txt, type a new starting number and save it again.

Labels: , ,

Add to Technorati Favorites

Sunday, February 18, 2007

Autonumber a series of Word documents

Word does not contain any option for automatically numbering a series of documents with a consecutive number - the type of thing you might want to do if you are using Word to create invoices or numbered purchase orders. The solution is to create a macro to do the work for you.

Start with a template that has a macro that runs when ever the template is used for a new document. The macro should read a number stored in a file on your drive, add it to your document and then, to prepare the number for the next time it's required, the number should be incremented by one and be written back into the file.

To create the solution, create a new document (or open an existing one to use as a template) and click where you want the sequential number to appear, and choose Insert, Bookmark, type docNum in the Bookmark name area and click Add.

Save this file as a template by choosing File, Save As, from the Files as type list choose Document Template (*.dot), give the file a name and click Save. With the file still open, choose Tools, Macro, Macros and type the name of the macro docNum and, from the Macros In list choose the template file name for the file you just saved and choose Create.

Type this macro as shown, the sub and end sub lines should be there already:

Sub docNum()
Dim MyString, docNumber
FileToOpen = "c:\windows\docNumfile.txt"
Open FileToOpen For Input As #1
Input #1, docNumber
Close #1 ' Close file
ActiveDocument.Bookmarks("docNum").Select
Selection.InsertAfter Text:=docNumber
docNumber = docNumber + 1
Open FileToOpen For Output As #1
Write #1, docNumber
Close #1 ' Close file.
End Sub

Now choose File, Close and Return to Microsoft Word. With the template on the screen, choose File, Close and answer Yes when prompted to save your changes.

Now open Notepad and type a number 4 or 5 numbers less than the number of the first quote you want to use. So, if you want to start numbering at 200, type 195 so you have a few numbers to use to test the process. Choose File, Save As and save the file as a text file, calling it docNumfile.txt and save it to this folder: C:\windows. Close Notepad

To test the process, choose File, New, choose the template file and click OK. Now run the macro by choosing Tools, Macro, Macros, docnumb, Run. If you have everything right the document number will be inserted in the document.

When this is working fine, alter the macro so this process of inserting the document number happens automatically whenever you create a new document based on this template. To do this, choose Tools, Macro, Macros, click on docnumb and click Edit. Change this macro's procedure name by altering this line of code:

Sub docnumb()

to read

Sub AutoNew()

Choose File, Close and Return to Microsoft Word. With the template on the screen, choose File, Close. Say No to saving your changes to this file but answer Yes to save the changes to your template file.

Now test again by creating a new file using File, New, choose your template and click OK. The document number should be added automatically to the new document.

If, in the process of testing you find you go past your starting document number, open Notepad and open the file docnumfile.txt, type a new starting number and save it again.

Labels: , , , , ,

Add to Technorati Favorites

Monday, February 5, 2007

Using special characters in Word documents

I write for UK magazines so I often have to use pounds symbols and my mum's and brother's surnames have an 'e' with an accute accent - unfortunately neither is on my keyboard. So, to make things easier to write, I use a macro to convert a word to a typed character.

Here's a sample you can use and adapt. It converts the words cents, pounds, degrees and division to their character equivalents and you can use it to replace almost any word or character with another single character, word or phrase of your choosing:

Sub ConvertText()
FindAndReplace "cents", "¢"
FindAndReplace "pounds", "£"
FindAndReplace "degrees", "º"
FindAndReplace "division", "÷"
End Sub

Sub FindAndReplace(FindThisWord, ReplaceWithWord)
Set EditRange = ActiveDocument.Content
EditRange.Find.ClearFormatting
EditRange.Find.Execute FindText:=FindThisWord, ReplaceWith:=ReplaceWithWord, MatchCase:=0, Replace:=wdReplaceAll
End Sub

Labels: , , ,

Add to Technorati Favorites