Articles | Photoshop blog | Photography blog | about me | e-mail

Helen Bradley - MS Office Tips, Tricks and Tutorials

I'm a lifestyle journalist and I've been writing about office productivity software for a long time. Here you'll find handy hints, tips, tricks, techniques and tutorials on using software as diverse as Excel, Word, PowerPoint, Outlook, Access and Publisher from Microsoft and other applications that I love. My publishing credits include PC Magazine, Windows XP mag, CNet, PC User mag, SmallbusinessComputing.com, Winplanet and Sydney Morning Herald.

Friday, November 21, 2008

Smarter Photoshop Crop


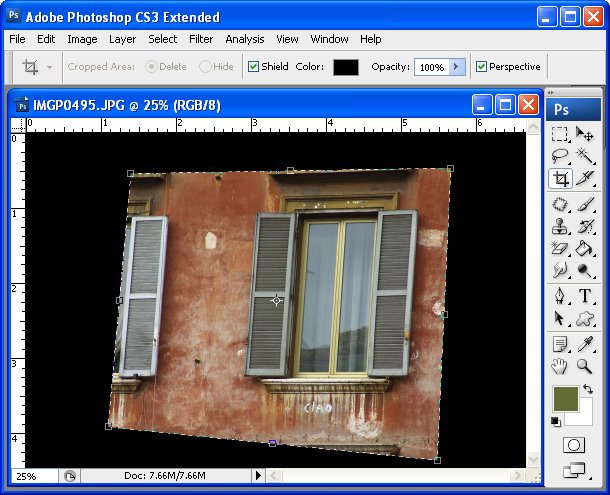
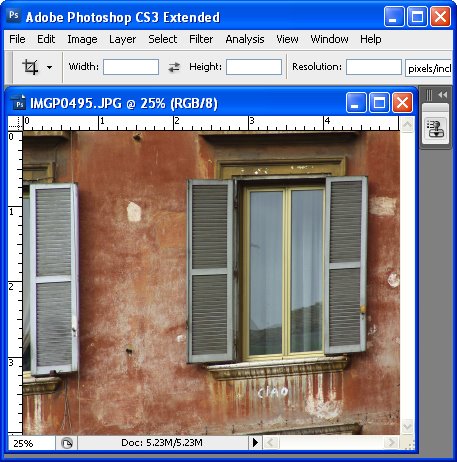
Before (above), After (below)


There is more to Photoshop's crop tool than meets the eye! Read on to learn everything you didn't know about using it:

Shield color and opacity
When you click the crop tool and drag the crop marquee over an image in Photoshop you will see a shield around the area of the image that will be removed when you commit the change. You can change this shield color from the Tool Options bar to make it any color you want. For example, click in the color selector and make it white, gray, black. You can also Adjust the opacity of this shield to make it, for example, 100% so it totally masks out the unwanted area of the image. This lets you see more clearly the portion of the image you have selected.

Rotate your crop
Rotate the crop marquee by dragging on one of its handles to change the angle of the rectangle and make an angled crop from your image. This way you can make a diagonal crop without having to first rotate the image.

Perspective crop
This option is way too cool! Click the Perspective checkbox on the tool options bar and you can crop an image in perspective. So, drag the corner handles into any four sided shape you like - each corner operates independently of the others when this option is enabled. Then click the Commit button and the unwanted part of the image will be discarded and what remains will be reshaped and deliciously distorted to a rectangle.

You can use this feature to fix keystone perspective problems with images such as tall buildings (which tend to be wider at the base and narrower at the top) or you can use it for creative purposes.

So, next time you select the Crop tool, check out these features and put them to work on your images.

Labels: , ,

Add to Technorati Favorites

Tuesday, February 27, 2007

Making fixed sized selections in Photoshop

When you need a series of same sized images, you can create an image using a fixed size selection in Photoshop. To do this, choose the Rectangular Marquee tool and selecting the Fixed Size option from the Style dropdown list. Set the width and height in pixels and then click on the image. A marquee of this size appears and you can drag it with your mouse to position it in the correct place and then crop the image. If you simply want to select with the same overall aspect ratio but resize the image later on, select the Fixed Aspect Ratio option and set the ratio of height to width for the selection.

If your selection is not a regular one, for example if you want to cut a piece from a series of images in the shape of Australian, make the selection and save it to a channel in the document by choosing Select, Save Selection. With the document still open, open the images to crop the shape from and load the selection using Select, Load Selection and select the image in which you saved the selection from the dropdown list. Now you can move the selection into position and crop the shape from the image.

Labels: , ,

Add to Technorati Favorites

Friday, February 16, 2007

Shameless Self Promotion

Ok, so it's not exactly a tip of the day, but I already did today's so I feel it's justified.

I have lots of cool Photoshop tutorials around my site, check these out:

Photoshop Brushes tutorial
Learn how to create your own Photoshop Brushes

How to use Adjustment Layers
Make photoediting a simple and undoable process using Adjustment layers

Photoshop Gradients
Fix images and create colorful effects using Photoshop Gradients

Straighten an image in Photoshop, Elements and Paintshop Pro
Straighten your images with this simple to follow tutorial that covers the popular photoediting programs

Photoshop Shapes -New!
Helen Bradley explains how to use Photoshop Shapes to edit your photos and create fun shape overlays.

Create and use Photoshop Masks
Masks aren't as hard as you think they are and this tutorial makes them simple to use.

Create seamless patterns in Photoshop
Whether you need them for the web or for a background for an Excel worksheet, here's how to create great seamless patterns and we've included a mini tutorial on TV scan lines.

Color match photos in Photoshop
Even if your photos were taken in totally different lighting

Color Swatches in Photoshop
Create your own custom color swatches and use them in your photo editing work.

Ok, so that's done, now back to the tips..

Labels: , , , , , , , , , , , ,

Add to Technorati Favorites

Wednesday, February 14, 2007

5 Hot ways to make grayscale images in Photoshop

There are lots of differnt ways to convert a photo into a grayscale image and each of them offers different benefits such as speed or the ability to customise the results.

Here are five great ways (and one cool extra tip) for making a grayscale image in Photoshop:

(Hot tip) Before you convert an image to black and white, adjust it to ensure there is a good tonal range in the image. Choose Image, Adjustments, Levels and make sure the markers are under the ends of the chart. Adjust the midtones slider (the middle one), until you have a good result. An image with good contrast and a pleasing tonal range will give better results in the steps that follow.

Grayscale - Version 1
The simplest method of converting to Grayscale is to choose Image, Mode, Grayscale. When you do this, you create a grayscale image and color cannot be added back into it unless you convert it back to a color mode. To do this, choose Image, Mode, RGB Color if you plan to do more work with the image. Convert to CMYK color mode only if you intend to send the image for commercial printing.

Grayscale - Version 2
A RGB color image is made up of three color channels Red, Green and Blue. These channels are grayscale images displaying the relative amount of that color in the image at any point. To see the channels, display the Channels palette and click on the channel to view, hiding the others. If you like the grayscale representation of a particular channel display it, hide the rest, and choose Image, Mode, Grayscale and you'll be asked if you want to discard the remainder of the channels – this turns the current channel into the grayscale image. Answer Yes to do so. To work on the image again in color, choose Image, Mode, RGB Color.

Grayscale - Version 3
Another method of converting an image into grayscale image but which retains the RGB color mode is to choose Image, Adjustments, Hue/Saturation. If you select the Master channel and then drag the Saturation slider to the far left, you'll remove the color from the image by desaturating it. However, because it is still RGB Color you can add color back without needing to alter the mode.

Grayscale - Version 4
The Channel mixer gives you the opportunity to tweak the final grayscale representation by using more or less of the colors from the image. Choose Image, Adjustments, Channel Mixer and click the Monochrome checkbox. Now adjust the Red, Green and Blue sliders until you get a result you like. Ideally, you should ensure that your percentages add up to 100% although this isn't a hard and fast rule.

Grayscale - Version 5
One situation you may encounter is where you want to convert a single layer into grayscale but leave the other layers in the image in color. In this case, choose the layer to convert to black and white and choose Layer, New Adjustment Layer, Hue/Saturation and enable the Use previous layer to create clipping mask checkbox and click Ok. Move the Saturation slider to the far left and click Ok.

So, there you have it - more ways to convert an image to black and white than you ever thought possible?

Labels: , , , , ,

Add to Technorati Favorites