|
|
|
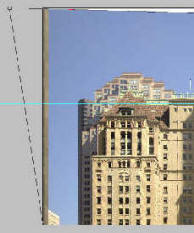
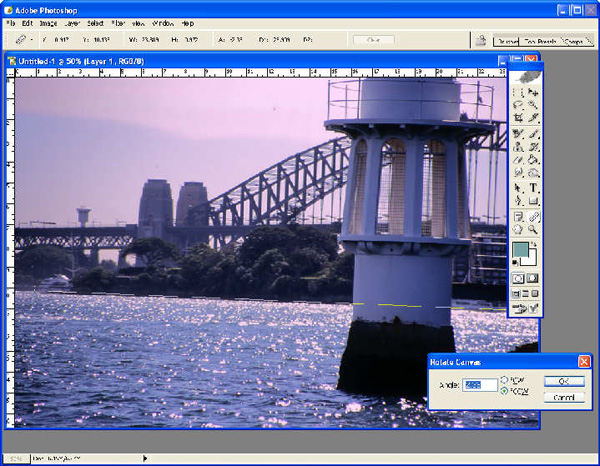
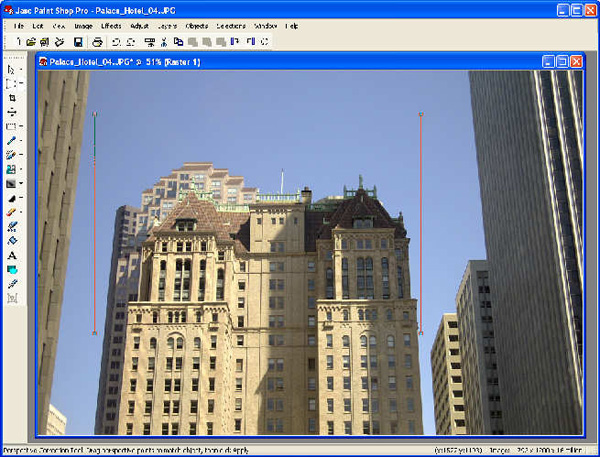
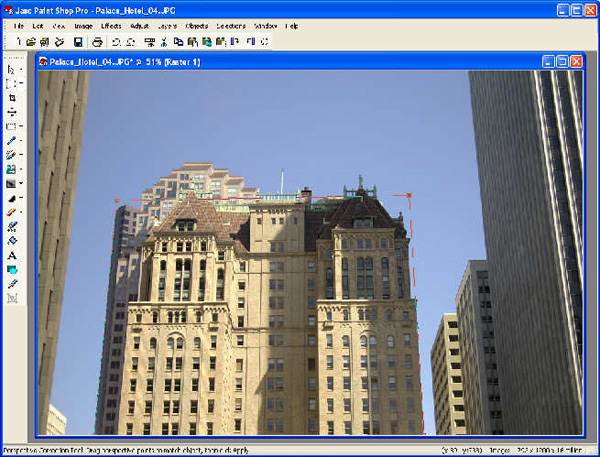
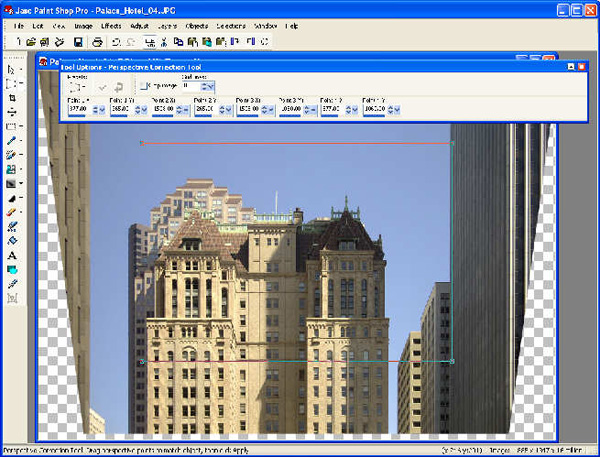
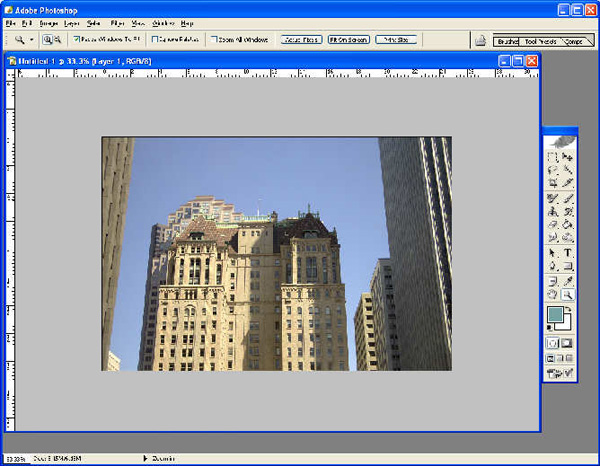
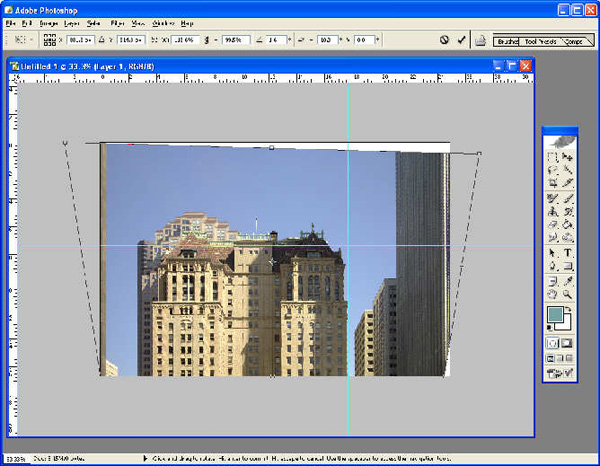
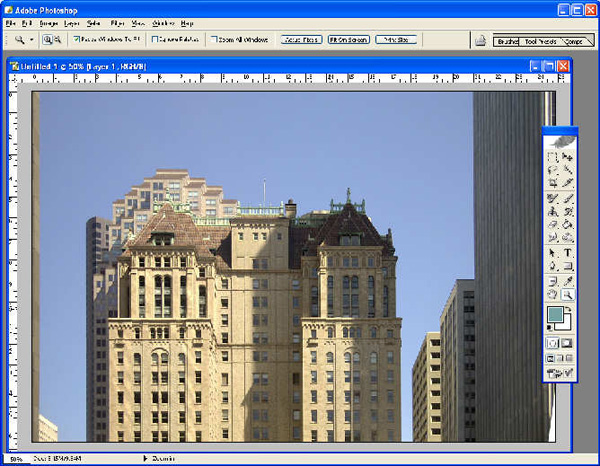
Straighten a photo in Photoshop, Photoshop Elements and Paint Shop ProHelen Bradley There's nothing quite so visually off-putting as an image which is nearly straight but not quite!Whenever you take photos, you're generally concentrating on so many things that occasionally you forget to check that everything is straight. The result is an image which is on an angle and which doesn’t look as good as it should. Sometimes too, the very angle that you're shooting at results in an image where lines in the buildings, or the image subject, which should be perpendicular simply aren't. Most graphics programs have tools which help you fix these problems. We'll look at ways you can do this in both Photoshop and Photoshop Elements as well as in Paint Shop Pro. Simple straighteningThe simplest straightening task you will have is to adjust an image which is simply not straight. This typically occurs where a line such as the water line or horizon line is not straight. It can also happen when there is no visible horizon but where a strong horizontal line in the image, such as a fence rail, is not quite horizontal. To fix an image in Paint Shop Pro 8 use its straighten tool. Click the Straighten tool in the tool palette and a bar appears on your image. Drag it so its ends are at either end of a line in the image which should be horizontal (or vertical) such as the horizon, water line or fence rail. The Paint Shop Pro marker should touch this line along its length - what you're doing is marking the line you want PaintShop Pro to straighten. When you're done, click the Apply button in the Tool Options palette for this tool or double click the image. If you want to fix a vertical line rather than a horizontal one, choose Make Vertical from the Mode dropdown list for this tool before clicking Apply. As with any straightening task, when you're done you must crop the image to square it up as you will lose the straight edges of the image when you straighten it. The method for straightening an image in Photoshop is to use the Measure tool which shares a toolbar position with the Eyedropper and Color Sampler tools. As with Paint Shop Pro, drag the Measure tool so it lies along a line in the image which should be horizontal. When you have it lined up correctly, choose Image, Rotate Canvas, Arbitrary. The value which appears in the Angle area of the dialog is the exact angle you've described with the Measure tool so click Ok to rotate the image into position. You can now crop the image to size to remove the problems around its edges. Use the Photoshop measure tool to measure the angle to rotate an image to straighten it. If you're using Photoshop Elements you can get a similar result if you use its Line tool to determine the angle to rotate the image. Start by choosing Window, Info and drag the Info palette somewhere you can see it clearly. Now choose the Line tool (it shares a spot with other shapes like the Rectangle and Ellipse tool) and drag a line along the part of the image which should be horizontal. Don't let go the mouse button until you have read the angle measurement for this line in the Info palette. Take note of this (it's the rotation amount), and then choose Edit, Undo to remove the line you just created. Choose Image, Rotate, Custom and enter the value you got from the Info dialog and press Ok. The image will rotate into the correct position. In Photoshop Elements you need to find a way of determining the angle to rotate. Keystone issuesSome straightening problems are more complex than a horizon line being crooked. Typically when you shoot pictures of buildings from a position on or near the ground, the tops of the buildings curve inwards so that the buildings are wider at the bottom than at the top. A similar thing occurs when you shoot a photo of a picture on a wall – if you're not exactly level with the picture the top and bottom edges won't be the same size. This is, in fact, exactly how we see the world every day but a conversation between our eyes and brains makes the necessary adjustment to our perception and we see the picture as rectangular and the building as the same width at the bottom as at the top. When we capture this effect in a photo, however the distortions become more evident and you should fix the image so that the object you've photographed looks the right shape. To do this, use those tools your program has to offer. Paint Shop Pro 8 has an excellent Perspective tool which fixes perspective problems very well indeed. If you're using Photoshop, you'll find the recommended way to fix perspective is to use the crop tool with the Perspective checkbox selected. In fact this is a difficult tool to use and the results aren't always great to look at. Instead, I recommend the process shown in the step by step example opposite. If you use this technique you'll end up with great results every time. Paint Shop ProOf all the programs, Paint Shop Pro 8 has the best and easiest to use tool for fixing perspective problems. In Paint Shop Pro, click the Perspective tool which you'll find sharing a toolbar position with the Deform, Straighten and Mesh Warp tools. When you select it you'll see a selection box appear on the image with handles at all four corners. Drag each of the four corners of the shape to marks the four corners of the building which should be perpendicular to each other. Make sure you locate both the horizontal and vertical sides of the shape carefully along the lines of the building. When you're done, click the Apply button on the Tool Options palette for this tool (press F4 to display it if it is not visible). When you're done, you can crop the image to size to remove the areas which are 'missing' from the edges of the photo. Fixing Perspective in PhotoshopThe perspective crop tool in Photoshop crops the image at the same time so it's not as useful as it might be. Here's a workaround solution which also works similarly with Photoshop Element (although it doesn't provide guides to use): With the image open in the editing area, click the Zoom tool and decrease the zoom by one or two clicks. Once the image is smaller than the editing area, grab the window's bottom right corner and drag so you have a grey area around the image. Using the rulers click and drag one or more vertical and horizontal guides to use to line up the image with. Drag them into place. Now hold the Control key as you drag each corner of the image out or in until the building lines up against your guides.
When you're satisfied with the result, press Enter to confirm it. Any image outside the image area (on the grey area), will be cropped away. You can now remove the guides by dragging them back over the ruler.
|
|
|
(c) 2019, Helen Bradley, All Rights Reserved. |