Helen Bradley - Photoshop and Lightroom tips and techniques
I'm Helen Bradley - I'm a photographer and Photoshop professional. In this Photoshop and Lightroom blog you will find powerful Photoshop and Lightroom tips, tricks and techniques that will help you get more out of both programs. You will also find step by step guides for working creatively with your photos in Lightroom and Photoshop and any other cool applications I know you will be interested in knowing more about.
Sounds easy but it isn’t! How to turn a dotted stroked line into a line of dots
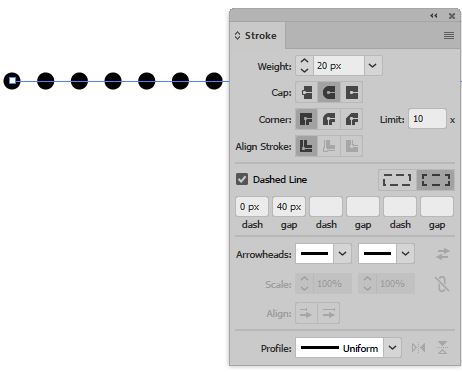
Adding a series of dots to a line in Illustrator is as easy as setting some stroke options. For example, with a black stroke and no fill, set the stroke to a Weight of 20, select Rounded Caps, select Dashed Line, set the Dash value to 0 and the Gap to 40. This will give you a line like this:
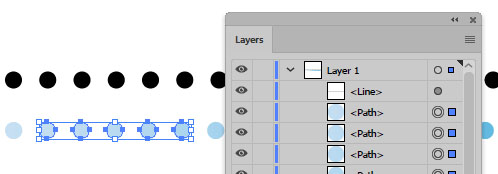
To turn the dotted stroke into individual dots, select the line and then, with the line selected perform this set of instructions without changing the selection:
Select Object > Expand Appearance
Select Object > Expand, disable Fill and enable Stroke and click OK
Select Object > Compound Path > Release
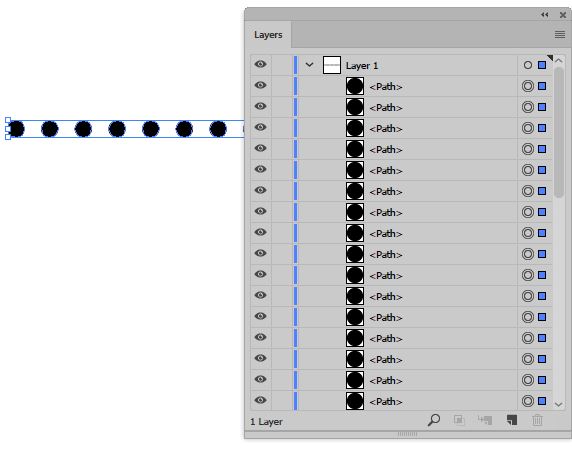
Select Object > Ungroup repeatedly until it can no longer be selected
Then, optionally, choose Object > Group
There is a lot of discussion on the web offering solutions which involve rasterizing the line at high resolution. Luckily my method is much better as it doesn’t require you to then trace the dots which results in them looking just horrible. My method is 100% vector all the way and it works!
This method will work for capsule shapes and dashes – in fact, any shape you can design to stoke a line with, this process will extract the shapes from that stroke for you.
Just how big an image can and should you use as an Identity Plate
I’ve just sat through a presentation by a very well known Lightroom trainer/expert and they were asked what size the ID plate image can be for it to appear (uncropped) in the top left corner of the Lightroom screen. Well they had an answer that “worked for them” but it wasn’t right! Yikes. Noooooo!
Their image was a particular size but, because it was a png file and has transparency they were ignoring the fact that their ID details didn’t fill the image so it “looked” ok in place but, if your image is full of ‘stuff’ from top to bottom with content then their dimensions were out by a whopping 4px!
So, I checked and tested this. I made an image in Photoshop and tested it to the exact pixel – top to bottom and right to left. Here are the proven dimensions:
360 wide x 42 tall
However, be aware, that at 42px tall the bottom pixel of your image sits slap bang on the top of the Lightroom interface so you might want to make it 40 px tall so you leave some breathing room – just saying – but it can go up to 42px before anything gets cut off.
Oh, and the width size needs some explanation too. You can make the width much wider but, if you do, the little disclosure triangle in Lightroom CC2015 appears slap bang on top of the image. So, think of 360 px as a good setting which leaves a few pixels between your ID plate and the disclosure triangle – enough for some breathing space so it all looks neat and tidy.
In the image above and below my document is 360 x 40 which works really well. If you are using a less wide image, make sure to add some space to the left of your logo to give it some breathing room – otherwise if you crop really close to your logo in your png file you’ll jam your logo up against the left side of the screen really unattractively.
Also – my logo was created in Illustrator so when I exported it as a png file I made sure to choose the black matte option so it looks just wonderful on a black background – if you don’t do this it will look just horrible with a white fringe around it. Oh! and I added my text in Photoshop – below was my first try – just saying it looks a lot better above where I smoothed the text and resaved and added it to Lightroom. Don’t say you haven’t been warned!
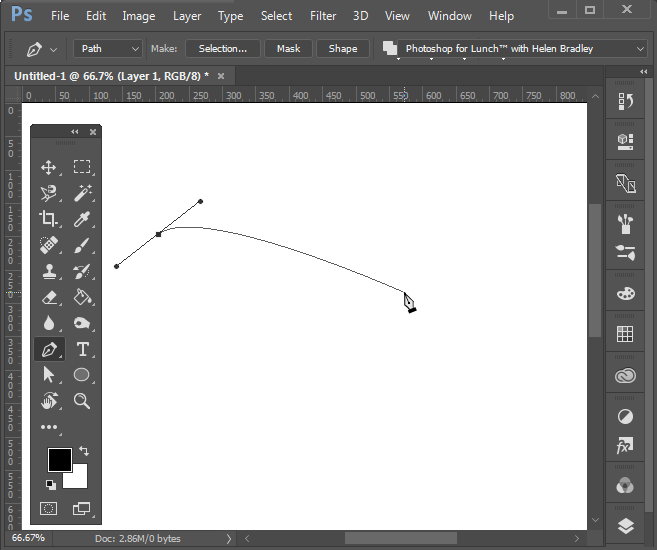
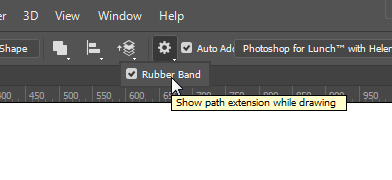
There is a feature for the Pen tool in Photoshop that makes it easier to see where the pen is headed when you are drawing. It is called the Rubber Band. So, if you don’t see a line following you as you draw with the Pen tool then chances are that that setting isn’t enabled. To configure it, with the Pen tool selected, click the Gear icon on the toolbar and check the Rubber Band option. You’ll find it easier to draw paths this way in future.
How to start a new path at the exact same place as another path starts or ends
In Illustrator, when you go to start a new path on the exact place that there is another path Illustrator wants to join them together – if you click on the start or end anchor. Or it wants to delete the anchor if you are over an anchor elsewhere on the path. If you’re just hovering over the path it tries to add an anchor point. Sucks doesn’t it? It seems impossible to make a totally new path and leave the existing one exactly where it is, untouched.
So, here’s the solution. First of all there is no key you can press to change this behaviour so you didn’t miss the memo on how to do this. You have to execute a workaround. So, you have two choices. Firstly you can go to the Layers palette and lock down the path that you want to draw on top of. When it is locked you can’t alter it so you can go ahead and start your new path anywhere on it. The second option is a little tricky but works a treat. Start your new line away from the path you don’t want to effect – you can be close but not close enough to effect the line. Then, while you have the mouse still pressed on the start point, hold the SpaceBar and move the starting point to where it needs to be. Then let go the SpaceBar and continue drawing.
It’s not a pretty solution but it does work. So there you have it – how to draw a path in Illustrator on top of an existing path without the auto merge / auto join behaviour. Oh! and if you need it, the shortcut key to lock the currently selected object is Command (Control) + 2.
Whatever you call them, these rings are so cool and so easy to make in Photoshop
Learn to make hi-tech HUD rings (also known as geo circles) in Photoshop. Personally, I think these also look like crop circles and Aztec circles and they are a great element for collages.
Know the filename or part of it? Here’s how to find it in Lightroom
When you need to find a file by looking up its name in Lightroom, here’s how to do so:
1 Go to the Library and on the left in the Catalog area, select All Photographs to search all the photos in your collection.
2 Press the Backslash key \ to display the filter bar (you can also select View > Show Filter Bar
3 Select the Text option
4 Type the filename into the box as shown here:
Lightroom will find the image if it exists in the catalog if it exists.
5 If you want to do so, you can type only part of the filename in the box – just make sure to select Contains from the list so you find all files whose names contain that text.
When you are done, select the Custom Filters dropdown and choose Filters Off to return to viewing all your photos.
Flat design is all the rage and here’s how to make your own icons with long shadows in Illustrator
Flat design is very popular and it looks great. It’s a design style that has little or no dimension so it is simple and very neat and clean. If there is any dimension it is typically illustrated by adding shadows – lovely long shadows that look best coming off the bottom right of the subject in the same way they would fall if the sun actually were casting the shadow off a real life 3D surface.
In this video I will show you two ways of creating long shadows for flat icon design. The first is simple and pretty fast and will work for personal projects. What worries me about it is that it isn’t very neat when you are selling vector stock. If you want to make it easier for a person who buys your images to be able to edit them then you need to provide a tidier resulting image. Hence my version #2 of the long shadow designs. In my second version everything is neatened up so it will be easier for a purchaser to understand what is going on in the image objects and to recolor the art if they need to do so.
So, here is the video that shows how to use blends and clipping masks and some other Illustrator tools to make wonderful long shadows for your icons. Fittingly I’ll be making my design using the Ai Illustrator logo as my example but it will work with any graphic or text element.
Learn the secrets of aligning and distributing shapes in Illustrator
Yep, there are some secrets!
When you need to align and distribute shapes in Illustrator there are some tricks to doing this. There are settings that let you configure whether the shapes are aligned and distributed relative to the artboard or relative to each other – the differences can make a big change to the effect you are trying to achieve. You can also determine, when you select a few objects, which of them the objects are aligned to – this is a very handy technique to know as it means you can select objects in any order that you like and have them align to match one of the objects that you select – you are in control!
This video demystifies the process of getting shapes and text to line up the way you want it to line up and quickly and effectively. You will learn what each of the alignment tools does and how to use them to align objects by their left edges or the right or top or bottom. You can also center objects to each other and distribute them evenly up or across the artboard.
The ability to be able to quickly align objects is a key skill to have in Illustrator – without it you would need to measure everything accurately or just eyeball it! This video solves all your problems and gets you started quickly and easily understanding the alignment tools in Illustrator and how to configure them so they work best for you.
Love Steampunk? Then you will love this video on how to draw steampunk style
I just love all things steampunk and gears and fancy metal shapes are key to the steampunk genre. In this video you will see how to draw steampunk style gears in Illustrator. This is a great tutorial for beginners as you will learn about rotating shapes and how to rotate a shape around a point of your choosing in Illustrator. You will learn to combine shapes, subtract one shape from another and an entire range of useful Illustrator tips and tricks that will help you in your other designs in future.
The gear shapes vary from simple to more complex to draw so you will build Illustrator skills as you work through these shapes. You will see how to make holes in your gears so the background will show through the gear and how to add small edges to the gears using a simple rotation technique. Learn to group objects so they move as one element and so they don’t split apart when you least expect it. There are four fun gear shapes here to draw and, when you have finished this tutorial you should be able to design and draw your own gears with confidence. If you are looking for inspiration when you are designing your own gears I suggest you Google “Steampunk Gears” as this will turn up a heap of great gear images that you can use as inspiration for your own designs – I am always amazed at the awesome shapes I find when I do this which I can use as a basis for my own custom steampunk inspired gear drawings.
Draw a cute cartoon style bird in Illustrator – a great beginner project!
When you are learning to use Illustrator a fun project can make your learning less of a chore. That’s why I created this video – this cartoon style bird is easy to make using basic shapes in Illustrator. You will learn how to make the shapes and assemble the bird and the background so you end up with a finished piece of art that you made all by yourself. You will learn to use fill and strokes, to make basic shapes and how to use the Shape Builder tool to join shapes together and even to remove pieces from shapes. This tool is an alternative to using the Pathfinder options and, when you are starting out, it is a good tool to learn to use. Although this video also shows the use of some Pathfinder options too.
This project also includes a small amount of Pen tool work which makes it a great introduction to using the Pen tool which is a tool that a lot of people hate to use but which it can be of benefit to learn to use. You will see how to use the pen tool and how to adjust anchor points using their handles to form shapes. You will also see how to draw lines and apply strokes to the lines. Once the lines are made you will see how to group the lines together so that the lines all travel together in the illustration.
The clouds are made from shapes that are united together using the Unite option in the Pathfinder palette.
Learn to draw simple shapes using the Pen tool in Photoshop
The Pen tool is far from the easiest tool to use in Photoshop but being able to use it will open up a world of possibilities. In this video I will show you how to use the Pen tool in Photoshop. Starting with how to find the tool, I’ll show you how to draw straight sided figures by clicking with the pen tool. You’ll see how to fill the shape and then how to stroke its edges using a Brush.
Then you will learn how to draw curved shapes such as a heart and how to draw S shape curves and M shape curves. You will also see how to draw a perfectly symmetrical shape by drawing half of it, duplicating it, flipping it and joining it all back together – it’s much easier than it sounds, I promise.
You will also see how to save a path you have drawn with the pen tool as a Custom shape in Photoshop so you can draw that same shape at any time in the future just as you would any of Photoshop’s own shapes.
You will learn all about anchors and how to add and delete them and about handles so you can drag on them to reshape a curve. By the time you have completed this video you will be able to confidently use the Pen tool in Photoshop to make shapes and fill and stroke them. This video is suitable for beginner Photoshop users as well as anyone who uses Photoshop a lot but who is not familiar with the Pen tool.
Whether you call it a Swoosh or a Swash, here’s how to draw it in Illustrator
The Nike Swoosh is a recognizable logo and most people will call it a swoosh or a swash, but Nike didn’t invent these wonderful curvy shapes. In fact, shapes like these have been part of fonts for years and years and they are a fun way to make a type logo effect. Simply draw a fun shape off the end of the last letter in a word, join it to the word and then add your custom effects – what could be easier? Well, it’s not super simple but it is fun when you know how.
In this video I will show you how to choose a good font to use for a swoosh (or swash) effect and I’ll show you where you can download the one I used for free from a free font download site. I’ll show you how to rough out the shape to draw and then how to draw it using the Pen tool (don’t worry, it’s not difficult). Then I’ll show you how to turn your type into Paths so you can join the type and the swoosh together and finally how to decorate your new logo text using multiple strokes in Illustrator. When you are done you will have a custom, logo style result and you will have added a whole range of new skills to your Illustrator toolkit and what’s not to like about that?
Click on the image above or the video below to view the complete instructions on how to create a swoosh in Illustrator.
There is a trick to getting a blend of stars evenly spaced around a circle – here’s how!
See how to make a simple blend of any shape and how to wrap it around a circle (or oval) in Illustrator. This technique is simple to do and the video shows a handy trick for wrapping the blend around the circle so the shapes distribute evenly around it (hint: it involves the Scissors tool!)
This fun neon illustration is quick and easy to make in Illustrator
This video tutorial shows how to create a glowing neon sign in Illustrator. You will start by learning some quick and easy ways to draw the sign and then you will see how to make the neon glow. The glow is made in such a way that you can save it as a Graphic Style which means that you can then apply it to any shape in future. The entire sign is very easy to make even for a competent beginner Illustrator user and it is fun to make too. Once you’ve made it you can turn any drawing or even text into a neon sign.
Learn how to make circles of dots in Illustrator a number of ways
You can use circles of dots in lots of ways in your designs and they can be the design itself. The challenge, of course, is how to make the circles of dots. In this video you will see how this is done using two different methods in Illustrator. Each method results in a different effect, in one the dots are the same size so when the circles get larger the dots spread out more. In the second version, the dots get bigger as the circles get bigger. Both require a different approach to the solution. So, here’s a video that shows you how to make dotted circles in Illustrator: