|
|
|
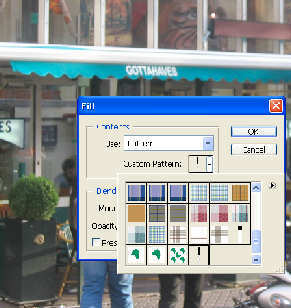
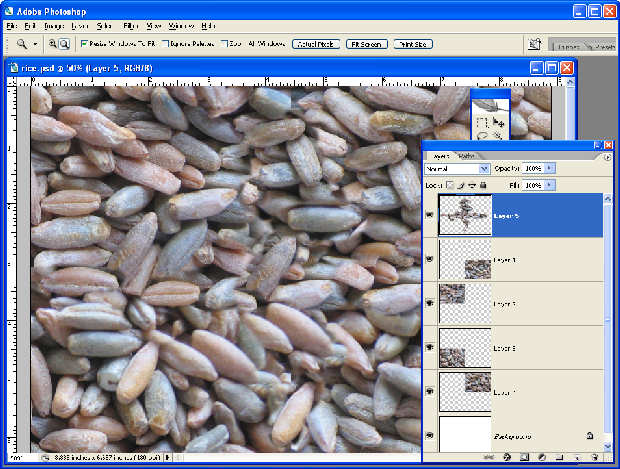
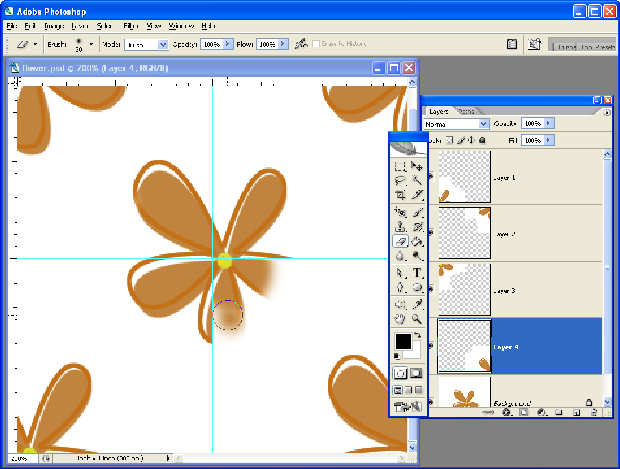
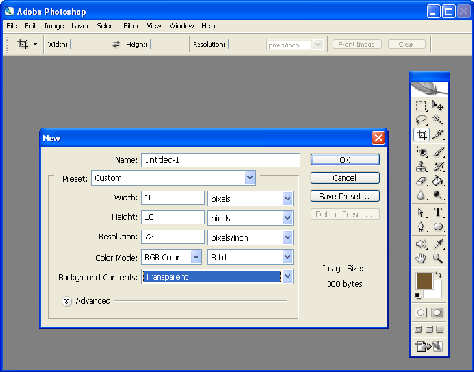
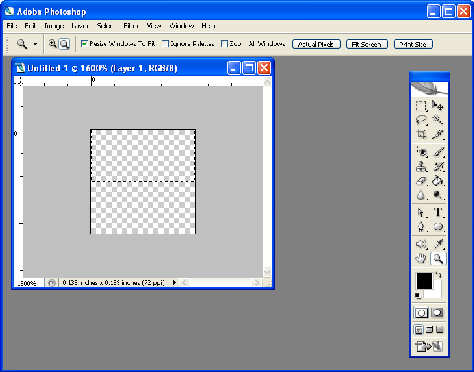
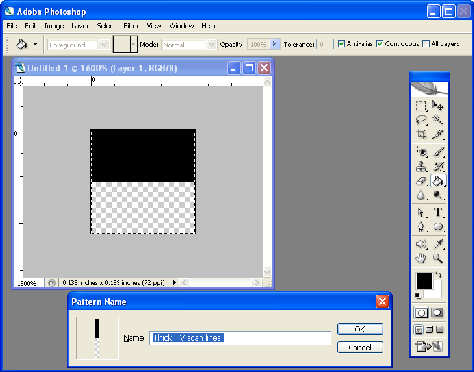
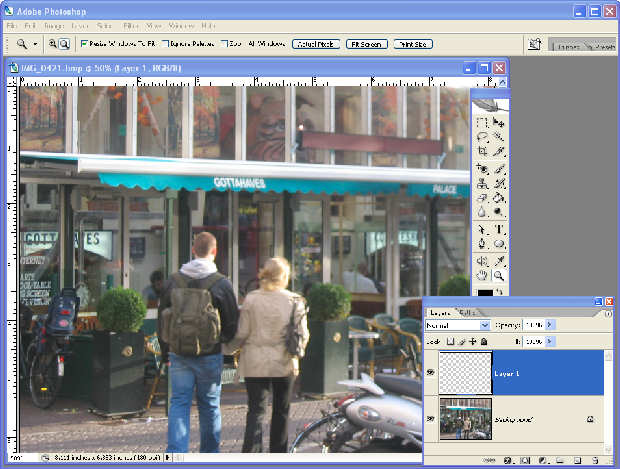
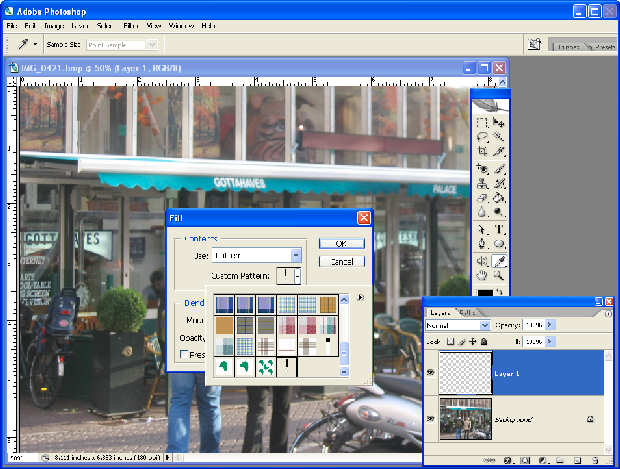
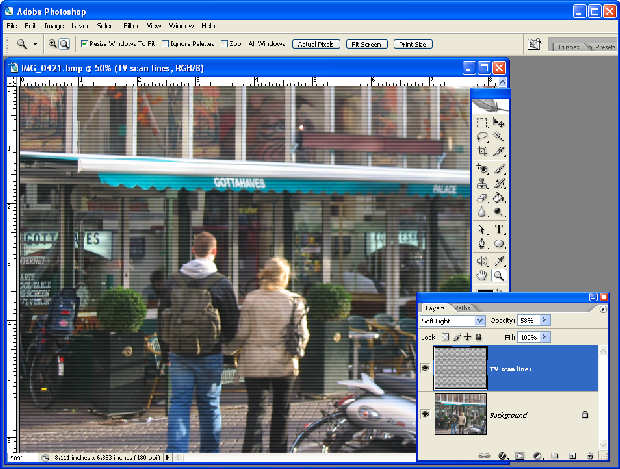
Photoshop: Making seamless patternsHelen Bradley How to create repeating pattens in Photoshop.Photographic textures make a great background for a collage or for a web page. However, if the texture image you're using is smaller than the area you intend to fill it with, you'll need to perform a little magic to save the day. The tool you'll use is the Photoshop patterns tool – it lets you define a selection as a pattern and use it to fill a selection or an entire image. The best patterns are those that are seamless so you don't see where one image ends and the next one begins. Here, I'll show you a technique for creating a seamless pattern in Photoshop that you can adapt to use in any graphics software and for photographs as well as drawn images. I'll also show you a quick and easy way to add TV scan lines to a photo to give it an edgy look which uses the same patterns tool. Seamless patternsCreating a seamless pattern requires that you start off with a suitable image. In the first example shown here I'm using a photo of some rice grains. The photo was shot square onto the rice so there is little or no variation in focus or size that would occur if the photo was taken from the side. This evenness of size and focus is required to create a successful seamless pattern. To create your seamless pattern, open the image to use to create the pattern and determine its size in pixels. To do this, choose Image, Image Size and read off the values in the dialog and write them down so you have them handy – my image is 1600 x 1200 pixels in dimension. You will create two guides one horizontal and one vertical at the half way point across the image (if your image dimensions can't be divided exactly by 2, resize it so it can). To add the guides, choose View, New Guide and click Horizontal and then type the horizontal value – for my image it is 600 px (half of 1200 px). Click Ok to create this guide. Repeat the View, New Guide command and choose Vertical and then type your value (for my image it is 800 px which is half of 1600 px) and click Ok. You should now see two guides forming a cross over the image. Choose View, Snap to and ensure that the Guides option is enabled and ensure also that the View, Snap option is enabled so the cursor snaps to your guides. Click the Rectangular marquee tool and make a selection around the top left corner of the image using the edge of the image and the guides as the boundary. Choose Edit, Cut to remove the shape. Choose Edit, Paste to paste it back into the image. Click the Move tool and drag it to the bottom right corner (diagonally opposite where it came from). Hide this new layer for now. Repeat the process this time selecting the bottom right corner of the image – make sure you have the background layer selected when you do this and cut it then paste it into the image and move it into position in the top left corner of the image. Hide the layer when you're done. Now repeat the process again this time on the top right and bottom left of the image. You will cut each area in turn and paste it into the diagonally opposite location. When you are done you shouldn't have any of the image left on the background layer and you should have four new layers which, when you turn their visibility on, fill the image area. To turn off the guides, choose View, Clear Guides. You will see that the four portions of the image don't butt up to each other very well so you see definite lines visible where the guide lines were – this is to be expected. To fix this, add a new layer to the image, select the Clone Stamp tool, enable the Sample all layers checkbox on the tool options bar and start sampling and painting over the lines so they disappear. Do not paint over the outside edges of the image or you'll ruin the seamless effect you've worked so hard to create – the portion of the image you're most interested in blurring away are the visible lines inside the image where the four pieces join up. When you're done, choose Select, All and choose Edit, Define pattern and type a name for your pattern. Create a new blank image larger than the original pattern image and fill it with the pattern by choosing Edit, Fill. From the Use list, choose Pattern, open the Custom Pattern swatch and select the pattern you just saved – it is the last one in the list. Click it and click Ok to fill the new image with your seamless pattern. Making a seamless graphicUse a similar process to create a seamless pattern from a graphic image such as the flower shown in the second example on this page. In this case, use the same process to switch diagonal blocks in the image but, instead of using Cut, use Copy to do this so, in addition to the four quarter images you should still have the original image in place. When you are done, erase away the background areas on the top four layers until you see the entire image below. Now define the pattern and, when you fill an image with it, you will have a seamless and very professional looking result. Use the Clone Stamp Tool to create a smooth transition inside your image before creating the pattern. Use a similar process to create a repeating background image like this small flower that can be used to fill a page. TV scan linesCreating a patterned overlay for an image that makes it look as if it's been photographed from the TV is a fun and easy way to incorporate patterns into your photos. Step 1To create the lines to use, start with a new document that is transparent and only a few pixels in size. To do this, choose File, New and set the file size to 10 pixels wide by 10 pixels high and the Background Contents to Transparent. Step 2Set the foreground colour to black. Zoom in so you can see the square very clearly and make a rectangular selection of the top half, of the square – it's easier to do if you size the window a little larger than the image and make your selection starting on the grey surrounds. Step 3Use the Paint Bucket tool to flood the selection with black. Select the entire image by choosing Select, All – this selects the black and transparent area. Choose Edit, Define pattern and type a name for the pattern – I've called mine Thick TV Scan Lines. Click Ok. Step 4Open the image that you will add the scan lines to. Add a new layer for the lines by choosing Layer, New Layer and click Ok. If you want to apply the scan lines to only a portion of the image, select it now. Step 5To fill the layer with the scan lines, choose Edit, Fill and, from the Use list, choose Pattern and open the Custom Pattern swatch and select the one you just saved – it will be the last one in the dialog and you'll see its name if you hold your mouse over it. Click Ok to add it to the layer. Step 6Experiment to find a blend mode and opacity to use for the top layer that gives the best effect on your photo. For this image I chose the Soft Light blend mode and reduced the opacity to around 60%.
|
|
|
(c) 2019, Helen Bradley, All Rights Reserved. |