Articles | Photoshop blog | Photography blog | about me | e-mail

Helen Bradley - MS Office Tips, Tricks and Tutorials

I'm a lifestyle journalist and I've been writing about office productivity software for a long time. Here you'll find handy hints, tips, tricks, techniques and tutorials on using software as diverse as Excel, Word, PowerPoint, Outlook, Access and Publisher from Microsoft and other applications that I love. My publishing credits include PC Magazine, Windows XP mag, CNet, PC User mag, SmallbusinessComputing.com, Winplanet and Sydney Morning Herald.

Friday, November 21, 2008

Find Office Documents faster


The My Places feature in Microsoft Word and other Office applications makes it easy for you to find documents quickly by adding the folder that they're stored inside as a link on the left hand bar of the File Open and File Save dialogs.

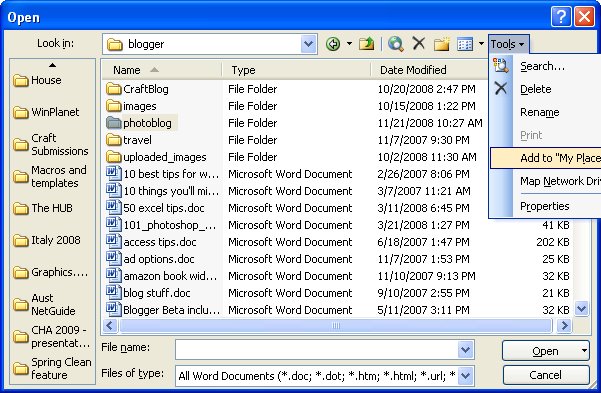
So, when you’re working on a project even a short-term one, navigate using the File Open or File Save dialog to the folder that the files for the project will be stored in. With the folder selected (don’t open the folder), in Office 2003 and earlier click the Tools button on the toolbar and choose Add to My Places. In Office 2007, right-click the left sidebar and click Add folder name.

This adds the folder at the bottom of the list in the left sidebar making it easy for you to navigate to that folder by simply clicking its name in the list.

If you’re using a combination of Office 2003 and Office 2007 you will notice that the left hand panel of each of the File Open and File Save dialogs are different. However, if you're working in Word 2003, for example, the same sidebar appears in Excel 2003.

If you have lots of links in the sidebar - I have around 20 - right-click the panel and select Small Icons to make the links smaller so that everything fits better.

Labels: , ,

Add to Technorati Favorites

Friday, September 14, 2007

How-To with Helen Bradley


I write for lots of wonderful publications across the globe and one of them is Internet.com's Small Business Computing web site.

The great news is that I now have my own section and here it is: SmallBusinessComputing.com. Check a few sections down and you'll see a link to all my small business columns. There are heaps of columns on all things Office including Office 2007 and lots of stuff for earlier versions too. It's a great way to get down and dirty with some of the new features in Excel, PowerPoint and Word including Themes, SmartArt, Charts and lots of other handy tools.

Labels: , , ,

Add to Technorati Favorites

Thursday, August 9, 2007

Shapes are different in Word 2007


I've been working with shapes a lot in Office 2007 cause I've just written a huge article about them. It didn't start out to be huge but that's the way it ended up. You see there's just so much to learn about them and it's not all intuitive. The problem as I see it is that part of Office 2007 was just cobbled together (love that word cobbled!). Things aren't consistent, far from it. One of the most interesting inconsistencies is how Shapes are implemented in Word and in Excel and PowerPoint.

In Excel and PowerPoint shapes work the same pretty much and, if you add a shape and right click it you can choose Format Shape and you get this snazzy new dialog to work with. Do the same in Word and life is very different indeed - there's no new dialog just the old stuff.

What this means in practical terms is that you can't fill a Word shape with an image from the clipboard or a clip art image - you can in Excel and PowerPoint and you can't create your own custom multicolor gradient for a Word shape. The issue is that there's a new graphics engine in Office 2007 called Escher graphics (presumably named after one of my favourite artists, MC Escher) which is implemented fully in Excel and PowerPoint but only partially in Word. So, don't expect Shapes in Word to behave the same as they do in PowerPoint or Excel, cause they won't - it's that simple.

Labels: , , ,

Add to Technorati Favorites

Tuesday, August 7, 2007

Where is it? Office 2007 stole your fave command


I get a lot of emails from folk who have spent time agonizing about things missing from the new Office 2007. True, a few of your old favourite commands have probably bitten the dust but some are still there, just not visible.

To see what you can't see (if that isn't a totally confusing statement) click the Office button, choose Word Options (or Excel Options if you're using Excel etc) and then click Customize. This is where you can manage your toolbar. From the Choose Commands From list choose Commands not in the Ribbon. The list below shows all the commands that still function but which you just can't see. Click any you can't live without and click Add to add them to the Quick Access toolbar and they'll be there for you to use.

This is also the first place to look when you are wondering if a certain command is on the ribbon. If you can't see it, check here, this is a definative list of what still works but isn't where it is easily accessed.

Labels: , ,

Add to Technorati Favorites

Monday, July 9, 2007

My Places in Office 2007

I use the My Places option all the time to add folders to the left hand side of the File Open and File Close dialogs. If you do this too and if you use Office 2007 you'll find very quickly that the Add to My Places option isn't where you expect it to be. Instead of being accessible from the Tools menu, you simply right click the icons on the left of the dialog and you can add the current folder to the list.

In all fairness, it makes more sense to be here than having the option where it was -it's just if that's where you expected it to be, it ain't there no more.

Labels: ,

Add to Technorati Favorites

Tuesday, May 29, 2007

Axe the Mini toolbar


If you don't like the new mini toolbar that appears when you right click something in an Office 2007 document, you can axe it. You can't customize it, you can't add or remove anything from it but you can zap it.

In Word 2007, PowerPoint 2007and Excel 2007 you do this by clicking the Office button and choose the Options link at the foot of the dialog. In the Popular group you will disable the Show Mini Toolbar on selection checkbox.

The steps are a little different in Outlook 2007 in Outlook, you need to open an element that uses the new Ribbon interface such as a new message window. Now click the Office button, Editor Options and disable the Show Mini Toolbar on selection checkbox.

If you want it back at any time, just reverse the process.

Labels: ,

Add to Technorati Favorites

Friday, May 11, 2007

Working between Office 2007 & 2003


If you're using Office 2007 in a workgroup with others who are 2003 users, then you'll encounter problems with them not being able to read your 2007 documents.

The simple solution is to change the default save format in the Office 2007 applications so they save automatically in the older formats. To do this, click the Office button and choose the Word Options button (for example), and click the Save option. In the dropdown list, Configure the Save files in this format option to the 97-2003 format.

You'll need to do this separately for each application you want to change the default save format for.

Of course, this doesn't stop you from saving in the new format or any other supported format. It just ensures that the default save format is backwardly compatible with other users.

Labels: , , ,

Add to Technorati Favorites

Thursday, May 10, 2007

PDF Writer for Office 2007 - free!


Why would you go to all the trouble of creating Office 2007, packaging it into a cute box and then leave some of the best bits out? Ask Microsoft because I sure as heck don't understand it. In the past they've left out Producer for PowerPoint, options in Excel and now, in Office 2007, the PDF writer. Seriously - it's silly and it's sad 'cause lots of folks don't know that these tools are there so they struggle along without them or worse still, go and pay for something they could have had for free.

So, in the interests of getting the word out, here's a download link for the PDF writer for Office 2007. Grab it, install it and use it.. you're entitled to it.

Labels: , ,

Add to Technorati Favorites

Wednesday, May 2, 2007

Hide the Ribbon in Office 2007


Ok, I'm on record, I love the ribbon in Word but on my laptop with its scrunched up screen (in the tradeoff between size and weight, I opt for weight!) the ribbon is sometimes too big.

Not a worry, it's simplicity itself to hide it. Press Control + F1 and it disappears and press it again and it reappears. You can also have it disappear so it will come back with a single click on any tab name. To do this, double click a tab name and the ribbon disappears. Single click a tab name and it reappears - click again on the tab or in the document, and it disappears. Repeat until you're tired of the magic! Double click or Control + F1 to go back to how it is.

It's a neat party trick to play on a co-worker (no! I did not tell you to do that), and a great way to buy back some much needed screen real estate.

Labels: , ,

Add to Technorati Favorites

Wednesday, March 21, 2007

Too cool for school - Office 2007 SmartArt


New to Microsoft Office 2007 PowerPoint, Excel and Word is the SmartArt feature which is one you’re just going to love.

To test it out add a new slide to a PowerPoint presentation, for example, and select the blank layout. From the Insert tab on the Ribbon, select SmartArt and then one of the SmartArt objects.

I like the one called Staggered Process which I've shown here as it makes a great display for a simple step-by-step process. Select your choice of design and then you’ll see text brackets appear on the screen. Click in them or click the double-pointing arrows at the left of the SmartArt object and type your text in the special dialog.

Once you’ve got your bullet points in - and you can add more than the default three if you need more - you have a simple step-by-step graphic. But - this is only the beginning.

There are lots of different looks for your graphic including beveled edges and 3D effects, and you can choose these from the SmartArt styles dropdown list in front of you. You can also change the colors used in the design which, of course, are based on the current document Theme colors. Change the Design Ttheme and the look of the project changes with it.

It’s about as simple as it’s ever going to be to add great looking step-by-step graphics to a PowerPoint slide. They are, seriously, way cool...

Labels: , , , ,

Add to Technorati Favorites