Articles | Photoshop blog | Photography blog | about me | e-mail

Helen Bradley - MS Office Tips, Tricks and Tutorials

I'm a lifestyle journalist and I've been writing about office productivity software for a long time. Here you'll find handy hints, tips, tricks, techniques and tutorials on using software as diverse as Excel, Word, PowerPoint, Outlook, Access and Publisher from Microsoft and other applications that I love. My publishing credits include PC Magazine, Windows XP mag, CNet, PC User mag, SmallbusinessComputing.com, Winplanet and Sydney Morning Herald.

Friday, October 23, 2009

Excel 2007 - Check for Duplicates


The new Excel 2007 has far superior tools for finding and removing duplicate entries in a list. Thankfully - because this has been a nightmare in earlier versions.

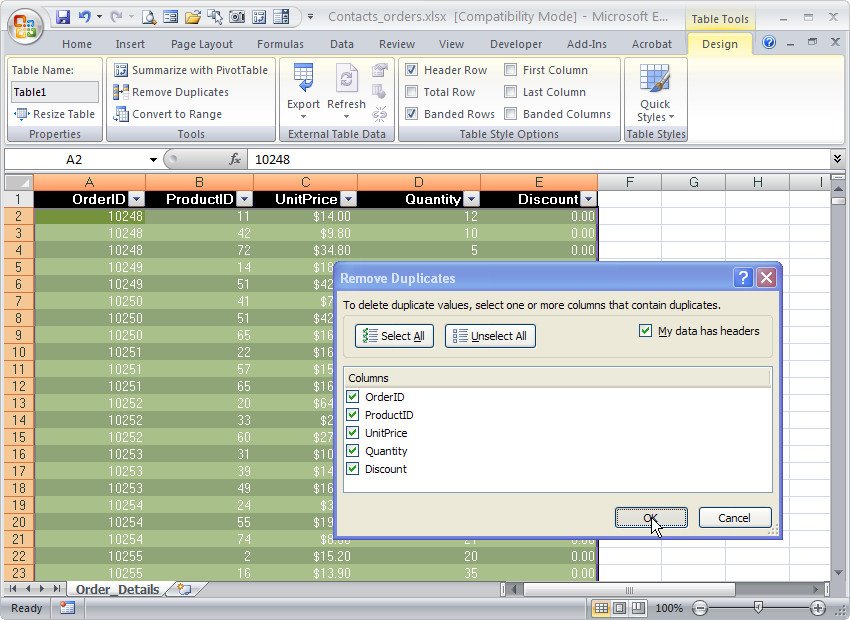
To find and remove duplicates from a list of data in Excel 2007 first format the area as a table by selecting it and, from the Home tab, choose Format as Table.

Click on any cell in the table and choose Table Tools > Design tab on the Ribbon.

Select Remove Duplicates to display the Remove Duplicates dialog. In this dialog are the Column headings for your data and all are selected by default. To remove the duplicate data from your worksheet leave all the column headings selected and click Ok.

If you want to remove rows where only certain data matches, leave the column headings for those particular rows selected and deselect the column headings for those columns which may have data that differs from one row to another. Now click Ok.

It is sensible to save your worksheet before running this Remove Duplicates option just in case you delete data by accident. If this happens and if you haven't closed the file, you can recover it using the Undo button.


If you are using an earlier version of Excel, here are links to earlier relevant posts:
Excel - finding duplicates
http://www.projectwoman.com/2007/02/excel-finding-duplicates.html
Check for duplicates in an Excel list
http://www.projectwoman.com/2007/01/check-for-duplicates-in-excel-list-1.html

Labels: , , ,

Add to Technorati Favorites

Thursday, August 13, 2009

Word 2007 – Sort Words, Paragraphs and Table Cells


Word 2007 finally fixed a huge problem that existed in earlier versions - it looked like there was no way to sort data in a list.

This wasn't the case - you used the table sort feature but it was far from being self evident.

Now Word 2007 uses the same tool it just puts it in a smart place.

To sort a list or series of words or paragraphs, select the text.

From the Ribbon, click the Home button and click the Sort button in the Paragraph group.

Choose Paragraph to sort on the first word and click Ok to sort the data in order.

If you're using an earlier version of Word, then visit this post to see how to sort in Word 2003 and earlier:

Sorting a Word list
http://www.projectwoman.com/labels/Table%20Sort.html

Labels: , , , , ,

Add to Technorati Favorites

Friday, February 16, 2007

Excel 2003 lists

Excel 2003 offered a cool new tool for managing data that was in a list format. It made Excel the place of choice for small lists and it simplified the process of charting list data - Excel lists expanded automatically to allow for more data to be entered and charts based on the list data automatically expanded to include the new data - wonderful!

Here's how to work with lists in Excel:
  1. Turn an existing table of data into a list by clicking on a cell in the range and choose Data, List, Create List. If your list has a heading row, enable the My list has headers checkbox and click Ok. Notice the border around the list.

  2. To add a row, click in the list area and click in the last (Insert) row which has an asterisk in its first cell. It is also possible to add a row in the middle of the list by clicking where the row should appear and choose List, Insert, Row.

  3. When data is created as a list, the AutoFilter feature is enabled. To sort data in the list, click the dropdown arrow to the right of the column (field) to sort on and choose Sort Ascending or Sort Descending as required. To sort on multiple columns, use the Data, Sort dialog.

  4. To create a complex filter for your list, click the Custom option from the dropdown list for the field that you want to create the query on. Set the tests to use and select And or Or depending on what information you need to extract. Click Ok to view the results. To display all records again, choose Data, Filter, Show All.

  5. When you create a chart based on list data it will be automatically updated when you add a new item to the list. To create your chart, click in the list and click the Chart Wizard button on the new List toolbar and proceed through the Wizard as you would for any other chart.

  6. To perform calculations on list data use the Toggle Total Row button. This adds a total row to the list and totals the right most column. To disable this total or create another one, click the down pointing arrow to the right of the total and choose None or a different calculation. Each column has its own down pointing arrow from which you can select the calculation to be made on that column's data.

Labels: , , , ,

Add to Technorati Favorites

Saturday, February 3, 2007

Automatic Excel cell entries

We all love to save time and here's a great tip to make repetitive cell entries in Excel just so much easier to complete.

You do this by making a drop-down list in a cell so you can select your entry from it rather than having to type it fresh each time.

To do this:
  1. Type the list of items to use in a single column in a spare sheet in the workbook.
  2. Select these cells and choose Insert, Name, Define and type DataForList and click Ok.
  3. Move to the sheet where the data goes, select the cells for the drop-down list and choose Data, Validation, Settings tab. From the Allow list choose List and, in the Source area, type =DataForList and click Ok.
Now, whenever you click a cell in this range you’ll see a list box indicator appear and you can choose the cell entry from the list.

Labels: , , , , , ,

Add to Technorati Favorites

Friday, February 2, 2007

Sorting a Word list

While it looks like Word has no tool for sorting a list – only for sorting data in a table, this is not the case and the Table sort tool works just fine for sorting data in a list.

To sort a list, such as a list of names, where each name appears on a new line and the last name is separated from the first by a comma and a space, choose Table, Sort. From the Sort by list, choose Field 1 and then, from the Then by list choose Field 2 and click Ok. This sorts the data into order by last name and then by first name where there are two or more people with the same last name.

If the names appear with the first name then a space and then last name you'll have to tell Word to differentiate between the two names. To do this, select your list and choose Table, Sort, Options and click the Other option and press the Space bar and click Ok. From the Sort by list, choose Word 2 and then, from the Then by list choose Word 1 and click Ok. This sorts the data into order by last name and then by first name where there are two or more people with the same last name.

If you find that Word 2 doesn't appear as an option in the Sort by list, click Ok to exit the Table Sort dialog and select the option again.

Labels: , , , ,

Add to Technorati Favorites