Articles | Photography Blog | Office Tips Blog | about me | e-mail

Helen Bradley - Photoshop and Lightroom tips and techniques

I'm Helen Bradley - I'm a photographer and Photoshop professional. In this Photoshop and Lightroom blog you will find powerful Photoshop and Lightroom tips, tricks and techniques that will help you get more out of both programs. You will also find step by step guides for working creatively with your photos in Lightroom and Photoshop and any other cool applications I know you will be interested in knowing more about.

Thursday, March 26, 2009

3 Step Photoshop Every Image Quick fix


Ok, so not technically Photoshop only - this tip works for any image software that supports layers, has layer blend modes and can do a gaussian blur. That includes Photoshop, Photoshop Elements and Paintshop Pro as well as lots of other great photoediting programs.

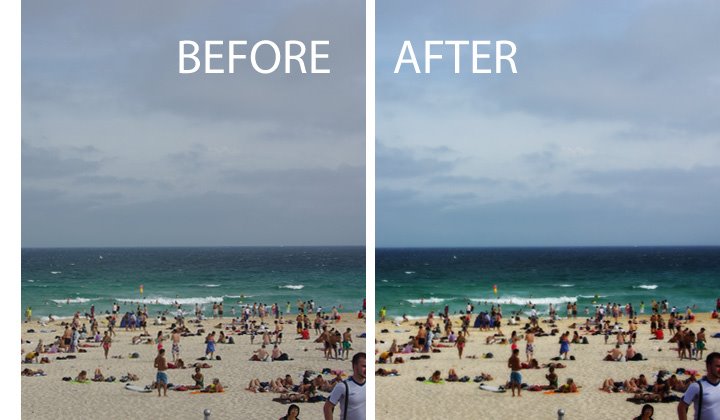
This is a very quick fix for boosting and image and giving it a really nice look.
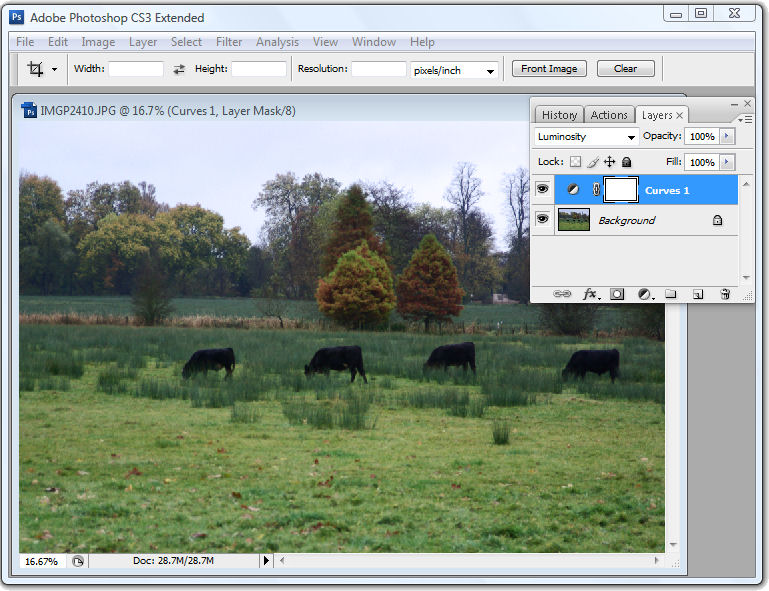
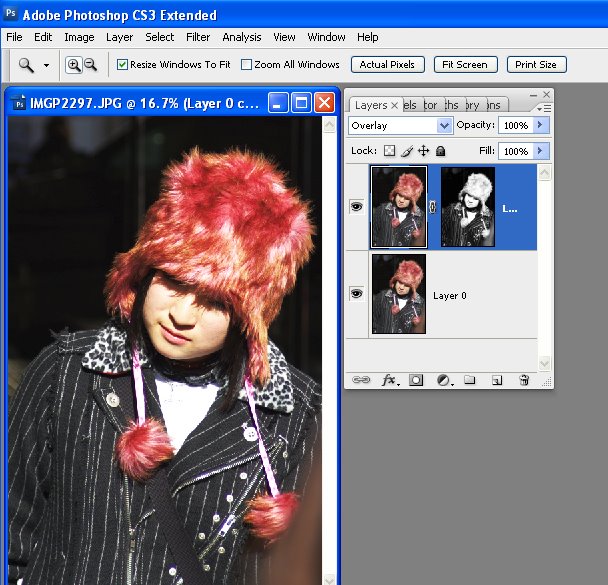
Step 1
Start by duplicating the image layer by choosing Layer > Duplicate Layer.

Step 2
Add a Gaussian blur to the top layer by using Filter > Blur > Gaussian blur. You need to use enough radius to get a nice light blur on your image. For smaller images you need only a small value blur - say 2-4 and for larger images you will need a higher value. Click Ok when you're done.

Step 3
Now set the Blend Mode for this blurred top layer to Soft Light or Overlay. You'll get a nicer looking image and the colors will get a nice boost. Reduce the layer opacity a little if necessary.

This is a simple and effective fix and isn't that the best type?

Labels: , , ,

Tuesday, December 09, 2008

Curves + Luminosity = Better Tones.


In the last blog entry I mentioned some cool things you can find in the Curves dialog that help you adjust the tonal range of your image. Today I’m going to show you how to wreck the color in an image in the name of improving tonal range.

The Curves dialog has four channel options – you can work on the RGB composite channel (the default), or you can work on the separate R, G or B channels. Problem is that although adjusting the R, G or B channels independently can help you improve the tonal range of the image – it can also totally mess with the color. For this reason, few users bother working with the individual channels. Makes good sense? No!

You see working with individual channels is a good fix. If the Red or Green channel lack contrast you can hype it up using a curves adjustment. You’ll mess up the color but, if you’re using an Adjustment Layer, you can simply change the blend mode of the adjustment layer to Luminosity and immediately the messed up color disappears and the adjustment is limited to luminosity only. Instant fix.

So, next time you need to apply a Curves adjustment, check the channels in the Channels palette. If you see a channel that lacks contrast - adjust it to add contrast to it. Then set the blend mode of the adjustment layer to Luminosity to remove the color problems you just created.

Labels: , , , ,

Tuesday, April 15, 2008

Hong Kong Trams


One of the most wonderful things about Hong Kong is its cultural and social diversity. Along side this tram is a person on a push bike - with a basket full of things they are pedalling around town. It's a sight you see a lot, high rise buildings, wealthy people contrasted with push bikes and mountains of laundry hanging off the sides of buildings. Gotta love this place, I certainly did.

This image needed more contrast and a bit of tweaking on the colour side to highlight its delicious pastels. My contrast fix of choice is now, officially Curves in Photoshop. But these aren't your dad's curves or your mums! They are curves on steroids - select the channels R,G and B and adjust each of them to get the best contrast in the image, just don't look at colour - look at contrast. Then, when you're done, you did apply your fix on an Adjustment layer didn't you? Set the Adjustment Layer blend mode to Luminosity. Notice how the wonky colours disappear and your image's contrast is adjusted perfectly? Luminosity blend mode applies the change to the image's luminosity (lights and darks on a grey scale) and keeps it away from messing with colour - Like I said, not your mum and dad's curves.. these are for real Photoshoppers!

Labels: , , , ,

Thursday, March 20, 2008

Fixing with Luminosity masks


Luminosity (Luminance) masks are an interesting tool. Consider the situation where you need to apply a fix to an image but the lighter portions of the image are ok, it's the darks that aren't - or vice versa.

Start by duplicating the image layer and apply the fix to the top layer. Concentrate on the portion of the image that needs fixing, ignore the disaster that's happening in the areas that don't need fixing.

When you have the fix in place, it's time for the fun stuff. Locate a channel which has the detail you want for your mask. You need a channel that is dark where you want the fix to be less and light where you want it more (or vice versa, as you can invert the mask). When you have your channel, Control + Click on the channel (Command + Click on the Mac) to load it as a mask. Now go back to the image and add a mask to the layer - it is automatically created as a luminosity mask based on the channel you used. So, your new mask is white where the channel is light and dark where the channel is dark. Of course, if you need it in reverse, add your mask, select it and press Control + I to invert it. Where the mask is lighter, the fix is more strongly applied and where the mask is darker, the fix is least strongly applied.

In the image above, shot in Harajuku, Tokyo on New Year's Day, I've used a Luminosity mask based on the image's own red channel to add some extra contrast and colour to the wonderful hat. I duplicated the image layer and applied a simple Overlay blend mode to that layer. Then I added the Luminosity mask to force the fix into the areas lightest in the red channel - ie where the reds in the image are located and less so in areas which weren't red. (If this sounds wrong to you, remember that in RGB mode, the red channel is lightest where red is located and darker where it isn't, ditto the green channel - it's lighter where the green is and darker where it isn't, etc..)

There's also a handy shortcut you can use to make your masks if you know which channel to use. Use Control + Alt + 1 for the Red channel in a RGB image, Control + Alt + 2 for the Green and Control + Alt + 3 for the Blue. In LAB, the same shortcuts will get you the L, a and b channels respectively.

Labels: , ,