Thursday, November 29th, 2007

Help!? WTF?

First up today, a pet peeve of mine. Why do folks head up emails with Help! or Information wanted? It’s so damn inconventient to have to open an email just to know you can’t help. Is it so difficult to say, Chart formatting issue or Contact details for XYZ needed? Obviously it is for some people. Sheesh!

Ok, rant over.

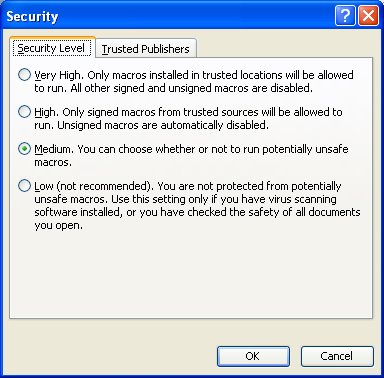
Problem: What do you do if a macro won’t run. You’ve opened a file with a macro in it and you go to run it and nothing happens? Problem is, most likely, that your copy of Word is configured so you can’t run macros. It’s a security thing but it’s no good if you need to run the macro is it?

Solution: Choose Tools > Options > Security, Macro Security and select an option that will let you run macros – go for the most secure option which still lets you do your work. Close and reopen the document and try again. Interestingly enough you might encounter this problem as you’re developing your macros. Word lets you create macros by may not let you actually run them.

Helen Bradley

Wednesday, November 28th, 2007

Paris Rooftops

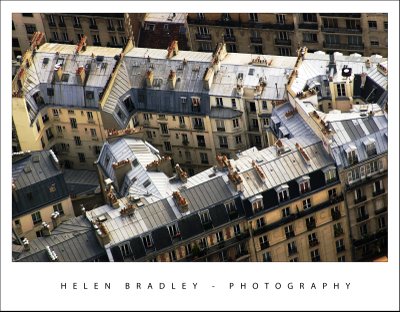
Ok, so there is this really cool place in Paris to shoot from. It’s called the Montparnarse Tower – it’s in Montparnarse (duh) and it’s this big office building. The beauty of it is that it has a rooftop area you can visit and it doesn’t cost a heap. It also has breathtaking 360 degree views of Paris all the way to the Eiffel Tower and across the Seine.

Ok, so they can be breathtaking views if it isn’t foggy and smoggy. Memo to self: don’t go there early in the morning before the wind has blown the mess away.

The Eiffel Tower could be seen, just!

Here is one of the photos I took of the rooftops in Paris from the tower. The poor air quality killed the color so there was precious little to recover and the overall image was muddy. The solution was to duplicate the image a few times and then drag bits and pieces of color and detail back out of it. The light roofs were a big issue, fix the tonal range enough to fix the image and the gorgeous detail in the roofs disappeared.

The solution is to fix the image multiple times on multiple layers. On each layer, focus on a specific detail. Then clobber the whole lot together again using Layer Masks you just paint on the bits you want and paint out those you don’t.

Helen Bradley

Wednesday, November 28th, 2007

Do You Undo?

This post is subtitled Undos that Do and Those that Don’t

If you’re using Excel 2003 or earlier, you have a big problem with the Undo command, you see much of the time, it plain doesn’t work.

Curious? Try this: open an Excel file, make some changes to it (minor however, you won’t be able to undo these however much you think you can). Check the Undo button – it is enabled. Save the file. Now check the Undo button again. Yikes, it’s now disabled. You see, after you save a file in Excel 2003, all the Undo steps are removed – no more Undo. It pays to know this is how it works.

In Excel 2007, things are much better, and the Undo retains the changes even after you have saved the file. Much nicer behavior.

Helen Bradley

Tuesday, November 27th, 2007

Preview image in Word

You’ll have seen preview images when you open a file in Word. If you choose File > Open and, from the Views option list you choose Preview, you will see either a small image of the full page or some of the text on the page. All this begs the question of what determines what you see?

The full page preview is an option when you save a file in Word. To configure it, choose File > Properties > Summary tab and enable the Save Preview Picture checkbox. Now, when you save the file it will have a preview image saved with it which will show in the preview area.

To ensure the Properties dialog appears everytime you save a file the first time so you can configure the Save Preview Picture option, choose Tools > Options > Save tab and enable the checkbox for Prompt for Document Properties.

Helen Bradley

Tuesday, November 27th, 2007

Remove spaces – Microsoft Word

I’m sure it’s happened to you just as it has to me. You copy and paste some text in from the web or an email message and it comes in with leading spaces – on evey line. There are lots of ways to remove the problem starting with hitting the delete key way too many times. Stop already!

There is, however one very smart way to do it without getting a repetitive strain injury. Select the lines of text and press Control + E to center the text. With the text still selected press Control + L to left align it and voila! the spaces are gone.

Helen Bradley

Thursday, November 22nd, 2007

Custom color swatches

I like to look at what users type into Google when they land on my blog. Today, someone wanted to create a monochromatic swatch from a monochromatic image. I don’t have explicit instructions for this, so I thought it a good concept to consider.

To do this, first convert your image to monochrome by choosing Image > Mode > Greyscale and click to Discard the color. If the image doesn’t show the variety of greys you want, use a Levels adjustment to alter the tonal range in your image.

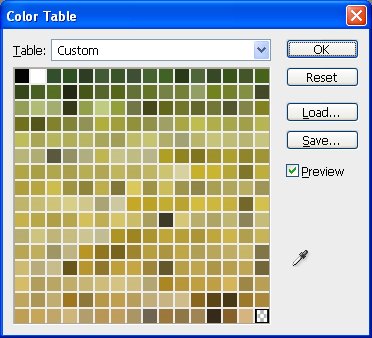
Now choose Image > Mode > Indexed color and then Image > Mode > Color Table. Here is your custom swatch sourced from your image. Simply click Save to save the color table.

Now, you don’t have to make a monochrome swatch. Say you need some lush greens for a project. Grab an image that shows the greens you like. Choose Image > Mode > Indexed Color and, for now, select the defaults and click Ok. Now choose Image > Mode > Color Table and you have a color table created from your image with your lovely greens and you can save them to use any time. If you get too many other colors in the swatch, crop the image to just the green area before making the conversion. Save the Color Table but don’t save the image and you’ll find no photos have been harmed in the process of creating your own custom color swatch.

To add the color table as a swatch, display the Swatches palette (Window, Swatches) click the menu and choose Load Swatches. From the Files of type list choose Color Table (*.act) and then browse to find your saved file and open it.

Helen Bradley

Wednesday, November 21st, 2007

Sticky spaces in Word

Picture this, you have a line of type in Word with a phone number in it. But… when ever you type it the first part of the phone number goes on one line and the next part scrolls around to the next line. It just won’t ‘stick’ all together.

What you need is a hard space. This is some thing that looks like a space, prints like a space but sticks things together. To use it, remove the space that is between the two pieces you want to stick together then press Control + Shift + Space Bar and you have your hard space.

Word also has a sticky/hard hyphen. It shows between two words but never splits words across the end of a line. Same thing – Control + Shift + Hyphen.

Helen Bradley

Wednesday, November 21st, 2007

Metro – Paris

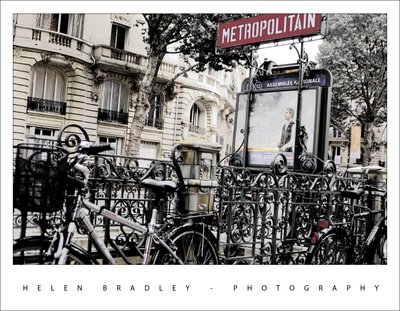
This was one of my favourite shots of the Paris metro stations. It was a throw away shot – I just took it walking past because I loved the bikes around it and there weren’t many people around.

I dumped most of the color in the photo as it just looked so good when you look at the blacks and whites in it.

I duplicated the background layer and turned the top layer into a black and white using the new Photoshop Black and White adjustment layer which lets you select which direction to take each colour into. It’s way more sophisticated than anything we’ve had in the past. Then I adjusted the opacity of the layer a little to show some of the colors from the layer underneath. The result is an almost ethereal photo. I’ve put it on a white tee shirt at CafePress in my store if you like it and want to wear it.

Helen Bradley

Tuesday, November 20th, 2007

Paste to a layer mask

Ok, here’s the dilemma. You have two images open in Photoshop and you want to add one image as a layer mask into the other.

One solution is to copy the first image, then switch to the second. Click the layer mask and switch to the Channels palette. The layer mask appears as a channel. Select the channel’s visibility icon to make it visible, select the channel to make it active, and click Edit, Paste. Deselect its visibility, reselect the RGB channel to make that one active, switch back to your Layers palette and the pasted selection is in your layer mask. This solution has the advantage that the copied/pasted piece doesn’t have to be the same size as the layer mask.

The alternate solution if the two images are the same size, is to use Apply Image. Select the target layer mask, choose Image, Apply Image and, as the Source, select the image to copy from, the layer to copy and click Ok. Now the selected layer (or the merged source) is pasted into the Layer Mask.

Two alternatives, the second is easier to use but it does require two same size images.

Helen Bradley

Monday, November 19th, 2007

Excel charts – create an overlapping series

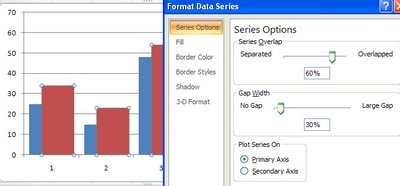
Sometimes an Excel chart will look better if your series overlap – this might be the case when you are comparing data from two years and where you want to show how the values have increased from one year to the next.

To make your series overlap in Excel 2007, select one series, right click and choose Format Data Series. Click the Series Options and decrease the Gap Width (it closes the chart up nicely) and incease the Series Overlap. Set the Series Overlap to around 60% and the Gap Width to around 30% for a good result. This is particularly useful when you are using images in place of colors for the bars of your chart but works in almost any situation.

Helen Bradley

Page 1 of 212