Sunday, January 31st, 2010

Love is in the air


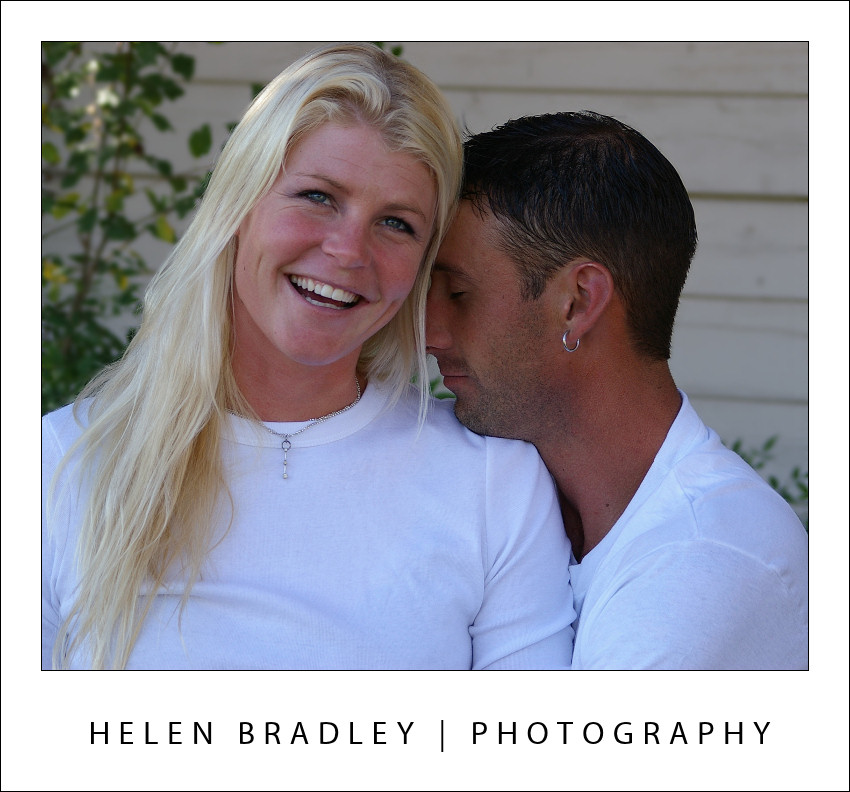
This engagement photo is casual and relaxed – it’s not a typical pose but it makes a pleasing composition.

In February, love is in the air. It’s a time that focuses on couples both new and old. When you think of photographs of couples you probably think of more formal arrangements with both people looking at the camera or at each other and holding themselves very stiff. However, couples photos don’t have to look that way. The wonderful thing about couples is that they know each other well and there is an intimacy between them that you don’t see in other relationships. If you can capture that intimacy in your camera lens then you’ll go a long way to getting some truly memorable shots.

In days gone by, photos were typically taken of couples at big occasions like an engagement and wedding. From that time onwards, photos tend to be taken as families and you probably won’t see the couple again in a photograph together without other family members until a memorable occasion such as their twenty or fifty year anniversary or their long awaited trip to Paris when they pose together, dwarfed by the Eiffel Tower behind them. Along the way we miss out on recording photographically the day to day progress of our lives. Although we take the time to note it in other ways such as celebrating anniversaries and with an eternity ring on the birth of the couple’s first child.


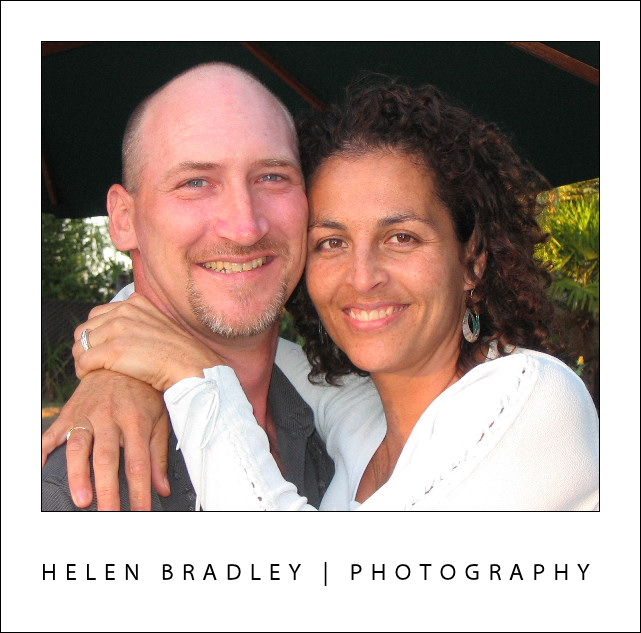
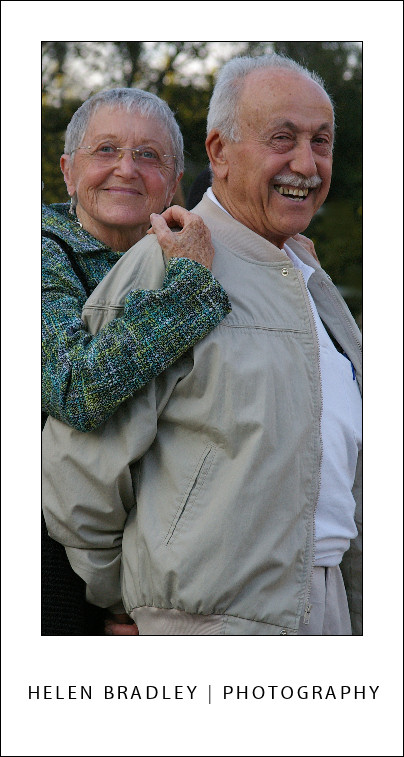
This couple was captured at a party – their closeness makes for a warm and charming photograph.

Choose your location
So how do you photograph a couple so you have compelling images rather than just a series of somewhat boring side by side posses? The first thing is to choose your setting. If you live in a rural area you’re blessed with a myriad of choices. A foot bridge over a river, under a tree in a field, a stile on a tow path. In the city, a local park will offer a variety of options but don’t overlook options on the street too. Shot in black and white, a table at a street café and even a cross walk offer can offer possibilities.

Dress up
Make sure your couple dress for the occasion. Avoid clothes with colours that clash with each other or that are highly patterned. If you’re shooting some casual shots in the country dressing in casual clothes will give the right feel to the shoot. If your couple is celebrating a big occasion like an engagement or anniversary or, the biggest of them all – their wedding, then it can be more formal and they will generally dress more formally. Suggest to the woman that she wear light makeup as this generally produces more even skin tones.


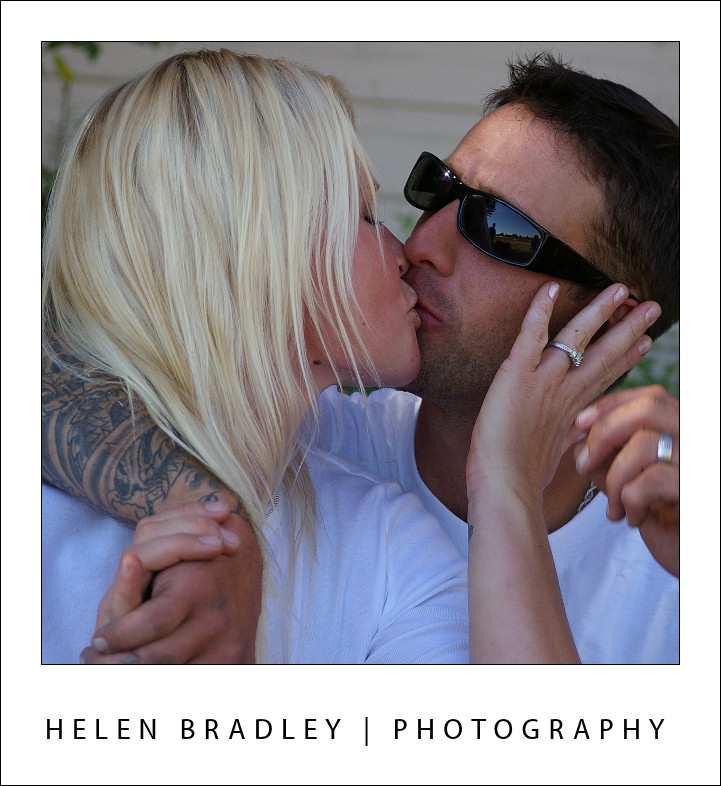
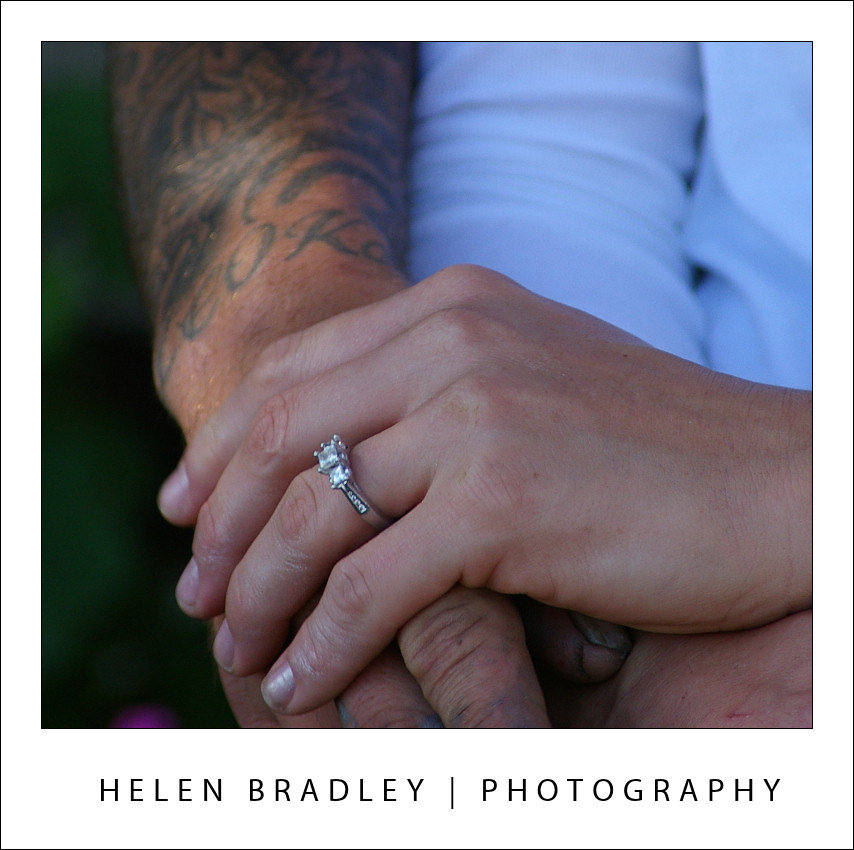
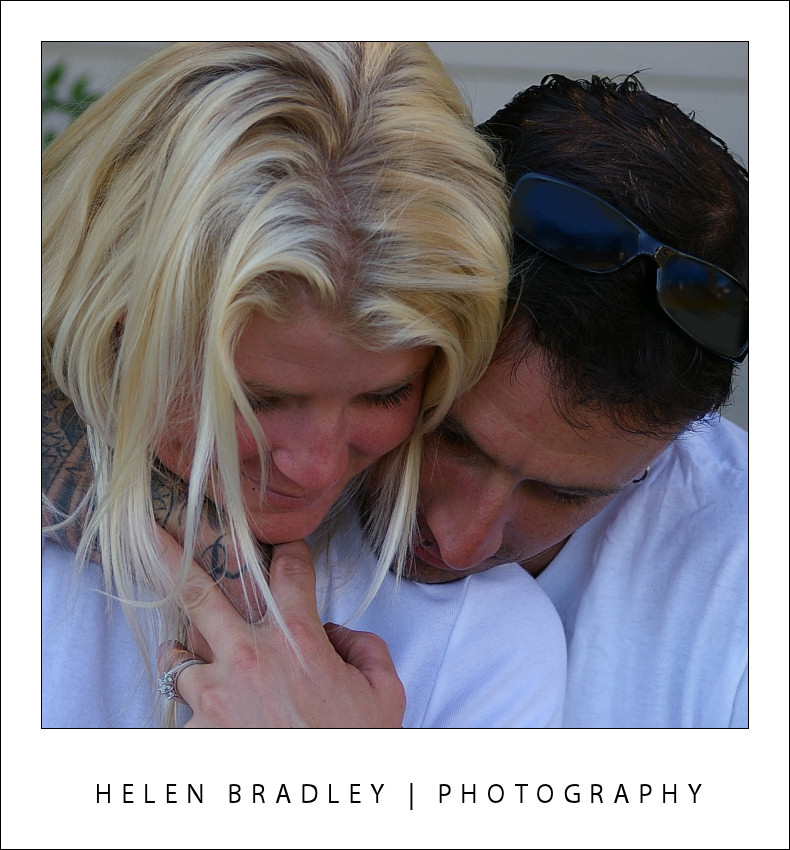
These photos show the warmth of a newly engaged couple – in some of them, the camera is merely a spectator.

Take your time
Allow yourself plenty of time to take the shots. Trying to capture something great in ten minutes is very difficult but with an hour to work you should get good results. Some couples are relaxed enough to be natural around the camera so they’re very easy to shoot. If the couple isn’t so relaxed, ask them to stand close to each other and then pause so you can frame a few shots before getting them to change poses and pause again for some more.

You may find that giving the couple an object to play with such as a flower will relax them as they start interacting with the object and with each other. Often when the couple are engrossed in their own play, the camera becomes a mere spectator capturing candid moments between them.

Posing tips
Don’t hesitate to ask the couple to try a pose for you if you think it might be fun or interesting. If it doesn’t work, try something else. If you think one person would look better if they hold their head up a bit or look in a different direction, suggest this to them. Remember that you’re the only one who can see potential flaws like double chins and shadows and asking for a small movement may result in a much better shot.


This candid photo was captured as the couple waited in line outside a restaurant, the woman’s arm around the man gives it a warm feeling.

One pose to try is to have one person sit with the other sitting or standing behind them and looking over their shoulder. Posing a couple on stairs can often give you just the right difference in heights to make this work very well if the couple is naturally around the same height. For a couple with very big height difference arrange them so the height difference is reduced and their heads are close together. This lets them interact with each other more easily and will give a much better shot. Options include sitting the taller partner and asking the shorter partner to stand or have one sit on the other’s lap. When positioning their heads you will get better results if one person is just a little higher that the other.


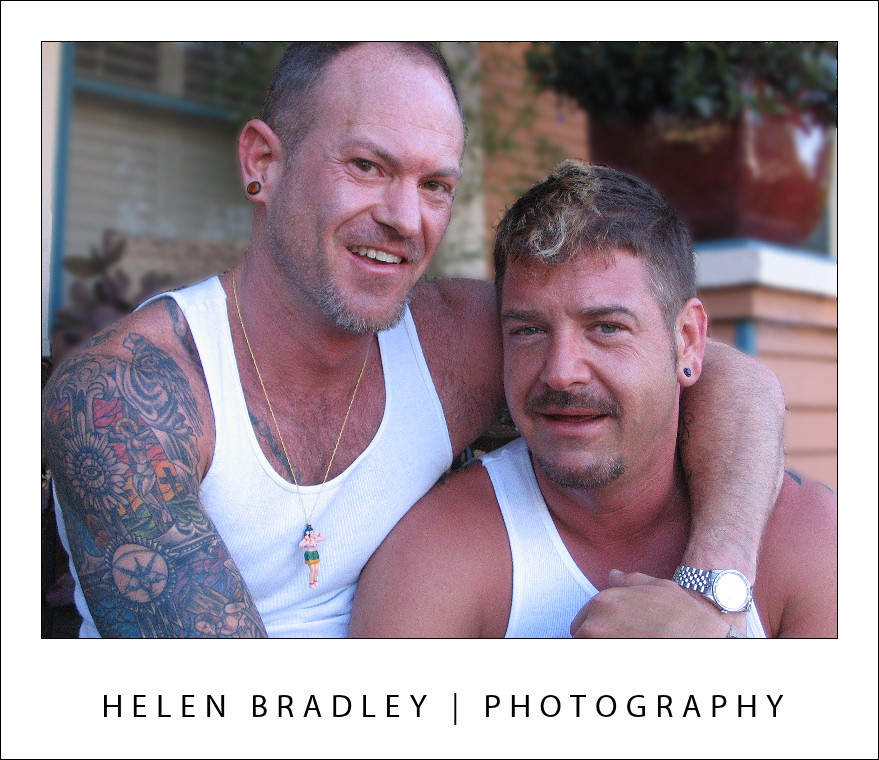
These men were so relaxed with the camera and having so much fun that it was impossible to take a bad shot.

When posing your couple, encourage them to touch each other – it might be holding hands, touching nose to nose, one might wrap their arms around the other – whatever feels natural and fun to them. As they move, follow their movements using the camera’s LCD screen (or view finder if you’re using a SLR) and look out for opportunities to take a shot. I like to vary between shooting in portrait and landscape orientation. While portrait mode lets me capture full body shots, working close up in landscape mode gives me the opportunity to capture the couple close up and exclude a lot of distracting background detail.


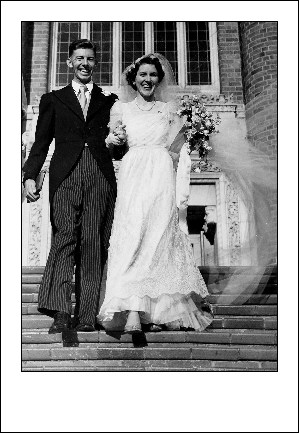
In my parent’s wedding photo the photographer has caught a fun and active young couple obviously very happy.

Not all couple shots you take will be taken in a prearranged manner like a photo shoot. Look out for photo opportunities when you’re around couples and when they are interacting naturally with each other. Since couples can’t generally take photos of themselves, when you take them for them, you’re helping them record a bit of their history. With luck, someday, someone will do the same for you.

Finishing touches
As with any portrait shot, always check your photo before printing. Remove any unsightly skin blemishes using the program’s healing brush.

Helen Bradley

Thursday, January 28th, 2010

Word 2007 – Formatting with Styles

Microsoft Word 2007 provides styles that you can use to format your documents.

These make it easier for you to change the look of a document very quickly by combining styles with the new Office 2007 themes.

To get started with styles, with a document open on the screen click the Home tab and choose the Change Styles button.

Here you can select a Style Set for your document, for example choose Distinctive or Elegant, Fancy or Formal depending on what you want your document to look like.

Once you have selected a Style Set, the Styles group on the Home tab will display styles from that set.

To apply a style to text, select the text, for example a title, then in the dropdown Style list and hold your mouse pointer over one of the styles to see how it would look if applied to that text. Select the style that you want to use and click it to apply it.

You can also add your own choice of formats as a selectable style. For example, format a piece of text so it looks the way you want your style to appear and select this text. Open the Style list and choose Save Selection as New Quick Style.

Give the style a name, click Modify to change any of its characteristics and click Ok to save it as a Quick Style. This style now appears in the Style list and you can select it to apply to text in your document at any time.

Helen Bradley

Thursday, January 28th, 2010

Better Photos Tip #8 – Take 2 steps forward

When capturing an image, get in close to the subject so they fill your viewfinder.

If there is one technique most digital camera users can use today to instantly improve their photos it is to stand at least two or three steps closer to their subject.

Most photographers stand too far away from their subjects so the subject ends up being very small relative to the rest of the photo.

When you move closer to your subject you make them larger in the viewfinder so they fill the photograph.

The result is not only a much more interesting photo but, because the subject fills the screen, there is less distracting background detail. If you can’t get physically closer to your subject use the zoom on your camera to zoom in closer.

Helen Bradley

Sunday, January 24th, 2010

Better photos tip #7 – Don’t just look – See

When you really look at a scene you may find things to photograph you might not have noticed at first glance.

When you are looking for things to photograph, study your surroundings. There are plenty of photo opportunities even in places that look anything but photographic.

A good exercise for budding photographers is to set yourself a challenge to photograph a predetermined subject matter such as numbers, signs, a particular colour or shapes like circles or rectangles.

Go out with your camera and set yourself an hour to complete the task. When you set yourself a challenge to capture a particular subject, you have to look to find it in a larger scene.

As you do you’ll see a range of things that you may not otherwise notice.

Part of what sets a good photographer apart from a mediocre one is the ability to see the possibilities in a scene.

Helen Bradley

Saturday, January 23rd, 2010

Lightroom Presets

In an earlier post, I explained how to create a custom Lightroom preset that you could use to edit your photos in Lightroom. In addition to creating your own Lightroom presets you can download and install presets from the web into Lightroom so you can use them anytime you like.

To begin, you’ll need to locate some presets to use. A good place to start is at Adobe Exchange: http://www.adobe.com/cfusion/exchange/ and search for Lightroom presets. Download a set of presets to your computer. In most cases this requires you to download and save the file to your computer and then you need to unzip its contents. Place the unzipped files in a folder that you can find easily.

Once you have done this, launch Lightroom and click to open the Develop module. Choose User Presets and, if desired, create a new folder for the presets by selecting New Folder and type the folder name. I like to do this so I can keep my presets separate to other people’s.

Once you have created the new folder, right-click it and click Import. Navigate to where you saved the preset files you downloaded, select them and click Import. The presets will be added to your Lightroom Preset collection. Chances are that one will be applied to your image too! Press Control + Z (Command + Z on the Mac) to undo it.

You can rename a folder by right clicking it and choose Rename and you can also delete a folder if you decide you don’t like the presets or simply remove individual presets by right clicking the preset and click Delete.

You can also share your presets with others. To do this, right-click a preset that you have created and choose Export. It is exported by default with its current name with the extension LRtemplate which is the extension that identifies it as a preset. To share your presets with others you can either send them the LRtemplate file so that they can import it into Lightroom themselves or zip a number of presets into a single file of presets and distribute that.

Even if you do not want to create your own presets, you’ll find that there are plenty of cool presets available on the web that you can download and use.

Helen Bradley

Thursday, January 21st, 2010

Word 2007: Drawing in documents

One technique that has changed with Word 2007 is drawing in documents.

Instead of having a Drawing toolbar you now select shapes from the Shapes dropdown list on the Insert tab.

From this list you can select shapes such as lines and all the AutoShapes that you are used to using in earlier versions.

To create a drawing, for example, you can select and insert the shapes that make up the drawing and then format them using the Drawing Tools > Format options on the Ribbon.

Many of the color options that are available are connected to the theme colors so, provided you use a theme color in your drawn shapes, the colors will change automatically later if a different theme is applied to the document so the drawing stays consistent with the remainder of the document.

Find the shape formatting tools on the Drawing Tools > Format tab on the Ribbon.

What is missing in Word 2007 is the ability to right click a shape and have the format AutoShape dialog appear as it does in Excel and PowerPoint.

The Format tab and the Format Object dialog in Word offer less features than are available in the new graphics engine in the other applications.

Helen Bradley

Wednesday, January 20th, 2010

Better photos tip #6 – Depth of field

This image shows a shallow depth of field – the statue is in focus but everything else is nicely blurred.

There is a benefit you get when you use the macro setting on your camera and that is that when you use it your camera generally captures the image using a very small depth of field.

Depth of field is the area in focus around and in front of and behind the subject of the image. When you have a large depth of field, everything is in focus and where the depth of field is small, only a very small portion of the image is in focus.

Shooting with a small depth of field requires some skill because you have to make sure that the subject itself is in sharp focus – so that the rest of the image is not.

Check the LCD screen or viewfinder to ensure that the subject looks crisp and in focus before shooting. When you have taken the shot, check the image and zoom in to it and make sure the subject looks sharp – the LCD screen preview at the regular size won’t show clearly enough if you have the subject sharp enough.

Depth of field will be a new concept if you’ve only used inexpensive film cameras in the past. Automatic film cameras shoot with a very wide depth of field so that everything in the photograph is in focus. In the days of film, only SLRs were capable of capturing images with a small depth of field.

Digital cameras changed that and many point and shoot cameras can capture images with smaller depths of field if you know how. The secret is in using the camera’s manual controls to set the aperture manually rather than leaving the camera to make the choice. This same option is available with digital SLRs and the results, because of the lenses you use, are generally better with a digital SLR.

For a small depth of field, adjust the aperture to a value such as f2.8 or f3.6 so it is very wide and so the camera takes in a lot of light. To get a large depth of field so everything in the image is in focus, use an aperture setting of f8 or f16 for example. This setting lets in less light so the shutter speed will be much slower than when shooting with an aperture value of f2.8 for example.

Helen Bradley

Tuesday, January 19th, 2010

Split toning in Photoshop

By Helen Bradley

Split Toning is an effect which has its origins in the days of film and it involves tinting the highlights in a black and white image one color and the shadows another color. The best results are where you use opposite colors for each, such as yellow and blue, green and magenta and so on.

If you are a Lightroom user you’ve probably experimented with the very cool Split Toning tool in the Develop module. However, you can achieve a similar effect in Photoshop with just a little more work.

Here’s how to create the effect in Photoshop:

Start by creating a black and white image using your favorite tool in Photoshop. I’m using Photoshop CS4 so I’m using the Black & White filter but you could use the Channel Mixer or Hue/Saturation and drag the Saturation slider into -100.

To create the split tone effect you can use a Color Balance adjustment layer as it lets you isolate the highlights and shadows in the image and to apply different colors to each. To start, choose Layer > New Adjustment Layer > Color Balance and click to select the Highlight tones. Now adjust the color sliders until you get a pleasing color in the image highlights.

Click the Shadows tone selector to isolate the shadows in the image and adjust the color sliders to get a pleasing color in the Shadows.

If necessary you may want to select the highlights again and fine tune the color used so it complements the color you’ve chosen for the shadows.

You can consider your image done for now or you can apply a filter effect. Here I’ve created a flattened image layer by pressing Control + Alt + Shift + E (Command + Option + Shift + E on a Mac) and applied a Diffuse Glow filter (Filter > Distort > Diffuse Glow) to it before blending the layer back into the underlying image.

Helen Bradley

Monday, January 18th, 2010

Restore a file association in Windows Vista


image

Don’t ask me how I did it – it has been one of those weeks! but I somehow associated zip files with Photoshop. So, every time I needed to extract the contents of a zip file Photoshop would open and gag on the file – not unsurprising but very annoying.

A fix was required. The solution is in the Registry but it’s not hard to find or to fix. You do need to have your wits about you and never touch anything you don’t understand. Oh! and back up your registry before you start playing with it.

Choose Start > Run > type REGEDIT and click OK and then, when the warning comes up, click Continue. You have to be an admin to use this tool.

Navigate to find this key:

HKEY_CURRENT_USER\Software\Microsoft\Windows\CurrentVersion\Explorer\FileExts\

and then locate the extension causing issues, in my case zip

Then find the UserChoice option under this, right click and choose Delete. This removes any custom choice and returns your association to what it was when Vista was first installed. Problem solved!

Finally, choose File> Exit to exit the registry editor.

Helen Bradley

Saturday, January 16th, 2010

Outlook – create Your own Signature Business Card

Add yourself to your Contacts list in Outlook 2007 so you can create a Business Card to send as an attachment to all your outgoing emails.

Once you have added yourself as a contact, choose Tools > Options > Mail Format > Signatures and chose the signature to attach the card to or create a new one.

Click New if creating a new card, and from the Business Card dropdown list, choose your Contact entry to attach it as a business card to each outgoing message.

Helen Bradley

Page 1 of 3123