Friday, July 31st, 2009

Create Silhouettes in Photoshop

One feature you’ll see a lot in advertising is silhouetted images generally of people or recognisable buildings. Here’s how to capture and create a silhouette image:

To capture a photo to use as a silhouette place the subject so they are backlit. You can do this easily by positioning your subject between your camera and the sun.

You’ll need an area that is clear behind the subject so that you can cut the shape from the photo later on. You can do this on the beach in summer or find a location where you can get down low enough to shoot from and so you capture some clear sky behind the subject.

The cleaner the background the easier it will be to isolate the subject.
I shot my image from ground level looking upwards late in the afternoon with my model in shadow but with plenty of clear sky behind her.

To create the silhouette
Step 1
Open a duplicate of your image and double click the background layer to convert it to a regular layer.

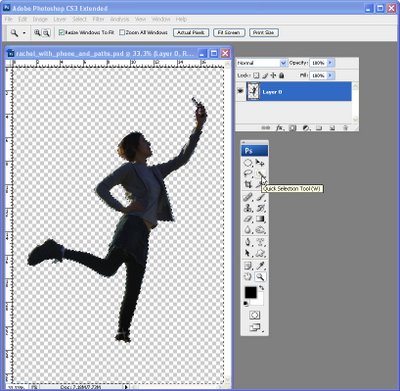
Make a selection around your subject using your favourite selection tool such as the Magnetic Lasso or Quick Selection tool.

Choose Select > Invert to invert the selection and press Delete to remove it.
Step 2
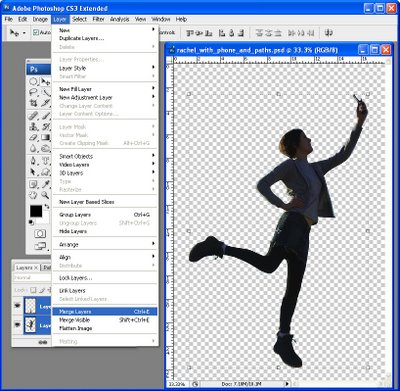
Tidy up the selection by removing any remaining background or add missing elements by selecting, copying and pasting pieces in from elsewhere in the image.

Don’t worry about matching colours – just get the outline right.

Choose Layer > Merge Layers to merge the layers. Here I copied and pasted one leg to create the one I was missing.

Step 3
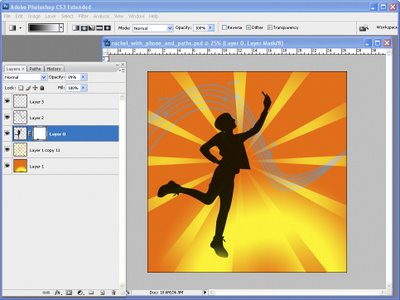
Control + Click on the layer that contains the shape that will become your silhouette.

Set the foreground colour to black and press Alt + Backspace to fill the silhouette shape with black. Add the extra details to finish your image.

In a future post I’ll explain how to create the sunburst shape.

Helen Bradley

Thursday, July 30th, 2009

Outlook 2007 – Find a Contact Address

When you need to visit an Outlook contact and when you need directions to their office, you can find them yourself using Outlook’s map option.

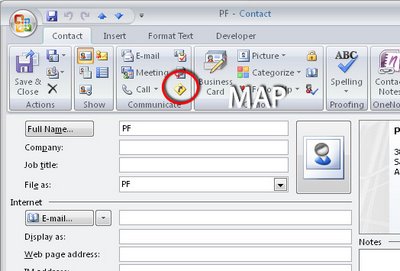
Select Contacts and open the contact’s card. Click in the Address area so you are viewing the address that you want to find directions for. On the Ribbon, locate the Contact tab and in the Communicate group click the Map option. Your browser will open to display a map of the location you selected.

Helen Bradley

Wednesday, July 29th, 2009

Excel macro – Format By Contents

You can do so much with Excel macros – they can be so powerful.

Here is a macro that formats a cell depending on its contents when you type something in it.

If you type a number, or a formula that returns a number, it is formatted one way, if you type a date it is formatted another way and if you type a word it is formatted a different way.

The macro uses the OnEntry event which fires whenever something is entered into a cell. If you attach the macro to an Auto_Open macro you’ll ensure it is run whenever the workbook is opened.

To create the macro, choose Tools > Macro > Visual Basic Editor and, choose Insert > Module to add a module to the current worksheet. Type the code into the dialog.

Sub Auto_Open()
ActiveSheet.OnEntry = “formatCell”
End Sub

Sub formatCell()
If IsNumeric(ActiveCell) Then
ActiveCell.Font.Name = “Verdana”
ActiveCell.Font.Size = 12
ActiveCell.Font.ColorIndex = 46
ElseIf IsDate(ActiveCell) Then
ActiveCell.Font.Name = “Verdana”
ActiveCell.Font.Size = 10
ActiveCell.Font.ColorIndex = 50
Else
ActiveCell.Font.Name = “Times New Roman”
ActiveCell.Font.Size = 12
ActiveCell.Font.ColorIndex = 5
End If
End Sub

Sub Auto_Close()
ActiveSheet.OnEntry = “”
End Sub

Back in Excel choose Tools > Macro > Auto_Open to run the macro the first time to test it. Provided you have Excel configured to run macros, it will run automatically every time you open the workbook in future.

To learn more about Auto_open, AutoOpen and other fun macro naming conventions in VBA, visit this blog post:

What’s in a name? Auto_Open or AutoOpen What’s in a name? Auto_Open or AutoOpen
http://www.projectwoman.com/labels/Auto_Open.html

Helen Bradley

Sunday, July 26th, 2009

Cool Photo Apps #1


Not all good applications come in big shinny boxes like Photoshop and Photoshop Elements. Many cool photo apps are available on the web and they’re free.

These apps do things that other programs don’t. They are fun to use and practical. In this Cool Photo Apps series I’ll show you some of these.

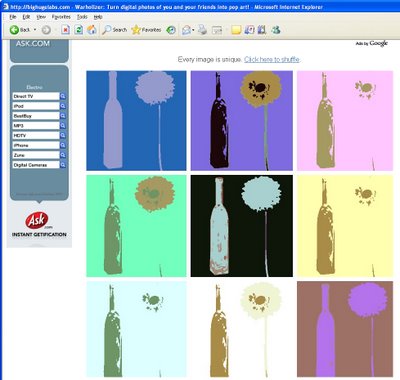
Let’s start at the online site bighugelabs.com – it has lots of good niche applications and the one we’ll look at today is the Warholizer. Find this at http://bighugelabs.com/flickr/warholizer.php. Here you can upload a photo and the site will create a series of nine mini Warhol like images from it.

If you don’t get great results, try increasing the contrast in your photo before you upload it to see if that gives you better results.

You can use the Warholizer with images you upload from those stored on your computer, you can grab pix from your Flickr or Photobucket account, or use an image located on the web by providing its URL.

Helen Bradley

Saturday, July 25th, 2009

Photoshop: Create an overlay of TV scan lines


Photoshop has a great tool for creating patterns which – on the face of it – is of little use to the average photographer. That is, until you begin to explore its creative possibilities and one of these is creating an overlay of lines on your image, much as you might see on a photo captured from a TV.

I’ll show you how to create a line pattern, how to apply it as an overlay on the image and then how to blend it into your photo for a creative effect.


Step 1
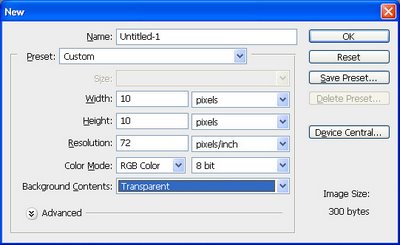
To create the pattern for the lines, start with a new Photoshop document that has a Transparent background and that is, say, 10 by 10 pixels in size.


Step 2
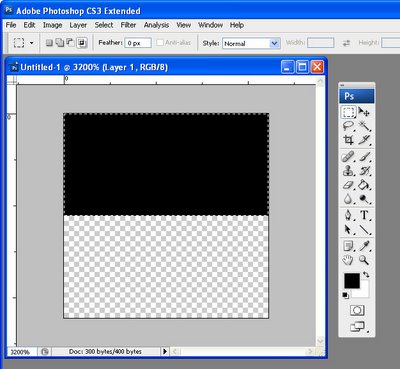
Set the foreground color to black. Zoom in to the image and select the top half of the square. Now press Alt + Backspace (Option + Backspace on the Mac) to fill the selection with the foreground color.


Step 3
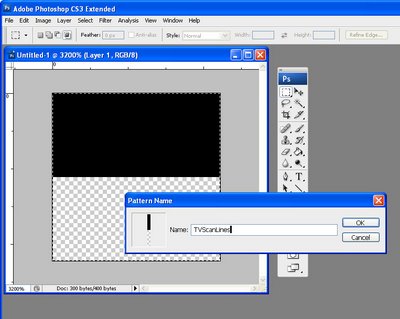
Select the image by choosing Select > All – you must select both the black and the transparent portions as together they are your pattern. Choose Edit > Define Pattern and type a name for your pattern – call it TVScanLines or something similar and click OK. Close the image.


Step 4
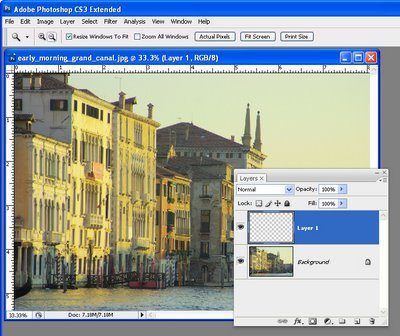
Open the image to add your scan lines to. Add a new layer for the lines by choosing Layer > New > Layer and click Ok.


Step 5
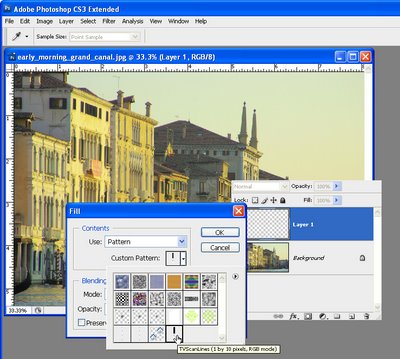
To fill the layer with the scan lines, choose Edit > Fill and, from the Use list, choose Pattern and open the Custom Pattern swatch. Your pattern will be the last in the list so click it and click Ok to fill the new layer with the pattern.


Step 6
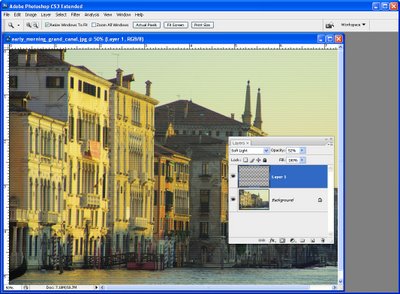
Select a Blend Mode from the Blend Mode dropdown list – something like Overlay or Soft Light generally works well. Reduce the Opacity until you get a result you like.

For this image I chose Soft Light blend mode and set the Opacity to 52%.

Tips
In step 4 you can select an area on the image and then apply the scan lines to only a portion of the image.

While this pattern isn’t so complex that it would be a nuisance to have to recreate it, many of your patterns may be more complex. To save a pattern choose Edit > Preset Manager and select the Patterns from the Preset Type dropdown list. Select the Patterns you have created and click Save Set to save them as a file on disk so you can load them again if you lose them.

Horizontal lines are not the only pattern you can use for this effect – try creating a pattern of diagonal or vertical lines or create a checkerboard one.

This process works exactly the same way in Photoshop Elements.

Ready to learn more? Here are links to two more fun and creative Photoshop tutorials:
Orton Effect in Photoshop

Make your own Photoshop brushes

Helen Bradley

Thursday, July 23rd, 2009

Excel: Monthly totals for daily data


One issue I was faced with recently was the need to calculate monthly totals for worksheet data that was recorded for every day of the month for a few years.

I had a long series of dates with corresponding data in the cells to the right which I had downloaded from the web. The data needed to be viewed as monthly totals rather than as daily values for me to have a better picture of the changes over time.

The solution to doing this quickly and easily is a PivotTable. Here’s how to do it:

1
Select all the daily data including the column headings. If you have lots more columns of data than you plan to analyze, don’t worry, just select the lot for now.

2
In Excel 2007, choose Insert > Pivot Table. In the PivotTable Field List you now need to drag and drop fields into the respective boxes on the screen.

Drag the Date field into the Row Labels box and drag the field for the data that you want to analyze into the Sum Values box.

3
This gives you a list of dates and the data on the screen and you’re over half way to your monthly totals.

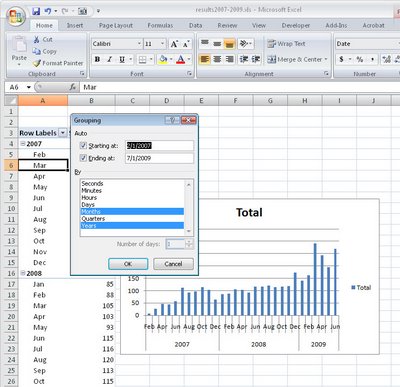
Click on one of the dates in the Row Labels column to select that cell, right-click and choose Group to display the Grouping box.

4
Click both the Month and the Years values in the list so that both are highlighted. Then click Ok.

5
Now your data will reappear grouped by the year and by the month within that year.

This allows you to analyze how the data has changed over time more easily than viewing it by day.

6
From here, to chart your data, click somewhere in the PivotTable, choose Insert > and then from the Chart area on the Ribbon click the Column option to create a column charts.

Select the chart sub-type and you’ll create a chart displaying the monthly totals from the PivotTable.

A PivotTable, while a little harder to get a feel for creating than a typical Excel formula, is actually the quickest and easiest way to summarizing this type data.

Helen Bradley

Wednesday, July 22nd, 2009

Photoshop does Merge to HDR

While Photoshop’s HDR merge tools are not as sophisticated as those of, for example, Photomatrix Pro, if you have Photoshop then you can use the merge to HDR option to create an HDR image from multiple exposures that you have taken of a scene.

You’ll need 3 or more images all at different exposures. I used 5 for the example shown here and all were shot using a tripod with IS turned off!.

Here’s how to assemble the images in Photoshop:

Step 1
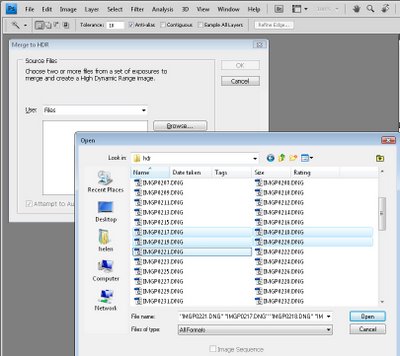
Choose File > Automate > Merge to HDR and click Browse and select the files that you want to merge.

Alternatively, if you have the files open already in Photoshop, select this same option and click the Add Open Files button to add the open files to the list.

Enable the Attempt To Automatically Align Source Images checkbox and Photoshop will align the images if they are not perfectly aligned.

To progress, click Ok.

Step 2
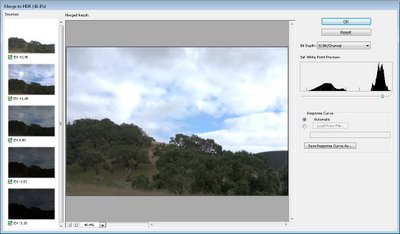
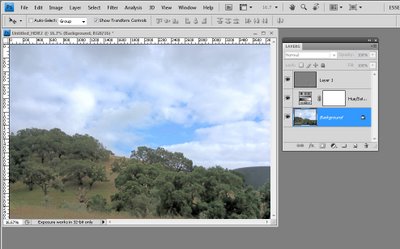
When the images are processed you will see your images combined to a single 32-bit image.

You’ll see a histogram in the top right corner which allows you to preview areas of the image. By dragging on the histogram you can see the lights and darks in the image. Drag the histogram to the far right and you’ll see all the shadow detail; drag it to the far left and you’ll see all the highlight detail.

Position the slider at an average position in the image and click Ok.

Step 3
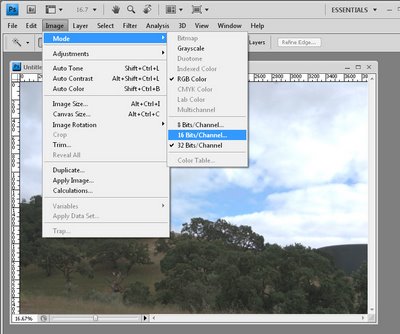
This opens the image as an HDR image at 32-bits per channel inside Photoshop. You can’t actually do anything much with this image as it is so you’ll need to convert it to an 8 or 16-bit image.

To do this, choose Image > Mode > 16 Bits/Channel.

Step 4
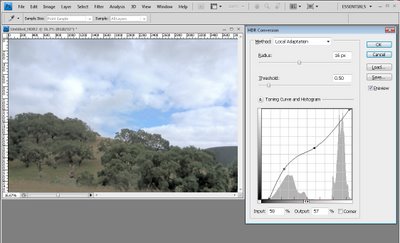
When you do this you will see an HDR Conversion dialog.

From the Method dropdown list, select Local Adaptation and make sure the Toning Curve And Histogram chart is shown.

Here you will fine tune the image. Drag the leftmost edge of the curve line in to the right so it touches the beginning of the darks in the image – this ensures you have some true blacks in the image.

Do this also for the highlights so that you get some true highlight areas.

You can then adjust the curve to your own preferences.

For this image, I wanted more lightness in the shadow areas and not so much in the lighter areas so I dragged the curve to give this result. This results in pleasing detail in the hill area as well as in the clouds.

Your artistic requirements for your own images will be different so adjust the curve until you get the detail in the image that you want to see.

When you’re done, click Ok.

Step 5
You now have a 16-bit image and you can go ahead and make the additional adjustments to it.

For example, I added a Hue/Saturation Adjustment Layer to boost the saturation in the image and then flattened the image to a single layer and applied a High-Pass Filter to it at a low radius to sharpen the image. The high-pass filter layer is set to Soft Light Blend Mode to finish the result.

If you want to save the image as a JPEG you’ll need to render it as 8Bits/Channel now to save it.

Helen Bradley

Wednesday, July 22nd, 2009

5 tips for taking Great Summer Photos

Summer is here and the warm weather brings with it good photographic opportunities. There are plenty of things to shoot and, if you’re lucky, you’ll be traveling to fabulous places, new and old, for your holidays. To ensure that your summer photos are all they promise to be, here are some summer photo shooting tips that will guarantee good photos even in the most challenging of conditions.

1 Warm your images
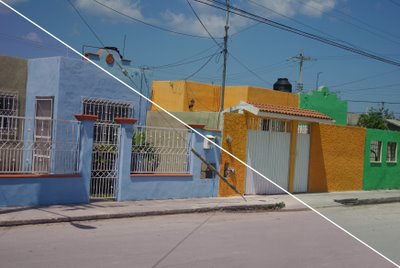

The harsh summer sunlight, particularly in the middle of the day, throws a bluish cast on your images which, in spite of the heat that you’re shooting in, actually makes them look cold.

Luckily, you can easily warm them up and make them more inviting by changing your camera’s settings. This works well for summer portraits and for landscapes too. To do this, set your camera’s white balance setting to Cloudy even though you are shooting in full sun.

The cloudy setting compensates for the blue-green cast of filtered sunlight and gives your images an instant subtle pink/orange cast which is more attractive and inviting.

2 Summertime is flash time


Although it sounds counterintuitive and you would think that in the bright summer sunlight the last thing you need is your camera’s flash, in fact it is the first thing to know how to set properly.

Your camera’s flash will not fire on a bright sunny day if you are shooting something which is lit behind by a strong backlight, for example a person at the beach. Your subject will be thrown into deep shadow unless you use the camera’s flash.

The camera’s flash provides a fill light which lights your subject without affecting the background which is too far away to be affected.

To use the flash to provide fill light for your subject you must set it so it is forced to fire. Use this forced flash too if you’re sitting in a shady position with a light behind your subject such as sitting under an umbrella. Without the flash you’ll get harsh shadows and with the flash you’ll get a much more attractive portrait.

3 Crisp blue skies


When everything is very bright around you, the camera has a lot of trouble capturing the full amount of tonal detail in the scene. Quite often you will find that what was a bright crisp blue sky looks anything but that color when you get the photographs home.

If you are using a digital SLR camera invest in a polarizing filter for shooting in bright sunny conditions. The polarizing filter filters our reflected light so the camera captures only light coming directly into the lens. The result is that your colors will look more saturated and brighter.

The polarizing filter must be adjusted for the best results so, when you look at it, check for a small mark on it indicating its start position. Twist the filter a small distance to the left or right to fine tune the effect of the filter until you get a look that you want.

4 Photographing at the beach


If you’re sunning yourself on the beach this summer you will have plenty of opportunities for capturing great photos. Use your camera’s macro setting to capture small details in the shells washed up along the shoreline.

If you are clambering through rock pools a polarizing filter will let you capture the details in the bottom of the rock pool by minimizing the reflections bouncing back off the surface of the water.

If you are looking for a challenge, feeding gulls will give you practice at capturing images of birds in flight. Set your camera to a fast shutter speed and follow the movement of the bird with the camera to get best results. So the bird does not fly out of the frame, reduce the zoom on the camera so you capture the full bird rather than risk losing a wing tip for example because the bird has moved. You can always crop the image later on to get in closer.

5 Shooting in tourist locations


If you’re off to popular tourist destinations for your summer holidays you’ll get plenty of photographic opportunities. You’ll also come up against the problem of capturing both the monument and the person in front of it both in focus.

If you’re using a digital SLR, set the aperture to a value around f16 or f22. This ensures that everything in the image will be in focus. On the other hand if you want the person to be in focus and the monument attractively out of focus, set the aperture to around f2.8 or f3.6. Make sure to focus on the person and use the camera flash to light their face. With a large aperture like this you will get a small depth of field around the subject with everything else in the image thrown out of focus.

Whenever you want to capture a very large object like a monument and a person in front of the monument, you run the risk of capturing the monument at a good size and the person will be so small as to be almost unrecognizable in front of it. There are a couple of ways to avoid this happening. One is to bring the subject very close to the camera so that you get both at good size in the image. The other is to take more than one photo.

Capture the monument at full size and then place your subject closer to the monument in front of an area which has interesting detail in it. Take the second image this time focusing on the portrait aspect and using the monument details as a pleasing background.

Helen Bradley

Monday, July 20th, 2009

5 Lightroom mistakes to avoid

If you are new to working in Lightroom your first few weeks will be a steep learning curve. Here are my top 5 mistakes to be aware of and avoid when you’re starting out. I hope they’ll save you wasting time, getting frustrated and generally tearing your hair out.

1 Think – Navigate on the left – Keyword on the right.
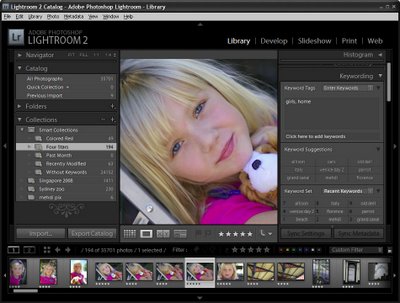
Ok, so this isn’t exactly true but basically, in the Library module, your navigation options are on the left and bottom of the screen and the Keywording options are on the right.

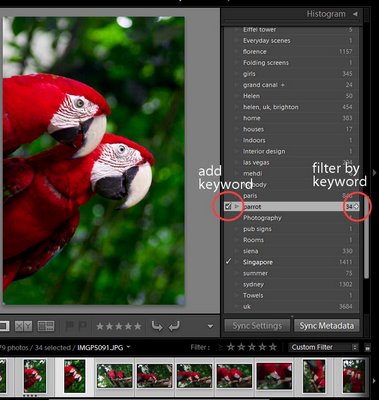
The typical mistake you’ll make is to open the Keywording or Keyword List areas of the panel on the right and click on a checkbox for a keyword or click one of the keyword sets thinking that somehow this will select and display images with those keywords – Not so! Instead you just added those keywords to the selected image or images.


You can filter by keyword using the Keyword list in the panel on the right and you do so by clicking the small arrow to the right of the keyword – that switches to display all the images with this keyword.

2 Don’t move your photos – except in Lightroom.
This is a biggie. Once you bring images into Lightroom, Lightroom tracks where they are on disk. If you delete or, worse still, move the images from one folder to another one, the links inside Lightroom will be broken. If you rename your folders then the links to them and to the images in them will be broken too. In a very short time you can wreak havoc on your Lightroom catalog – this is the voice of experience speaking here! In short, once your photos are in Lightroom, manage them in Lightroom.


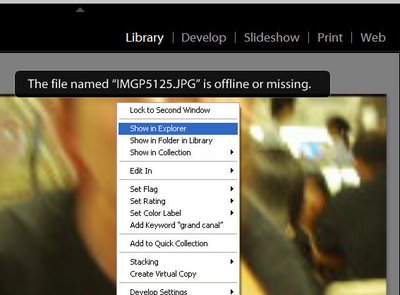
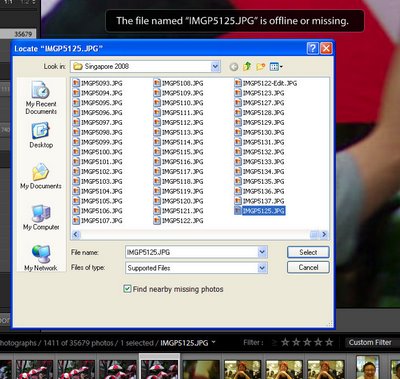
If you break the links to your photos, Lightroom will still display the previews and it will tell you the “The file named xxx is offline or missing”. If you moved the image, right click it and choose Find in Explorer and you can then click Locate and browse to locate the folder you moved it to.


When you locate the missing image, click it to select it and also enable the “Find nearby missing photos” checkbox as chances are if this image has been moved other photos in the same area of the catalog will have moved too and Lightroom will now locate and update their details in the catalog too.

3 Don’t by pass a valuable organizing opportunity


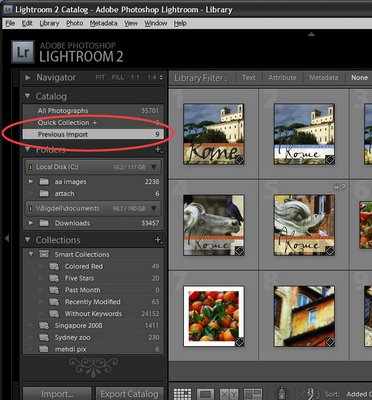
When you import images into Lightroom they’re immediately added to a new category called Previous Import. They stay there until you import more images. Having all your newly imported images in a single collection lets you do things with them such as adding keywords, sorting them, moving them into new folders and even preprocessing them as a group and without having to search for them.

However, you’ll need to do some fancy footwork if you want to bring in more than one set of images into Lightroom and to manage them all at once using this temporary catalog. One such situation would be where you capture two or more cards of related images at a time such as a wedding or other event, or photo walk.

In this situation, you can avoid losing the benefits of the Previous Import catalog by dumping all the images from multiple cards into a single folder on your disk outside Lightroom and then import the folder of images into Lightroom. Now all the imported images will appear in the Previous Import catalog and you can organize and pre-process them as a group. They stay in this category even if you close Lightroom and reopen it and only disappear when you import another set of images.

4 Don’t make work for yourself


When you capture a number of images in a single location or with a particular light you can batch process them in Lightroom and save yourself hours of work. To do this, choose one representative image from the group and use either the Quick Develop tools in the Library module or switch to the Developer module and make your initial fixes there. Fixes that you might apply to a sequence of images include White Balance, Exposure, Recovery, Fill Light and Blacks. Remember you don’t have to get it 100% right, just better than it was.

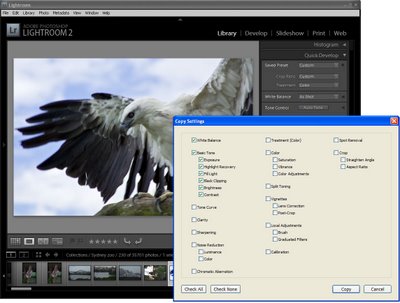
When you’re done, right click this image and choose Develop Settings > Copy Settings and select the settings that you have just made to the image and that you want to copy and click the Copy button. Now select the other images in the sequence, right click and choose Develop Settings > Paste Settings to paste these changes onto all the selected images. These changes give you a starting point for your work in Lightroom.

5 Don’t risk losing your sidecars
If you’re working in Camera RAW (not DNG) any changes you make to an image in Lightroom are stored in the sidecar XMP file for the image – because it is not possible to write data into a proprietary Camera RAW file. So, when you send a RAW image to someone else they can’t see your edits unless they have the sidecar XMP file that goes with it. Long term you need to make sure your RAW files and their XMP files always stay together.

Because of this, many users prefer either to capture in the non proprietary DNG format rather than Camera RAW if their cameras offer this as an option or to convert to DNG as the RAW image files are imported into Lightroom. Converting to DNG rather than working in Camera RAW ensures that changes can be stored in the DNG file making it easier to manage your images now and in the future.


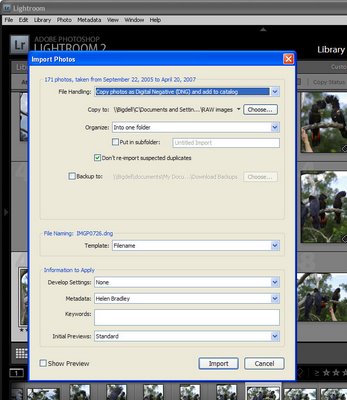
To convert to DNG as you import your files, choose File > Import Photos From Disk and select the folder or files to import. When the Import Photos dialog appears, choose the “Copy photos as Digital Negative (DNG) and add to catalog” command and then choose a folder to store them in. Complete the remainder of the dialog options and click Import to import and convert them in the one step.

Helen Bradley

Page 1 of 3123