Monday, February 25th, 2008

Leading zeros in Excel

This is a fun solution. You want to put a series of numbers in a range in Excel and you want them to have leading zeros. So you want, 001, 002, 003 etc. Problem is that Excel drops the zeros when you type them. It makes sense, leading zeros aren’t required and really don’t aid comprehension. However, for your own reasons, you want them.

Here’s how to do this:

Select the cells and choose Format > Cells > Number tab. Select Custom from the Categories list and in the box marked Type:, type this:

00#

This tells Excel that there must always be 3 digits showing which forces leading zeros to be displayed. It doesn’t do anything to the numbers so they are still numbers which is just as you would want it to be.

Helen Bradley

Tuesday, February 19th, 2008

Color and activity

It’s hard to find a single phrase to define Hong Kong. You can be horrified by the pollution or captivated by its industry. You can long for the days of British rule or you can wonder at its cultural contrasts – a snippet of UK and a bucket load of eastern magic.

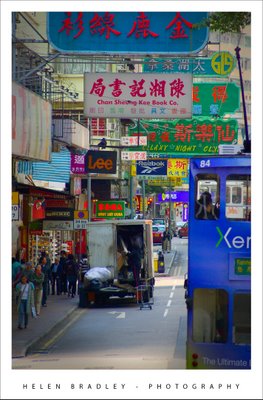
These narrow streets along Hong Kong Island were my favourite places. The trams are so beautiful, decked out as they are in advertising, each of them so different from the next and the street signs, brilliant and light by night, duller by day, an eclectic mix of Chinese characters and signs so familiar such as Lee jeans.

This image didn’t need much work. I just brought the colours out to lighten and brighten the signs then added a very subtle edge effect. This darkened vignette effect isn’t noticeable unless you look for it but it edges the photo, subtly keeping your eye in the middle where the action is by creating a slightly darker border around it.

To create a vignette frame effect, finish editing the photo and then add a new empty layer to the top of the Layer stack. Make a selection using the Rectangular marquee tool around the inside edge of the image. Invert the selection so you have just the edge selected and fill with a dark gray or a dark brown. Then deselect the selection and apply a really big blur to it – the Gaussian blur filter is the best choice here – you don’t want to see any edge left.

Now, adjust down the opacity of this top layer so that it blends with the image below. You want to be just able to see the effect darkening the edge of the photo when you look for it but not if you don’t – if that makes sense!

Helen Bradley

Tuesday, February 19th, 2008

Calibrate your HP Tablet screen

I am the happy owner of a HP T1000 tablet but till today I had a screen that was a bit off. The stylus had to be used just to the left and a little up of whatever you wanted to select – very annoying indeed. The problem should have been easily resolved, simply recalibrate the screen. Duh! but where is the recalibrate option? I don’t know. I checked the Control Panel and the pen tools. There is plenty of information on how to use the pen and how to flick and tap it, but no detail on how to make the screen work properly with it.

My screen has been out of calibration for some time now. Finally, today I found the solution. Choose Start > All Programs > Tablet PC Settings and click the General tab. There you’ll find the Calibrate button – click it and then calibrate the screen and save the resulting settings. Easy when you know how but devilishly hard to find when you don’t.

Helen Bradley