Wednesday, April 30th, 2008

Sorting data in Excel

Sometimes the data in your worksheet doesn’t appear in the order you want it to. You can reorder the data by sorting it.

To sort data in a worksheet, select it using your mouse, or click inside the data area and press Control + Shift + * to select all the cells in the current block. In Excel 2003, choose Data, Sort and then choose the column which contains the data to sort from the Sort by: dropdown list. To sort on more than one column choose the second column from the dialog’s Then by: dropdown list. For example to produce a ‘phonebook’ type of sort, first Sort by the column containing the last name and Then by: the column containing the first name. If you do this, two people with the same last name will be grouped together but appear in alphabetical order by first name.

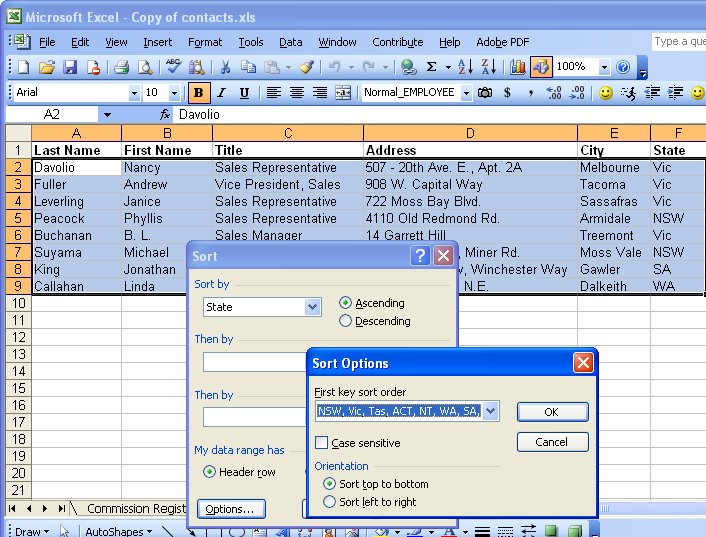
You can also sort in order of a custom list. So, for example, if you wanted all the people who live in Victoria to appear at the top of a list then those who live in NSW, etc.. create a custom list with the state names (or abbreviations) in the order you want to use for sorting. Then choose the State column in your data list as the Sort by: column and click Options. From the First key sort order dropdown list choose the custom list containing the state details and click Ok, and Ok again. The list will be sorted in order of the entries in your custom list and any entries which don’t match an item in the list will appear at the end, in alphabetical order.

Helen Bradley

Saturday, April 19th, 2008

Kiosk Presentations

You’re not always going to be there when a presentation shows. Some PowerPoint presetations are shown on computers where not one is in attendance or you might want to send an autorunning slideshow to mum to show off your latest pix.

These work if they’re set up as Kiosk presentations. You need to set the presentation so the slides more forward after a period of time and not by mouse click. Do this on the PowerPoint 2007 Animation tab. Then choose the Slide Show tab and click Set Up Show. Choose Browsed at Kiosk and make sure the Advance slides option is set to Use Timings if present. The the show will run automatically without needing attention.

There you have it, hands free PowerPoint slide shows.

Helen Bradley

Saturday, April 19th, 2008

French Quarter

I have never been to New Orleans, so this is a first. The mighty Mississippi has to be seen to be believed, it’s huge. I haven’t seen a river like that before – ever. You can hardly see from one side to the other and the river dwarfs the paddlesteamers and the container ships that plow their way up and down.

We spent a morning in the French Quarter, dubbed the “sliver by the river” and the “isle of denial” by locals as it remains less touched by the ravages of Katrina than other areas. We ate beignets at Cafe du Monde which is the quintessential New Orleans experience. Beignets are wonderful doughnut like square pastries piled high with powdered sugar which ends up everywhere – over your face, over the table and everywhere in between. Topped off with Cafe au lait, it’s not to be missed.

Fresh from California, where signage is in English and Spanish, here it is English, French and Spanish and it’s the deep south so it’s hot, marshy and humid but so very compelling in it’s own way.

This guy was playing the trumpet raising money to rebuild his church. He was very funny and, to my delight, only too happy to let me capture some photos which I’ve promised to send him with an invitation for him to use them on his next album cover… who knows?

I had to work to get the exposure right, shooting from a covered area into a bright street was challenging and he was wearing that wonderful cap which added to the problems of lighting him without using a distracting fill flash. I had to use Curves to enhance the darks as the +2 exposure compensation muddied the blacks and blew out the highlights. The Photoshop Shadow/Highlight tool brought back enough detail in the highlights to give the images the richness I wanted to see.

Helen Bradley

Wednesday, April 16th, 2008

Too cool for school

Everyone gets captivated by IR photography, right? The wonderful inverted black and whites are just too cool. Traditional IR photography is a pain in the bum. You have to put this filter over your camera lens to filter out visible light so you only get IR. Trouble is your digital camera is designed to capture visible light not IR, and digital cameras have a hot mirror filter to deliberately block IR. In all, it’s a recipe for frustration. You can’t see to check your focus or to compose your shot and you have to take really long exposures so you have to use a tripod. Forget about capturing a scene with things that move.

But, the news isn’t all bad. This image was shot with a brand new (albeit without any warranty remaining) Canon SD870 point and shoot. There is no warranty on this camera any more because 5 minutes after I bought it I shipped it to Lifepixel.com who pulled it apart and rebuilt it as an IR point and shoot. So, it captures IR, not visible light. And, because the camera is customised and only captures the light you’re wanting to capture, you can focus it, compose your shot in the viewfinder, adjust ISO and shoot moving objects – how amazing is that? I’ve only had a few minutes to test it so I took it down the road to shoot the hills and some farmland. I’m taking it to Mexico this week too.

Helen Bradley

Tuesday, April 15th, 2008

Hong Kong Trams

One of the most wonderful things about Hong Kong is its cultural and social diversity. Along side this tram is a person on a push bike – with a basket full of things they are pedalling around town. It’s a sight you see a lot, high rise buildings, wealthy people contrasted with push bikes and mountains of laundry hanging off the sides of buildings. Gotta love this place, I certainly did.

This image needed more contrast and a bit of tweaking on the colour side to highlight its delicious pastels. My contrast fix of choice is now, officially Curves in Photoshop. But these aren’t your dad’s curves or your mums! They are curves on steroids – select the channels R,G and B and adjust each of them to get the best contrast in the image, just don’t look at colour – look at contrast. Then, when you’re done, you did apply your fix on an Adjustment layer didn’t you? Set the Adjustment Layer blend mode to Luminosity. Notice how the wonky colours disappear and your image’s contrast is adjusted perfectly? Luminosity blend mode applies the change to the image’s luminosity (lights and darks on a grey scale) and keeps it away from messing with colour – Like I said, not your mum and dad’s curves.. these are for real Photoshoppers!

Helen Bradley