Thursday, May 31st, 2007
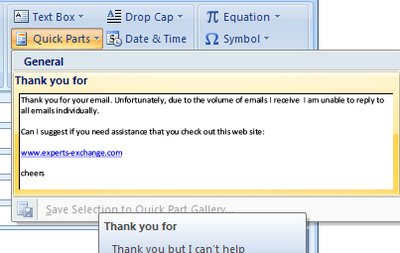
Ever get that sense of deja vu – you’ve said this before.. oh so many times? Office has never had a good tool for managing blocks of text that you use repeatedly. The is AutoText and AutoCorrect but they’re not highly visible or intuitive. In Office 2007 another tool is thrown into the mix. The jury is out on whether this is a good thing or just another option that isn’t properly thought our or implemented. Anyway, it’s worth testing out to see if it works for you. BTW the technical term for text you use over and over again is boilerplate text… not sure why, but there it is!
In Word, for example, type and select the text that you use a lot and, on the Insert tab choose the Quick Part option. You can save the text and later insert it using the same tool – it’s kinda nice that the tool shows you the full text before you insert it.
Interestingly the same feature is available in Outlook 2007 where it just might be a litte bit more use.
Helen Bradley
Labels: boilerplate text., Outlook 2007, Quick Part, Word 2007
Categories:Uncategorized
posted by Helen Bradley @ 3:28 pmNo Comments links to this post
Wednesday, May 30th, 2007
I need to meet with you. I know when I’m free I don’t know when you are. To avoid the “Can you do it this time?” “No. What about?” discussion you can send an outgoing email with your calendar in it so your recipient can see when you’re free and plan accordingly.
The proviso for this is you need to be using Microsoft Exchange so it’s the sort of thing you can do at work but unlikely you will be running exchange at home. To do this, in a new message dialog, click the Insert tab and select Calendar. You can then choose just how much calendar to send, just your available spaces or everything… it’s up to you.
Helen Bradley
Labels: Outlook 2007, share calendar
Categories:Uncategorized
posted by Helen Bradley @ 3:14 pmNo Comments links to this post
Tuesday, May 29th, 2007
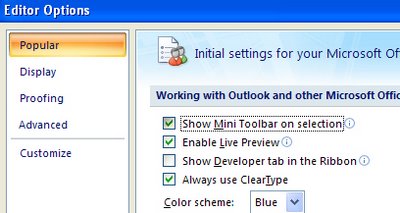
If you don’t like the new mini toolbar that appears when you right click something in an Office 2007 document, you can axe it. You can’t customize it, you can’t add or remove anything from it but you can zap it.
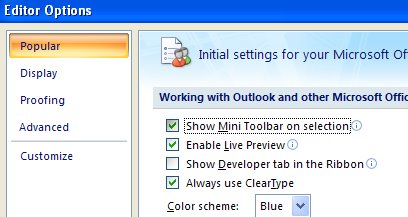
In Word 2007, PowerPoint 2007and Excel 2007 you do this by clicking the Office button and choose the Options link at the foot of the dialog. In the Popular group you will disable the Show Mini Toolbar on selection checkbox.
The steps are a little different in Outlook 2007 in Outlook, you need to open an element that uses the new Ribbon interface such as a new message window. Now click the Office button, Editor Options and disable the Show Mini Toolbar on selection checkbox.
If you want it back at any time, just reverse the process.
Helen Bradley
Labels: mini toolbar, Office 2007
Categories:Uncategorized
posted by Helen Bradley @ 2:51 pmNo Comments links to this post
Saturday, May 26th, 2007
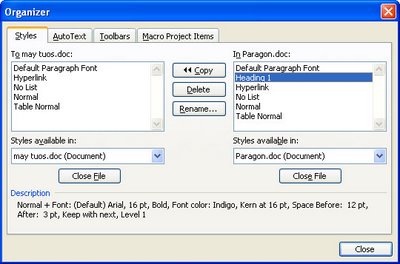
If you often work on documents that need to use custom styles, you can easily copy the styles from one document to another – if you know how. Since you’re reading this, you’re about to be invited into the inner circle of knowledge.
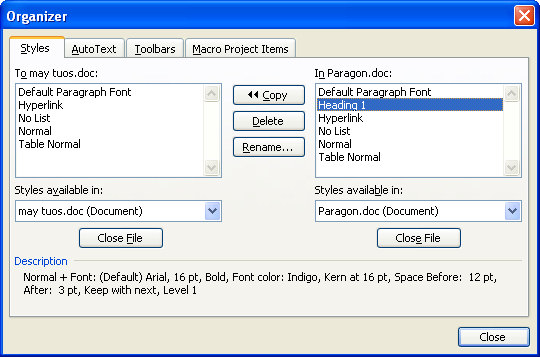
So, start with the document open into which you want to copy the styles. Choose Tools, Macro, Macros, Organizer – yep! sounds weird but it works!
Now click the Close file button on the right to close Normal.dot and then click Open File and browse to find the file to copy the styles from. If this is a regular file and not a template, you’ll have to select the correct file type from the Files of Type list. When you open your file, click the Styles tab and you can select and copy styles from one document to the other. Simple when you know how?
Helen Bradley
Labels: Copy Styles., Word 2003
Categories:Uncategorized
posted by Helen Bradley @ 4:04 amNo Comments links to this post
Friday, May 25th, 2007
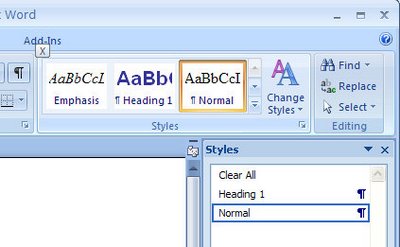
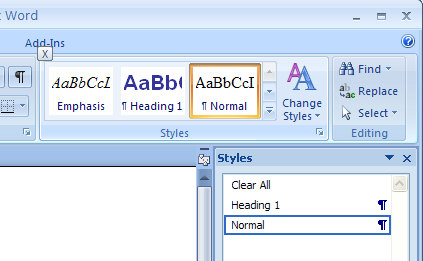
The Styles task pane in Word is a handy way of tracking what styles are applied to a paragraph and for formatting text with styles. You might be wondering if the Styles task pane is totally missing it in Word 2007. Don’t worry – it is still there, you just have to find it.
Click the Home tab and locate the Styles group. Click the indicator in the bottom right corner to open the Styles dialog – voila! just what you need. To dock it so it sits permanently on the right of the screen, double click its title bar. You can also display it by pressing Control + Alt + Shift + S.
Helen Bradley
Labels: Style Task pane, Word 2007
Categories:Uncategorized
posted by Helen Bradley @ 4:16 amNo Comments links to this post
Wednesday, May 23rd, 2007
As an extension to yesterday’s tip my preference for moving items around a Word document is to hold the Shift and Alt keys together and to use the Up and Down arrow keys.
This moves a paragraph up and down a document or, if you have more than one paragraph selected, it moves all of them up and down a document.
If you do this inside a table you move the table row up and down the table – neat but there’s more to come. If the table row moves past the top of a table it is broken out of the table and it becomes a table all of its own. Move some table rows from one table down into another table and they’re automatically incorporated into the second table. It’s an amazingly simple yet effective way of moving things around a Word document.
Helen Bradley
Labels: Microsoft Word, Moving paragraphs, table rows
Categories:Uncategorized
posted by Helen Bradley @ 7:35 pmNo Comments links to this post
Tuesday, May 22nd, 2007
My friend Theda and I were talking the other day about a project she’s working on where she has to reorder a lot of items into alphabetical order and, in some cases, an order which is not alphabetical.
While she is doing the project in Microsoft Excel there are, of course, difficulties in Excel in moving items around as Excel does not, by default, open up a row when you choose to move an item from one part of the worksheet to another – instead, Excel thinks you want to overwrite the target cells – as if!
There is, however, a way to do this which opens up the space for the new row and which closes up the space that you have just made available. To do this select an entire row or range of rows in Excel by clicking on the row number or numbers. Hold your mouse over the dark outline around the rows and hold the Shift key as you drag the rows to their new position. The empty space that you have created will be closed up and a new space will be created between the other two rows for your item.
Problem solved!
Helen Bradley
Labels: Excel 2003, Excel 2007, Moving rows
Categories:Uncategorized
posted by Helen Bradley @ 7:22 pmNo Comments links to this post
Monday, May 21st, 2007
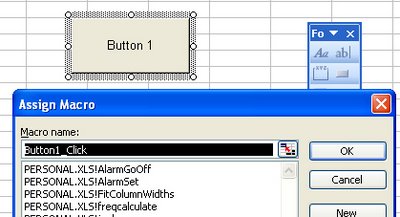
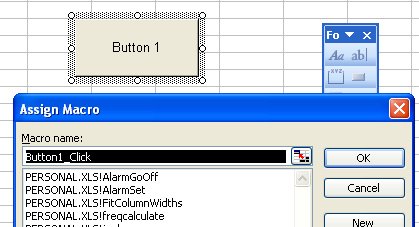
I love the form tools in Excel they let you do so many cool things. One thing I love to do is to make buttons run my macros. To do this, use the Forms toolbar, click the Button tool and drag to create a button on the worksheet. When you do, a dialog appears with all your macros listed so you can select the one to use. You can also edit the text on the button and when you’re done simply click it to run the macro – sweet huh?
If you’re using Excel 2007 you have to add the button tool to your Quick Access toolbar (it’s in the Commands Not In The Ribbon group and it’s called Button (Form Control).
Helen Bradley
Labels: button, Excel 2003, Excel 2007, Form control
Categories:Uncategorized
posted by Helen Bradley @ 6:42 pmNo Comments links to this post
Sunday, May 20th, 2007
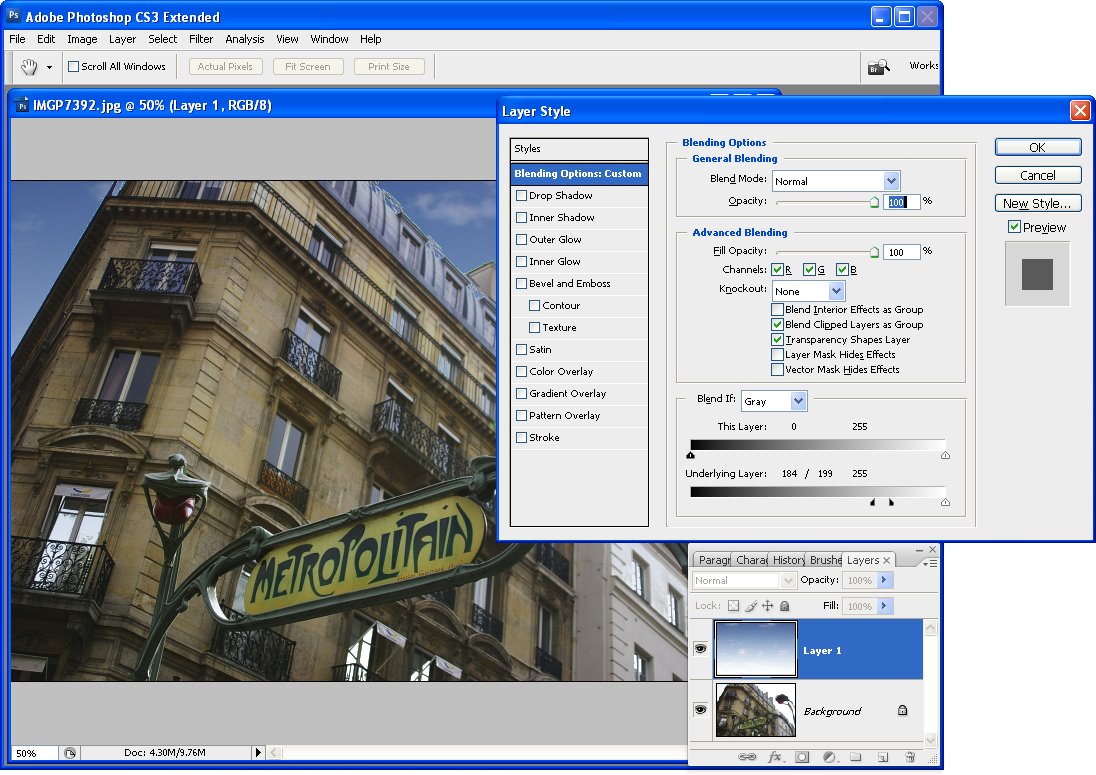
It seems to be one of those things that people are least satisfied with – the sky in their photos. It’s all too easy to shoot a wonderful image on a sunny day, there’s not a cloud in the sky and it’s blue, blue, blue. However, when you return home the sky in the photo you took is dingy blue white – yuck, yuck, yuck. It’s disappointing and it doesn’t have to happen.
If you’re shooting with a digital SLR invest in a polarizing lens and use it! It will make your skies deliciously blue. You can also get these lenses for many point and shoot cameras, I have an adapter and a polarizer on my Canon 3S IS and it all just snaps into place.
If all else fails, take a series if good photos of just sky when it’s not so bright and keep these in a “spare skies” folder. Then, when your sky isn’t all you want it to be, like my old car, you simply search out a spare part – replacement sky for it. To use it, visit my new Photoshop skies tutorial – don’t be fooled by the title, there’s a great 6 step by step solution at the foot of the page.
Helen Bradley
Labels: Blend If, Photoshop, Replace a sky
Categories:Uncategorized
posted by Helen Bradley @ 8:10 pmNo Comments links to this post
Saturday, May 19th, 2007
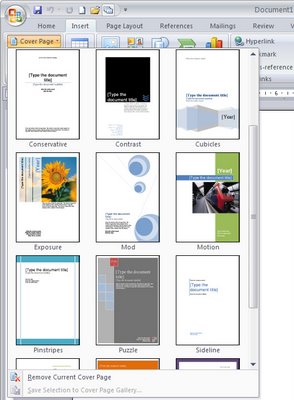
There’s a lot to love about the new Word 2007 and one of those things is the new Cover Pages tool. Cover pages are an all important introduction to your documents – they sit on the front of your document and they’re the first thing someone sees when they view your work. They should say all sorts of things about your professionalism and your style. If they’re plain and dull, they (and you) deserve better. Now there’s no excuse for plain ol’ cover pages.
When you’re next in the market to create a document of any more than two or three pages, check out the Cover Pages options. Click the Insert tab and choose Cover Pages. A gallery opens up and you can choose the page of your liking. It appears as a new first page for your document complete with places already marked into which you can type your information. Click and type and you’re done – simple, effective and a ‘must have’ solution for better business documents.
Helen Bradley
Labels: Cover Page, Word 2007
Categories:Uncategorized
posted by Helen Bradley @ 1:59 amNo Comments links to this post