Articles | Photography Blog | Office Tips Blog | about me | e-mail

Helen Bradley - Photoshop and Lightroom tips and techniques

I'm Helen Bradley - I'm a photographer and Photoshop professional. In this Photoshop and Lightroom blog you will find powerful Photoshop and Lightroom tips, tricks and techniques that will help you get more out of both programs. You will also find step by step guides for working creatively with your photos in Lightroom and Photoshop and any other cool applications I know you will be interested in knowing more about.

Monday, May 11, 2009

Lightroom: Spot fixing with the Adjustment Brush
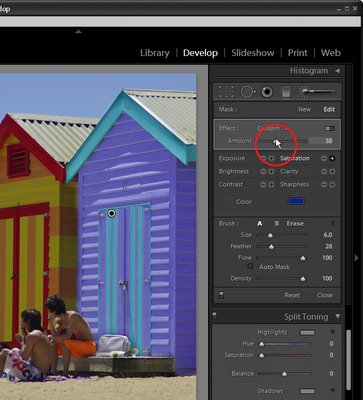


One of the exciting new features in Lightroom 2 is the adjustment brush which lets you to make spot fixes to your image in Lightroom. These fixes apply to only the area you select rather than the entire image. This means you can make local adjustments for contrast, saturation, exposure, brightness, clarity and sharpness without having to take the image to Photoshop to do this.

In this post I'll show you how to get started using the adjustment brush in Lightroom. 2

Step 1
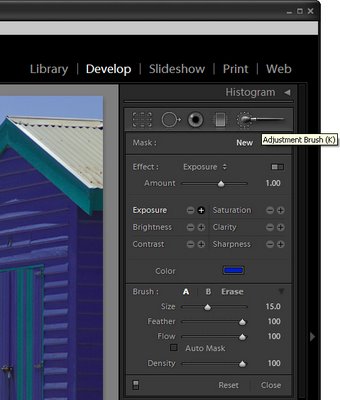
Open Lightroom and click the Develop module. Locate the Adjustment Brush and click it to select it. Hold the brush over the image to check its size. The inner circle is the hard part of the brush and the outer circle shows the edge of the feathering. To adjust the brush size use the [ and ] keys or adjust the Size and Feather using the sliders.


Step 2
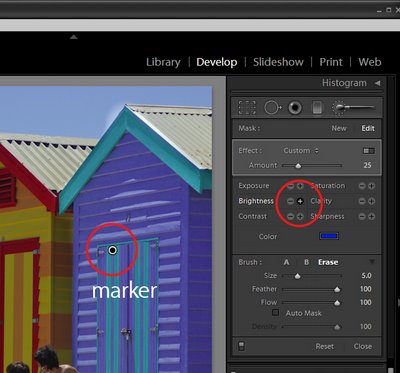
Select the adjustment to make, such as Brightness or Saturation by clicking its + symbol to increase its value or the – symbol to decrease it. Then start painting on the image to adjust that part of the image. When you start painting the effect onto the image, Lightroom places an identifying marker on the screen. Here I have Brightness selected and the marker is visible.


Step 3
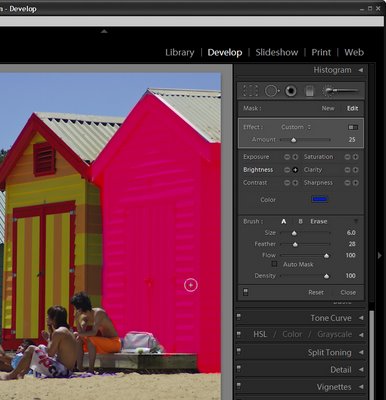
If you don't know where you have painted – and it's often very hard to know exactly - press the O key to view or hide a mask which shows the area you have painted on. If you prefer to, you can display the mask as you work. The mask also appears if you hold your mouse over the marker.

To erase the brush strokes, click the Erase option in the brush area and erase over the area to remove the strokes. To return to painting click brush A which is the default brush and continue to paint over the area. You can also use the brush with the Alt (Option on the Mac) to remove the painted areas rather than switching between the brush and eraser.


Step 4
If the effect is too much or too little you can adjust the intensity of the effect using the slider.

Step 5
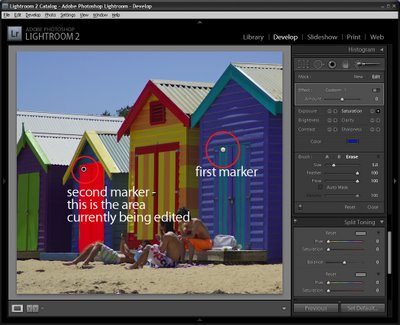
If another area of the image requires fixing, click the New option and then repeat the steps to select a fix and then paint it onto that part of the image. Later on you can adjust either of the fixes by first clicking the Adjustment Brush tool to select it and then click on the marker for the area to change – you will see that the word Edit is now highlighted - and you can now adjust the painted area or adjust the amount of the fix.

In a future post I will look at some more advanced functions of the Adjustment Brush.

Labels: , , , ,

Wednesday, February 25, 2009

Photoshop: Fixing photos shot from airplanes


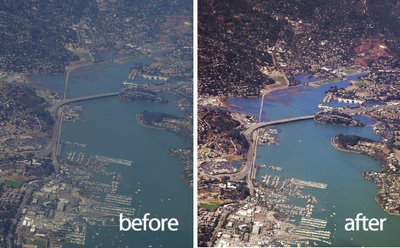
One of the cool things about getting a window seat in an airplane is that you get a unique opportunity to photograph things from a high vantage point. On the flipside, when you get them home you often find photos taken from the air look washed out and the colour is poor. Luckily there is not much that Photoshop can’t recover provided the photographs are in focus. So if you scored a window seat lately and if you have images that fix, I'll show you the Photoshop tools you need to fix them.

Understand the problems
Most airplane photos look washed out and they don’t have the richness of colour that you might expect them to have. The first step in fixing them is to boost the tonal range in the image using a levels adjustment - a by product of this is that the colour gets a boost.

Step 1
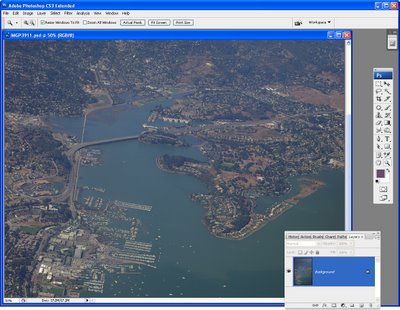
Start by making a duplicate of the background layer so that you're working on a copy in case you need to refer to it later on. To do this, right click the background layer in the layers palette and choose Duplicate Layer.


Step 2
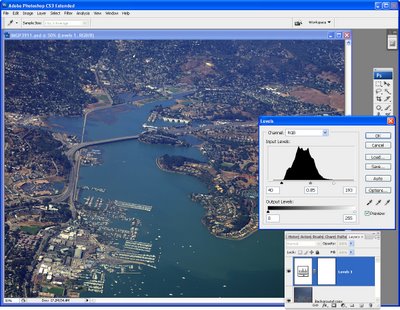
Select the background layer and choose Layer > New Adjustment Layer > Levels and click Ok. The Levels histogram tells you a lot about the state of your image. In most cases you’ll lack white whites and black blacks and most of the image content will be around the middle of the image. Drag the right and left sliders below the chart so that there are below the points where the chart data begins. This should give the image an immediate boost in contrast and some boost in colour too. Adjust the midtone slider if desired to fix the midtones in the image and click Ok to confirm your settings.


Step 3
Colour fixes: Often the image will contain too much blue and you can adjust this using a Curves adjustment. Choose Layer > New Adjustment Layer > Curves and click Ok to display the curves dialog. Click the Channel list and choose the Red channel. Drag up on the middle of the Red channel line to add some red to the image. Repeat with the Green channel adjusting it as required – drag down on the middle to remove green and up to add it. Finish with the Blue channel.

If you’re unsure which way to go with the adjustment, give the line a good pull in one direction or the other to see what happens, back off the adjustment to get something less intense. Different places on the curve line will give you different effects so experiment either side of the midline. Click Ok when you are done.

Step 4
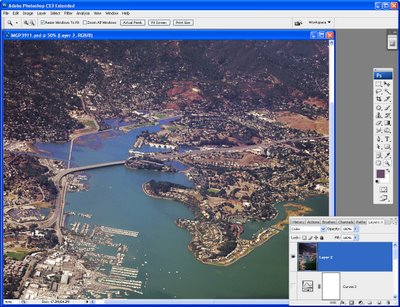
Fixing uneven contrast: Photographs shot from high up are generally display better tonality in the areas closer to you and poor tonality in areas farther away. To fix this add another layer by choosing Layer > New Layer and click Ok. Fill this layer with a gradient by selecting the Gradient tool and select the Black to White gradient. Choose the Linear option and drag the gradient to fill the layer. You want black at the top of the layer and white at the bottom – if you get it wrong, drag in another direction till you get it right. Don't worry that your photo has disappeared in the process!

From the Blend modes dropdown list choose Color Burn. This will darken the image considerably particularly in the areas where the black colour appears. Adjust the layer Opacity in the layer palette until you get an acceptable result.

Step 5
Final touches: To finish the colour fixing, boost the saturation using Layer > New Adjustment Layer > Hue/Saturation and increase the Saturation a little. If the image needs a little lightening and if you're using Photoshop CS3 or CS4, use a Brightness/Contrast adjustment layer. If you're using Photoshop CS2 or earlier, use a Curves adjustment and this time drag the composite RGB curve upwards to lighten the image. The Brightness/Contrast tool in earlier versions of Photoshop is to be avoided at all costs as it damages good pixels in the image - the new tool that first appeared in Photoshop CS3 is much different and much better.

step 6
Sharpening: The final step is to apply some sharpening to the image. To do this, you need a single image layer so press Ctrl + Alt + Shift + E to create a composite layer. Select this layer and use Filter > Sharpen > Unsharp Mask to sharpen the image. Set the Radius to between 0.5 and 1 and set the threshold to under 10. Adjust the Amount until you get a good sharpening of the image.

Labels: , , , ,