Articles | Photography Blog | Office Tips Blog | about me | e-mail

Helen Bradley - Photoshop and Lightroom tips and techniques

I'm Helen Bradley - I'm a photographer and Photoshop professional. In this Photoshop and Lightroom blog you will find powerful Photoshop and Lightroom tips, tricks and techniques that will help you get more out of both programs. You will also find step by step guides for working creatively with your photos in Lightroom and Photoshop and any other cool applications I know you will be interested in knowing more about.

Tuesday, October 13, 2009

Highlight Color effect in Lightroom


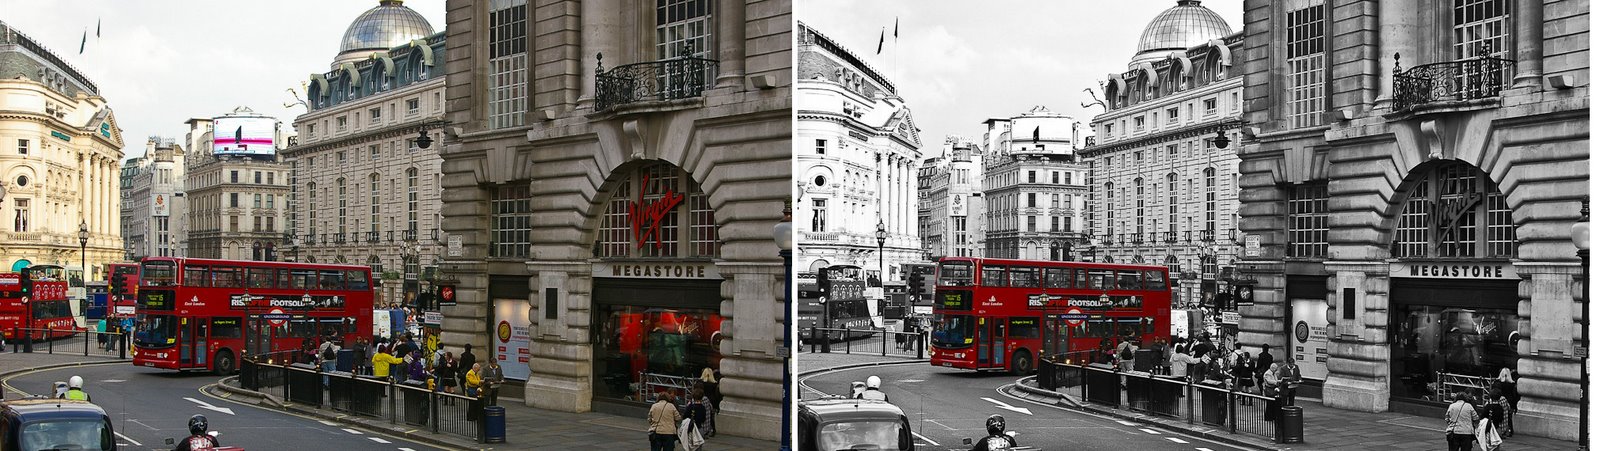
One effect many people like to use with their photos is to remove all the color from the image and leave it in only one place in the image. For example, in a wedding shot you might turn the entire image into black and white leaving just the bride's bouquet in color.

Here's how to achieve this effect in Lightroom using the Adjustment Brush.


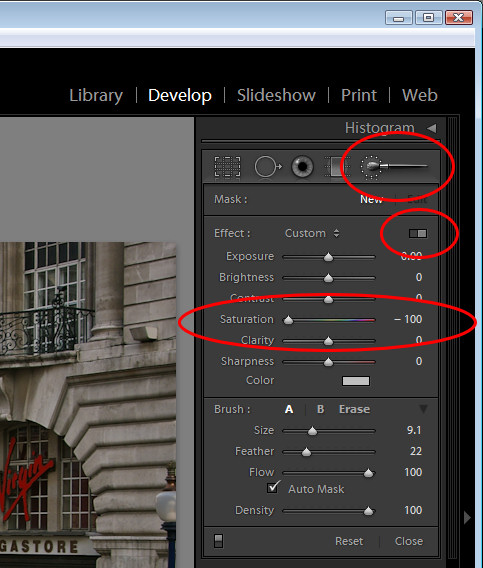
Start with the image selected in Lightroom and switch to the Develop module.

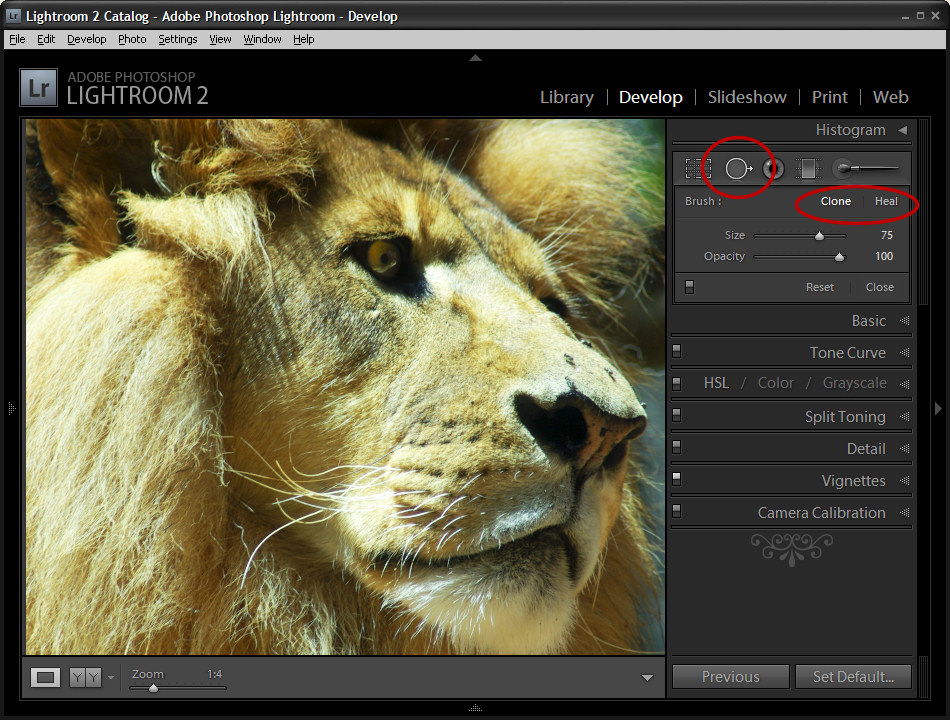
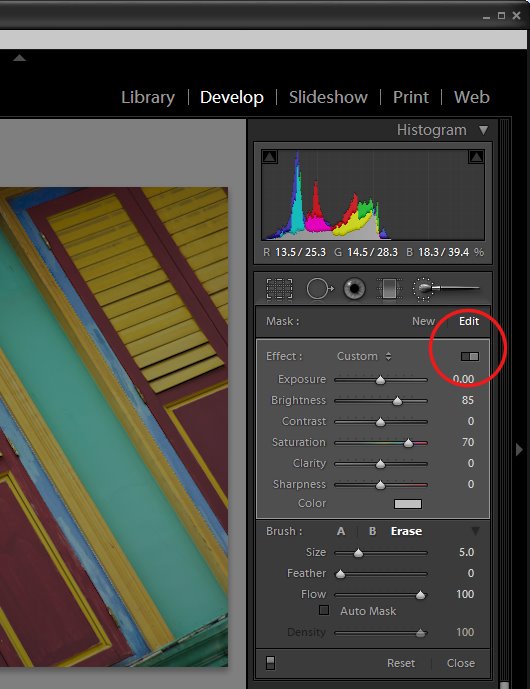
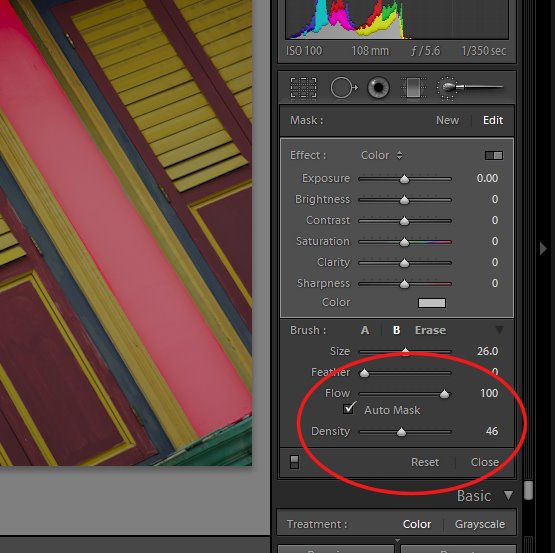
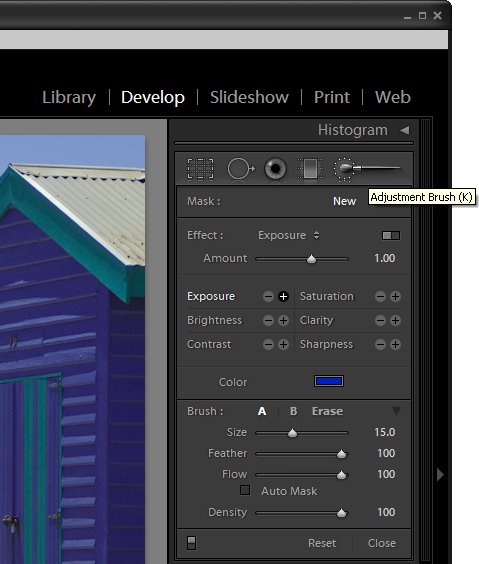
Click on the Adjustment Brush and make sure you have it set to Show Effect Sliders so that you can adjust multiple sliders at once. Drag the Saturation to -100.


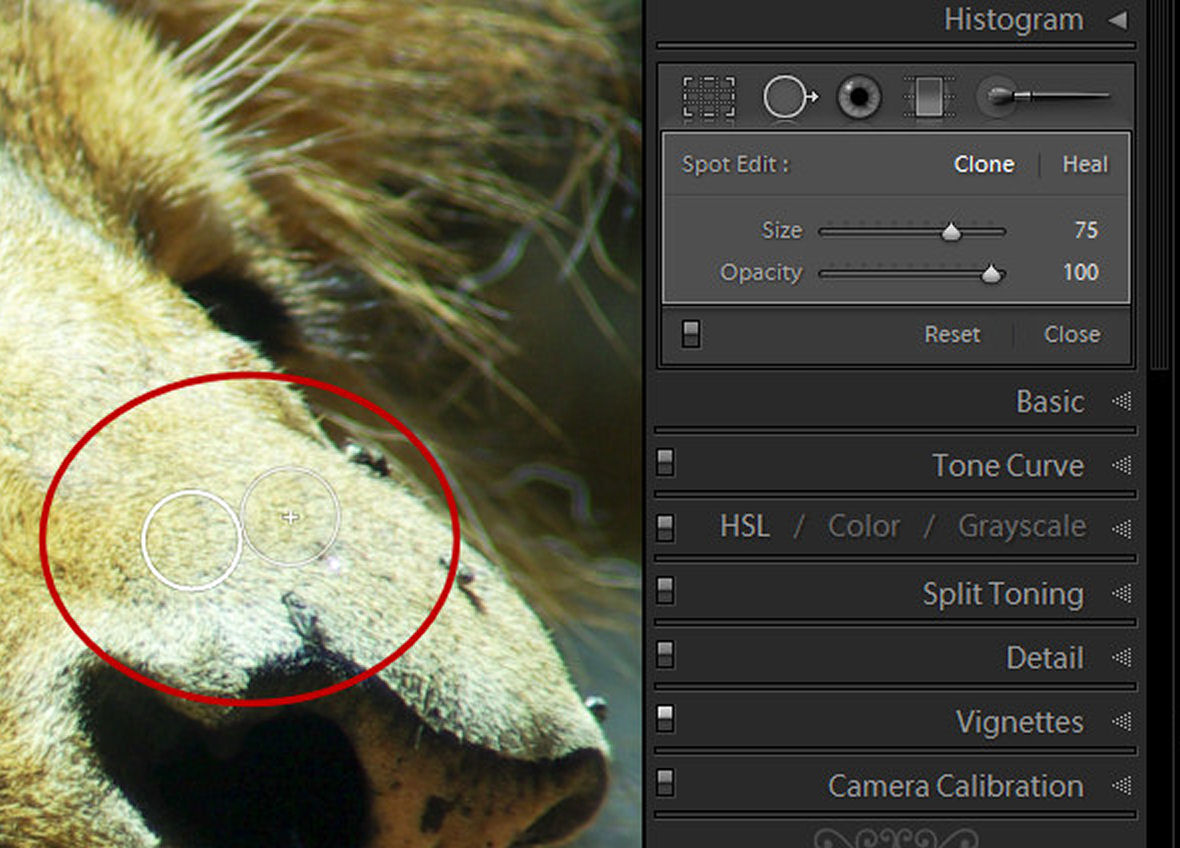
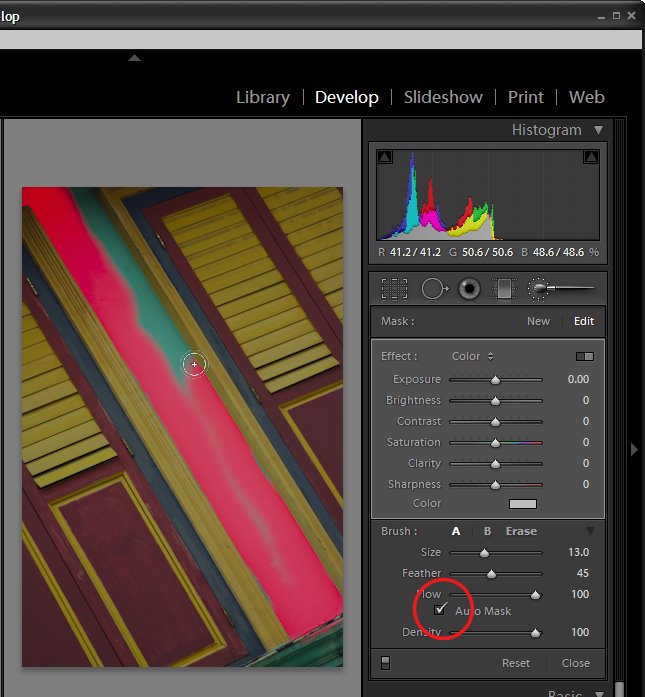
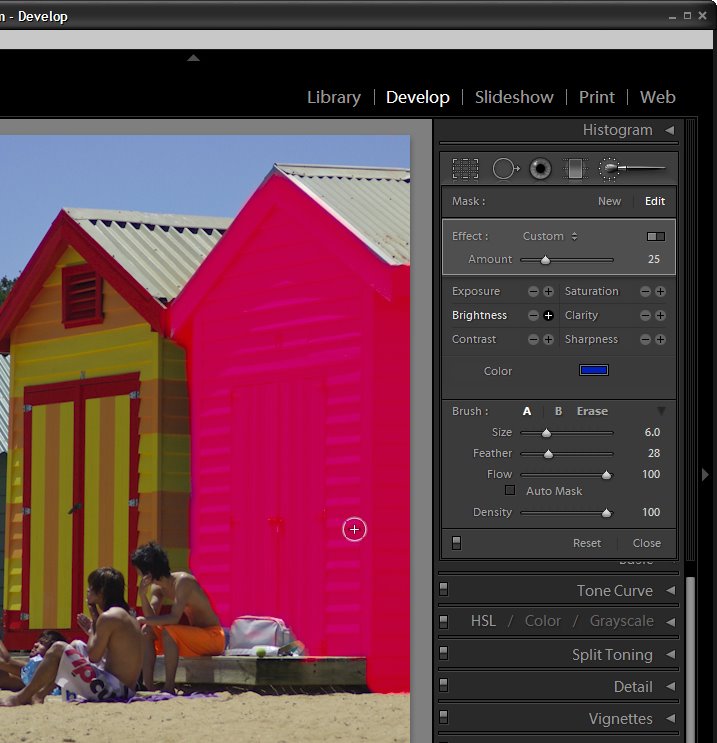
Click the letter O so that you can see as you paint and with a large size hard paintbrush click on the image in an area you want converted to black and white and then paint over the image in all places that it should be turned to black and white.

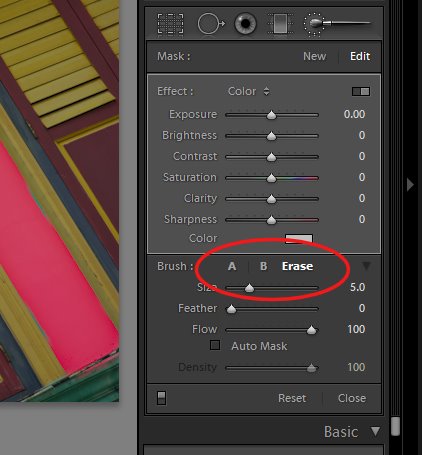
It will be quicker if you set the feather to a low value, the brush to a large size and disable the Auto Mask option for now.


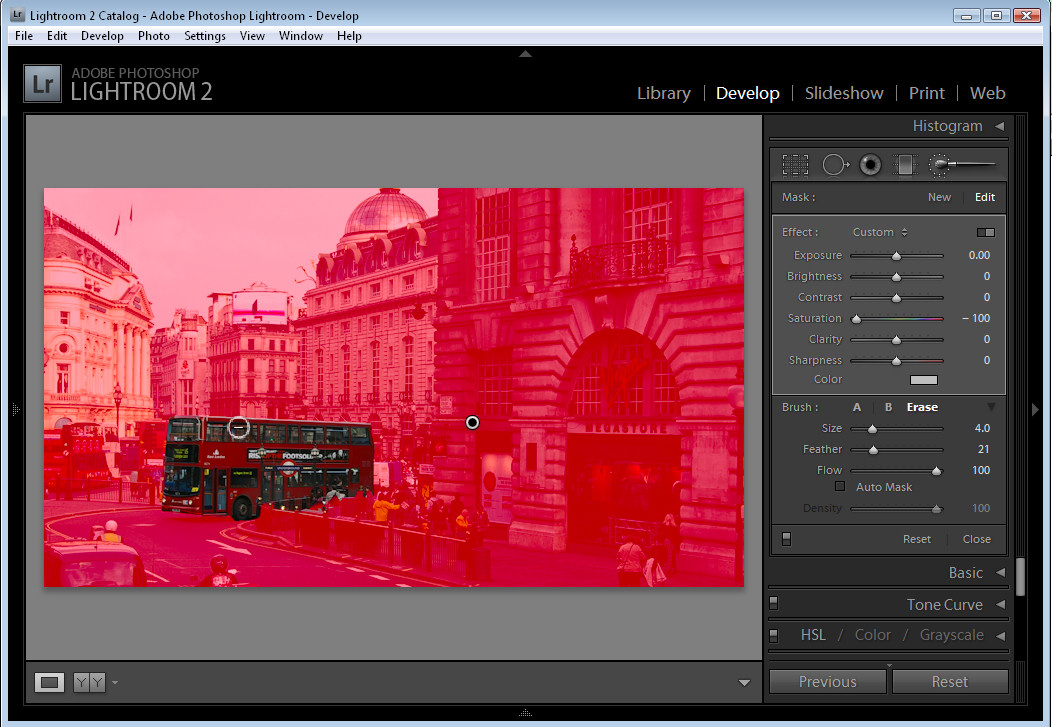
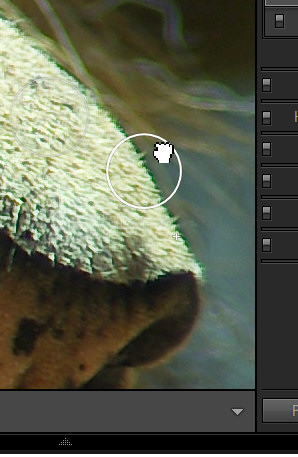
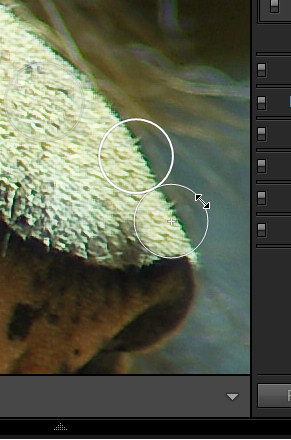
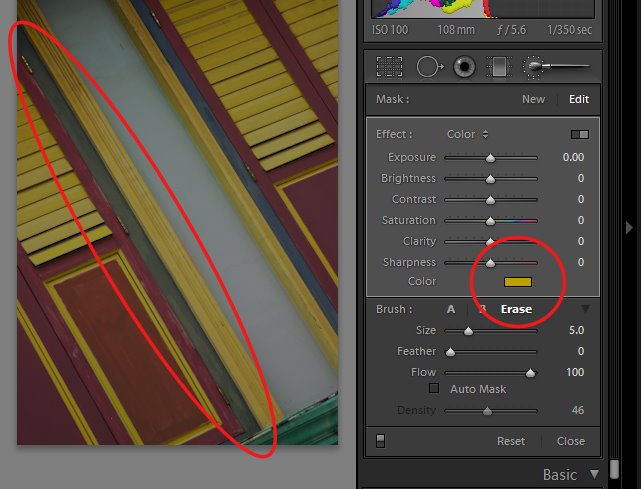
To work close around the edges of the area that you want to leave in color, set the brush size smaller and work slowly around the edges.

If you go too far, press the Alt key (Option on the Mac) and paint out the overlay color. The Eraser uses a different brush so make sure it too is set to have Auto Mask disabled and a low Feather value.

To zoom in click Z and to move the image, press the Spacebar as you drag on it.


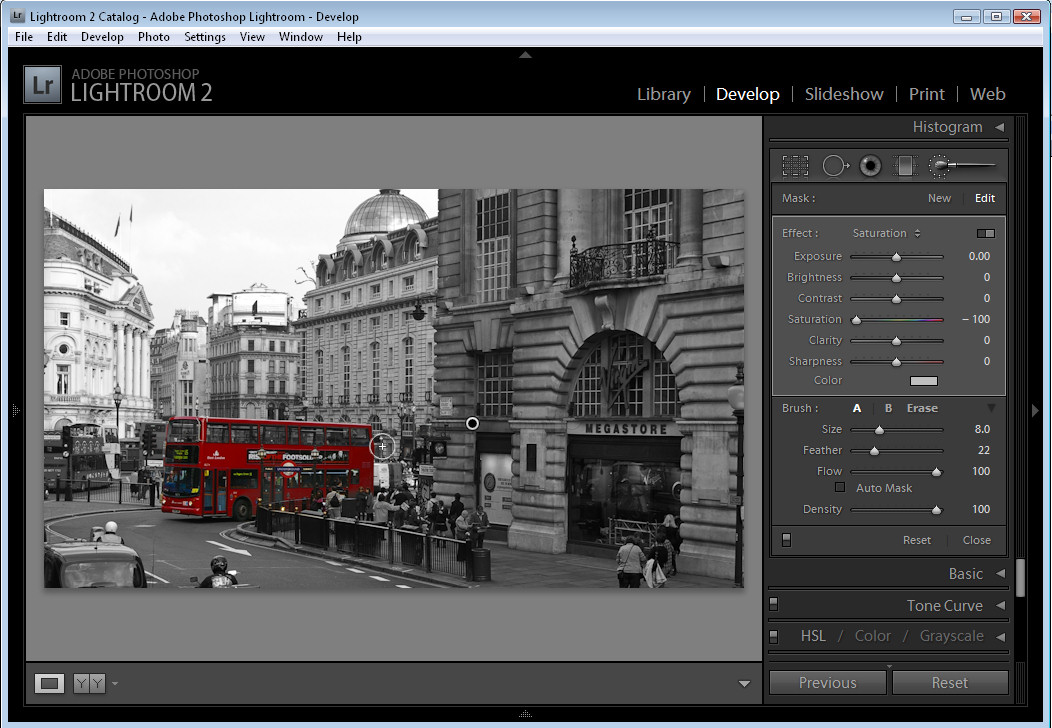
Once you have the area selected that you want to convert to black and white, disable the overlay color by pressing the O key.

This leaves the selected area in black and white and the unselected area in color.

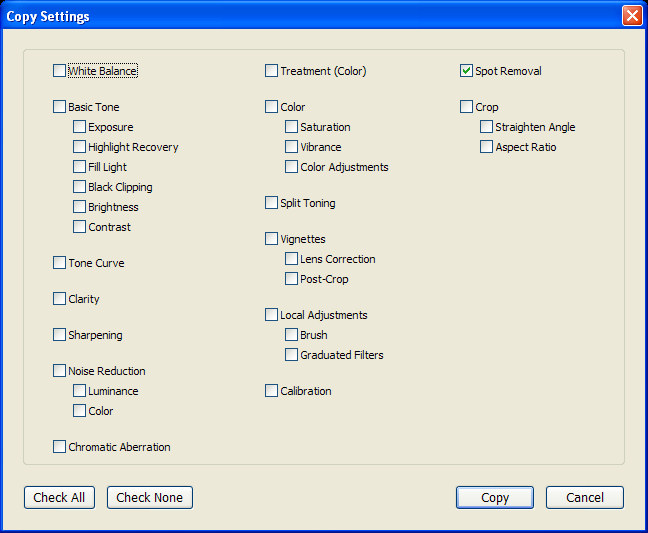
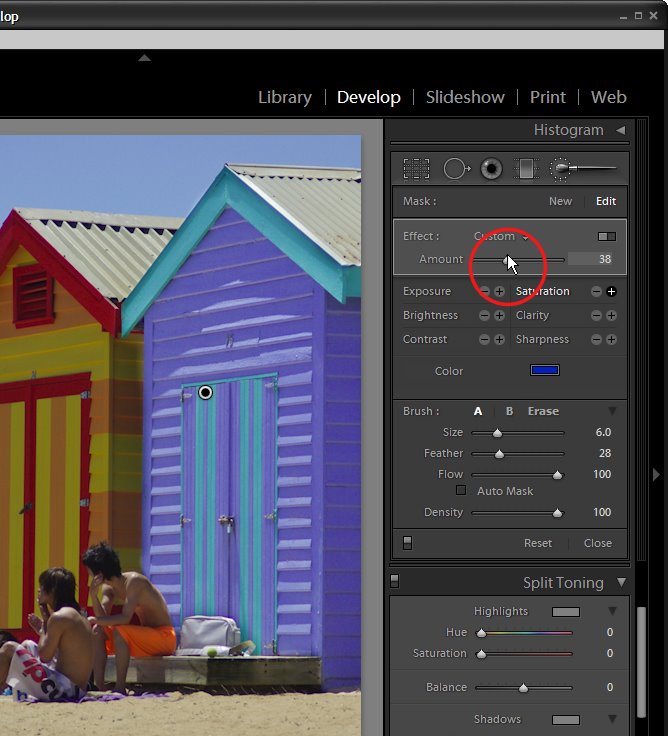
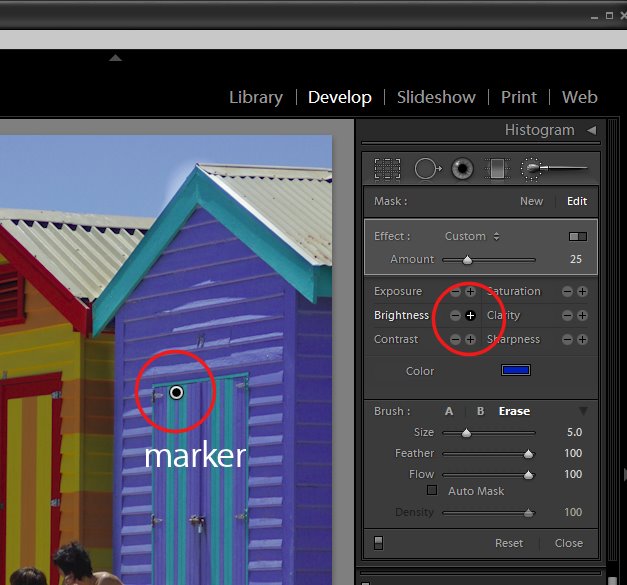
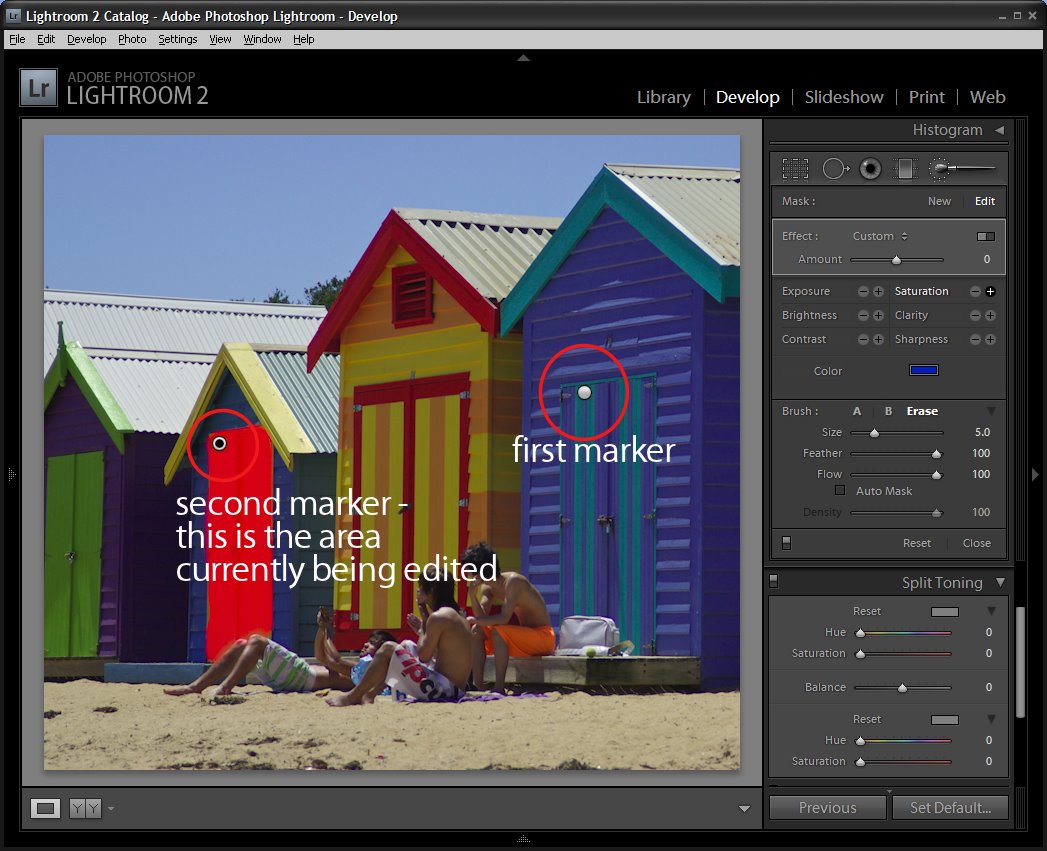
You can now tidy up the edges if necessary by using the Adjustment Brush tool - just make sure that you click on the marker for the Adjustment before you start painting - it should show a black center - if not, you're making a new adjustment and not editing the existing one.


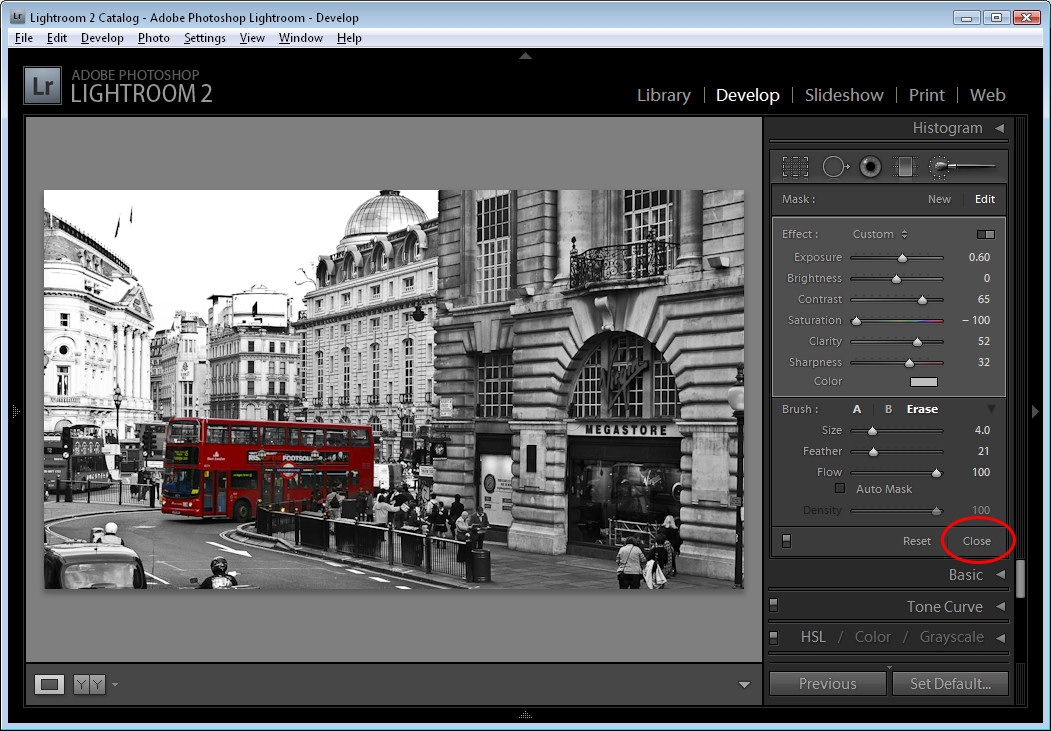
You can adjust the other sliders, if desired, to improve the black and white portion of the image. For example you can boost the Contrast and Clarity if desired. When you're done, click the Close option at the foot of the panel to finish.

In this example I added another adjustment using the Adjustment Brush over the top of this one to reduce the exposure and brightness in the sky to add back some of the cloud detail lost in the conversion of the image to black and white.

Labels: , ,

Friday, July 10, 2009

Fixing Blemishes in Lightroom


Spot_before-after.jpg
When you have an image which needs some spot fixing before printing you can often do the work in Lightroom and avoid the necessity of a round trip to Photoshop. Lightroom has both a Clone and a Heal tool available for fixing blemishes and removing problems such as spots caused by dust on your camera's sensor.

To see how to use these tools in Lightroom, start by selecting an image to fix and select the Lightroom Develop module.

Step 1


Locate the Spot Removal tool which is situated below the Histogram and to the immediate right of the Crop tool. You can also select it by pressing its shortcut key N.

For the brush options, you have the choice of Clone or Heal so select the option to use.

Clone works similarly to the Clone Stamp in Photoshop where you select the portion of the image to fix and then the portion to replace it with. Apart from choosing the Size of the brush and the Opacity Lightroom simply replaces one area of the image with another without making an attempt to blend the fix.

If you choose Heal then Lightroom samples the area you're trying to fix and attempts to blend in the replacement area so the fix is less apparent.

Step 2

Select Clone or Heal and then adjust the size using the slider or the square brackets [ and ]. Your brush size needs to be large enough to cover the area to fix.

You can click on the area to fix and leave Lightroom to choose the source image data to fix it with or click on the part of the image to fix and continue to hold the left mouse button as you drag to find an area to use to for the fix. You will see a preview of how the fix will look to help you determine a good part of the image to use. Only let go the mouse button when you have your selection in place.

When you have applied the fix you will see two circles on your image – they appear when you hold the Spot Removal Tool over the image. The circle with the thickest edge is the selected area and the circle with the + symbol in it defines the area you are fixing.


If you did not get the fix exactly right you can click inside either of the circles and drag the selected circle to a different position.


You can also select a circle and then position your mouse over the edge till it turns into a double headed arrow and then drag to resize it.

You can change a fix applied using the Heal option to a Clone fix (or vice versa). To do this, select either of the two circular marker and click Heal or Clone in the Develop tools panel to change the fix type. This allows you to experiment to find which gives the better results.

In our example, Heal worked well on the lion's nose in areas which were all hair and Clone worked along the top edge of the nose where the fix markers spanned part of the nose and part of the background behind.

To see the image without the circular markers, press H to hide them. Press H again to display them.

To see the Before/After results reflecting just the effect of applying the Spot Removal Tool, click the On/Off switch in the Spot Removal tool area of the Develop panel. This works better than the backslash key (\) which toggles on/off all the fixes you have made to the image and not just the most recent one.


If you have problems such as sensor dust that appear in the same position in a series of images, you'll appreciate the ability to copy the Spot Removal tool fix from one image to others. Right-click the fixed image, choose Settings > Copy Settings and from the Copy Settings dialog enable the Spot Removal checkbox disabling all other options that you do not want to copy. Click Copy to copy the effect and then paste it onto the other images which also suffer the same problem. While this may not be an ideal fix for all of them, it will give you head start on fixing most of them.

Labels: , , , ,

Tuesday, June 30, 2009

Lightroom: More Adjustment Brush techniques


You just gotta love the Adjustment brush in Lightroom 2. It makes Lightroom a great tool for quick fixes and, honestly, I've used Photoshop a lot less since I started using Lightroom. I love the combination, Lightroom is fast and so smart and Photoshop is there for when I need specialist effects. So, on to today's post...

In an earlier post I talked about using the Adjustment Brush in Lightroom 2 at a simple level - sort of Adjustment Brush 101. In this post I’ll show you some advanced features of the adjustment brush which help you make multiple adjustments to the image at one time and to do so more easily. Consider this Adjustment Brush 102.


In the Develop module, when you have the Adjustment Brush selected there is a switch that you can click to switch between Button and Slider mode. In button mode you can adjust one of the Exposure Brightness, Contrast, Saturation, Clarity and Sharpness settings at a time. In Slider mode, you can adjust any one or more of these options.


In the Brush area of the panel you will see an AutoMask option. When this is enabled, you can paint around the inside edge of an area and the AutoMask feature will mask the area ensuring your brushstrokes don't go over the edge. This works best on areas where the edge is distinct and recognizable. When you paint, make sure you have the main part of the paint brush inside the area you want to effect.

To toggle between AutoMask being on or off as you paint, hold the Control key as you paint (Command on the Mac).


In the Brush area you will see two brushes, A and B. You can switch between the two by clicking on the A or B indicator. Each brush has its own Size, Feather, Flow and Density settings, and AutoMask can be enabled for either or both of the brushes. Having two brushes lets you configure each differently and switch easily between the two.

Each brush can be switched into the third brush mode - Erase mode by holding the Alt key (Option on the Mac) as you paint with either brush.


Setting the brush size defines the area of the brush and it is the central circle which you see when you are painting. The Feather amount adds an additional softness to the brush which is shown by the second outer circle. A hard brush has a Feather of 0 and it shows as a single circle.

Flow specifies the flow for the brush which can be set to less than 100 so you can build up an effect gradually by painting over an area multiple times. The Density slider adjusts the opacity and controls the maximum opacity of the brush strokes. So, if you have Flow set to a low value and Density to 50, the maximum opacity that the brush can reach regardless of how many times you paint over an area is 50.


In the Effect area is a Color option which allows you to paint over an image with a color of your choice. To do this, select the color to use and then paint over the area to apply it to. You can use this to colorize a black and white image or, as I've done here, paint over a dark blue area with yellow to make it dark green.

Tip: Interested in learning more about Lightroom? Check out my post on understanding Clarity, Vibrance and Saturation in Lightroom 2.

Labels: , , ,

Monday, May 11, 2009

Lightroom: Spot fixing with the Adjustment Brush


One of the exciting new features in Lightroom 2 is the adjustment brush which lets you to make spot fixes to your image in Lightroom. These fixes apply to only the area you select rather than the entire image. This means you can make local adjustments for contrast, saturation, exposure, brightness, clarity and sharpness without having to take the image to Photoshop to do this.

In this post I'll show you how to get started using the adjustment brush in Lightroom. 2


Step 1
Open Lightroom and click the Develop module. Locate the Adjustment Brush and click it to select it. Hold the brush over the image to check its size. The inner circle is the hard part of the brush and the outer circle shows the edge of the feathering. To adjust the brush size use the [ and ] keys or adjust the Size and Feather using the sliders.


Step 2
Select the adjustment to make, such as Brightness or Saturation by clicking its + symbol to increase its value or the – symbol to decrease it. Then start painting on the image to adjust that part of the image. When you start painting the effect onto the image, Lightroom places an identifying marker on the screen. Here I have Brightness selected and the marker is visible.


Step 3
If you don't know where you have painted – and it's often very hard to know exactly - press the O key to view or hide a mask which shows the area you have painted on. If you prefer to, you can display the mask as you work. The mask also appears if you hold your mouse over the marker.

To erase the brush strokes, click the Erase option in the brush area and erase over the area to remove the strokes. To return to painting click brush A which is the default brush and continue to paint over the area. You can also use the brush with the Alt (Option on the Mac) to remove the painted areas rather than switching between the brush and eraser.


Step 4
If the effect is too much or too little you can adjust the intensity of the effect using the slider.


Step 5
If another area of the image requires fixing, click the New option and then repeat the steps to select a fix and then paint it onto that part of the image. Later on you can adjust either of the fixes by first clicking the Adjustment Brush tool to select it and then click on the marker for the area to change – you will see that the word Edit is now highlighted - and you can now adjust the painted area or adjust the amount of the fix.

In a future post I will look at some more advanced functions of the Adjustment Brush.

Labels: , , , ,