Articles | Photoshop blog | Photography blog | about me | e-mail

Helen Bradley - MS Office Tips, Tricks and Tutorials

I'm a lifestyle journalist and I've been writing about office productivity software for a long time. Here you'll find handy hints, tips, tricks, techniques and tutorials on using software as diverse as Excel, Word, PowerPoint, Outlook, Access and Publisher from Microsoft and other applications that I love. My publishing credits include PC Magazine, Windows XP mag, CNet, PC User mag, SmallbusinessComputing.com, Winplanet and Sydney Morning Herald.

Monday, October 1, 2007

Take a snap - Excel 2003 and earlier.


Need a copy of part of an Excel worksheet? Too easy!

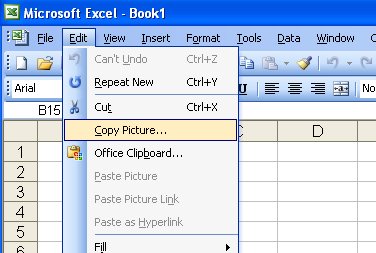
You can take a picture of a range in Excel and, for example, insert into Word as a picture or place it an image in another area on a workbook. To do this, first select the area to snap and hold Shift as you open the Edit menu. Choose Copy Picture, select As shown on screen or As shown when printed and click Ok.

Now go ahead and paste the image wherever you desire. This Shift + Edit menu option also works for copying a clip art or other type of image inserted into an Excel workbook.

Labels: , ,

Add to Technorati Favorites

Wednesday, January 31, 2007

Align anything in Word

When you want to make sure everything on a Word page lines up properly, display the gridlines.

To do this, first display the Drawing toolbar then choose Draw, Grid and choose the Display gridlines on screen checkbox. Set the Use Margins option to start the grid aligned on the left and top margins. Set the value to 1 for small squares and to 2 or 3 for a larger grid.

If you select the Snap Objects to Grid checkbox all objects will automatically line up against the grid.

If you don't want this to be the case, press the Alt key as you drag an object and it will be freed from snapping to align to the grid.

Labels: , , , ,

Add to Technorati Favorites

Saturday, January 27, 2007

Snap a range
It's possible to take a picture of a range in Excel to insert into Word as a picture or to place as an image in another area on a workbook. To do this, first select the area to snap and hold Shift as you open the Edit menu. Choose Copy Picture, select As shown on screen or As shown when printed and click Ok.

You can now paste the image wherever you desire. This Shift + Edit menu option also works for copying a clip art or other type of image inserted into an Excel workbook.

Use this technique to print data from two Excel sheets on the one sheet of paper, something that's notoriously difficult to do otherwise - regardless of the fact that it's a feature we'd all love to have!

Labels: , ,

Add to Technorati Favorites