Articles | Photoshop blog | Photography blog | about me | e-mail

Helen Bradley - MS Office Tips, Tricks and Tutorials

I'm a lifestyle journalist and I've been writing about office productivity software for a long time. Here you'll find handy hints, tips, tricks, techniques and tutorials on using software as diverse as Excel, Word, PowerPoint, Outlook, Access and Publisher from Microsoft and other applications that I love. My publishing credits include PC Magazine, Windows XP mag, CNet, PC User mag, SmallbusinessComputing.com, Winplanet and Sydney Morning Herald.

Tuesday, May 15, 2007

Grid and Guides in PowerPoint 2007


If you're like me you like to have everything neatly aligned on your PowerPoint slides. If you don't, a slide with navigation and action buttons can very quickly become very untidy.

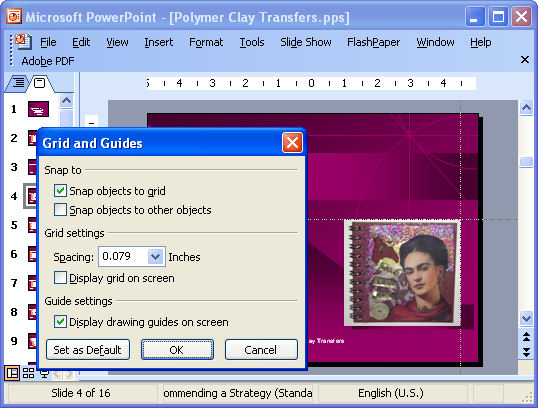
To line everything up, you need to be able to see the gridlines. Gridlines on a PowerPoint slide? I hear you ask. Why not?

To see the gridlines, right click an empty area on a slide and choose Grid and Guides. Select the Display Grid on Screen checkbox and configure the grid size and click Ok. You can also display drawing guides using the same dialog. By default these are placed in the middle of the slide horizontally and vertically.

To add a new guide, hold the Control key as you drag a new guide from an existing one.

Reverse the process to hide the guides and grids when you're done.

Labels: , ,

Add to Technorati Favorites

Wednesday, March 14, 2007

PowerPoint Guides


If you're a perfectionist like I am (on a good day, anyway), you will want everthing lined up neatly on your PowerPoint slides. To do this, use Drawing Guides. To do this, choose View, Grid and Guides and enable the Display Drawing Guides on Screen checkbox.

You'll see two cross hatch grid lines. To move them simply hold your mouse over them and move one. To create a new guide, hold the Control key as you drag on an existing guide. To remove a guide drag it off the slide.

You can now neatly line everything up that needs to be lined up.

Labels: ,

Add to Technorati Favorites

Thursday, March 8, 2007

Cool moves in Publisher

Here are some of my favorite tips for getting things lined up in Publisher 2003:

To move a number of objects together, select them and choose Arrange, Group from the menus or click the Group button which appears when the objects are selected. You can now move and size the objects all at once. Choose Arrange, Ungroup to ungroup them again.

The Nudge and Measurement menus help you move objects in small increments. Choose Arrange, Nudge and tear off the Nudge menu to have access to the buttons. The measurement toolbar (View, Toolbars, Measurement) helps you position objects with pinpoint accuracy.

To create a ruler guide, position your mouse over the horizontal or vertical ruler bar and, when the mouse changes shape, drag the ruler guide into position. To display rulers, choose View, Rulers. Use these guides as an aid for lining up objects on your page. Right click the guide to access other options.

Labels: , ,

Add to Technorati Favorites