Articles | Photography Blog | Office Tips Blog | about me | e-mail

Helen Bradley - Photoshop and Lightroom tips and techniques

I'm Helen Bradley - I'm a photographer and Photoshop professional. In this Photoshop and Lightroom blog you will find powerful Photoshop and Lightroom tips, tricks and techniques that will help you get more out of both programs. You will also find step by step guides for working creatively with your photos in Lightroom and Photoshop and any other cool applications I know you will be interested in knowing more about.

Saturday, October 03, 2009

Clean up a scene in Photoshop Elements
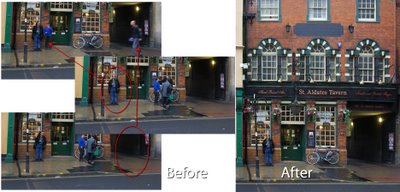

When you’re photographing popular places this summer, one issue you’ll face is getting a clean shot of what you’re photographing. Too often popular places are filled with tourists so it’s difficult to capture a scene without getting lots of people in it too.

The solution is to recognize the problem when you're shooting and capture a series of images and use the Photoshop Elements 7 Scene Cleaner tool to assemble an uncluttered scene later on.

When you are shooting take care to take two or more images each showing various elements of the scene uncluttered by people. It is best if these photographs are captured using a tripod but it’s not necessary to do so. What is most important is that you stand still as you capture all the shots - don't move yourself or the camera as you take them and don't change your camera settings as you photograph either - if you're using a manual mode, use Aperture priority not Shutter Priority. Make sure to get every part of the scene without people in it.
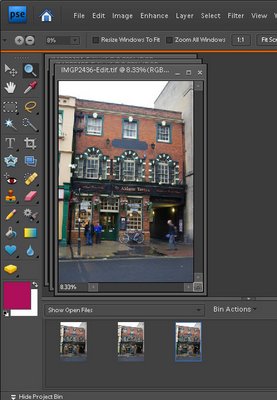

Step 1
When you return home, download your images and open them in Photoshop Elements 7 so that they appear in the Project Bin.
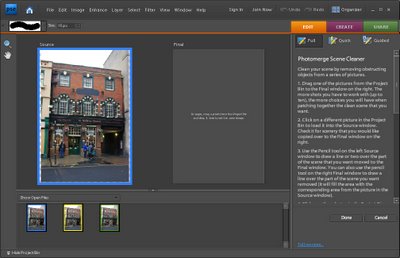

Step 2
Click on the first image in the Project Bin and Ctrl + Click on each subsequent image in your series.

Choose File > New > Photomerge Scene Cleaner. When you do this, one image will be loaded in the Source area on the left and nothing will be in the right hand panel.
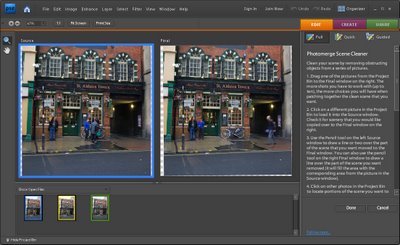

Step 3
The source image has a colored surround which matches the color surrounding the photo in the Project Bin so you know which image is which.

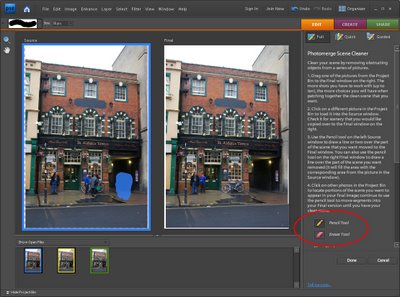
Drag and drop an image from the Project Bin into the Final box on the right - this will be the image you will work on to clean up - choose the best image to work with.

Zoom in to see the problem area clearly. Note that Photoshop Elements has aligned the images relative to each other.

Step 4
Now locate areas of the final image that need to be replaced using areas of the source image. What you’re looking for here are people in the final image you want to remove for which the source image can provide a clean 'people free' area.

Click the Pencil tool in the right hand panel and draw over the area of the source image to use. As you do this you see a colored overlay on the source image and the area you've selected will appear on the final image.

Adjust the pencil size using the [ and ] keys if necessary. Use the Eraser to remove the highlight if you select too much of the source image.

Step 5
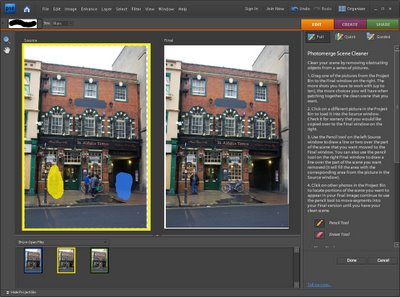
When you have used all the image data you can from the first source image, click on another source image in the project bin and it will move automatically to the Source area replacing the current image.

Continue and select areas of the source image to use to remove problems you see in the final image.

Step 6
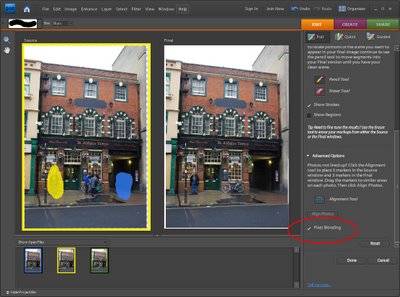
When you have the final image looking as you want it to look check to see if the pieces in the final image need blending or not. If they do, click the Pixel Blending check box in the right hand panel and the copied portions of the source images will be blended into the final image.

Click Done and you can then save the final version as a new file.

This tool is useful for removing tourists from around monuments, cars from roadways and other distractive elements in images where all you want is the scene unencumbered by people. The key is to recognize you have a problem when you're shooting and capture multipe images to use.

Labels: ,

Thursday, September 17, 2009

Fixing keystone issues in Photoshop Elements


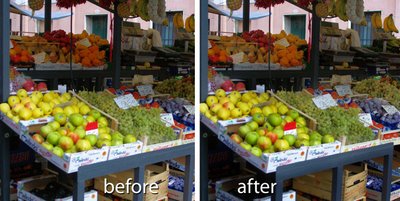
One issue you'll often encounter when you photograph tall buildings is a keystone effect caused by the angle at which you are forced to photograph from. The bottom of the building often looks wider than the top making it look out of proportion.

Most photo editing programs have tools for fixing keystone problems and, in this post, I'll show you two methods you can use in Photoshop Elements both of which work the same way in Photoshop.

Method 1: The Move tool


Step 1
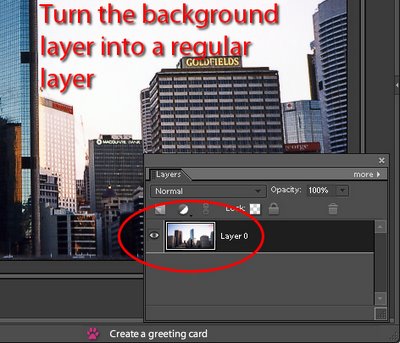
The first method involves using the Move too. Start by converting the image Background layer to a regular layer by double-clicking it and click Ok.


Step 2
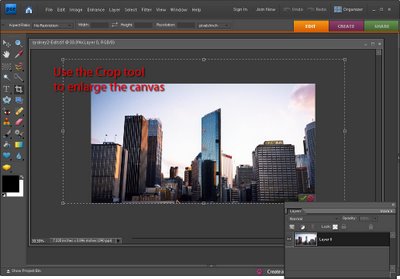
Enlarge the image canvas by selecting over it with the Crop tool and let go the mouse button. Then drag the crop handles outwards to select a larger area around the image and press Enter to fix the selection. You need to enlarge the canvas or the process will end up cutting off some of the image.


Step 3
Ctrl + Click on the layer thumbnail for the image to select the image but not the extra background.

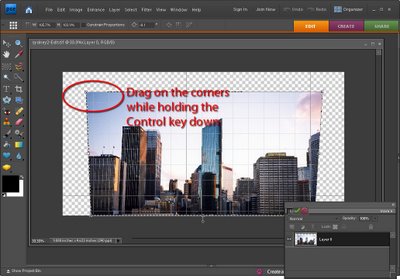
Click the Move tool to select it and hold the Ctrl key as you drag on one of the corner handles. When you do this you’ll notice that you distort the image - you'll use this feature to straighten it.

If you choose View > Grid you can display a grid over the image to make it easier to see line everything up. Choose Edit > Preferences > Grid to change the grid dimensions if necessary.

Drag each corner of the image in turn and, if desired, rotate the image until it looks correct to you. When you are done, turn off the visibility of the grid (View > Grid) and Crop the image to remove any excess.

Method 2: The Correct Camera Distortion filter


Step 4
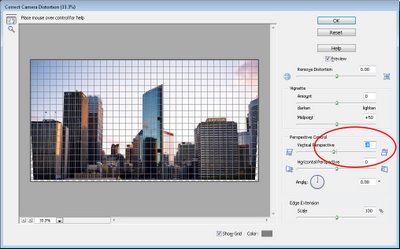
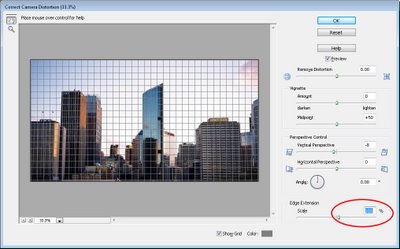
The second method uses the Lens Correction Filter. Select Filter > Correct Camera Distortion and the image will open in the filter dialog. From the Size dropdown list select Fit in View so that you can see the entire image.

Enabling the grid helps you ensure the image is squared off nicely. If necessary, drag on the Angle to rotate the image - in this dialog, the scrubby slider method works best so drag on the word Angle to adjust the angle (not the dial which tends to jump around a lot).

Select the Vertical Perspective slider and drag it to adjust the vertical perspective of the building. Choose Horizontal Perspective to fix horizontal perspective issues.


Step 5
The Correct Camera Distortion filter also includes a Remove Distortion slider which helps fix the sucked in or blown out effect you often see around the edges of an image caused by the curvature of the lens.

You can extend the canvas around the image by dragging the Scale slider to the left or drag to the right to crop the image.

When you’re done click Ok.

These tools also work well to fix an image of any rectangular object which is out of proportion - big or small.

Labels: , , , ,

Sunday, August 23, 2009

Smart Dodge and Burn in Photoshop Elements


In the traditional darkroom, you could adjust the relative lightness or darkness of parts of an image using processes called dodge and burn. If you were dodging or lightening the image you would expose parts of the image for a shorter length of time to lighten them. If you wanted to darken a portion of the image you would expose it for a longer period of time so that more light would be applied to the photo paper with the result that you would be darker.

The terms dodge and burn continue to be used in software today and Photoshop Elements has a Dodge tool and a Burn tool which are both accessible from a toolbar position which they share with the Sponge tool. The disadvantage of using the Dodge and Burn tools as they are shipped with Photoshop Elements and, indeed Photoshop, is that these fixes are designed to be made to the original image and the cannot be made on a separate layer and then, for example, be blended into the image.

The result is that if you apply a Dodge or Burn fix and later determine that you do not like the result or want to adjust it, it will be difficult to undo the changes that you have made.

In post production, dodging and burning are best applied to a separate layer in the image so that they can be undone, edited or blended at a later date.

Here is a method dodge and burn an image in Photoshop Elements which works the same way in Photoshop. It involves creating a layer on which the dodge and burn process is performed. It also takes advantage of a special characteristic of the Soft Light blend mode. This is a different dodge and burn method to that which Food blogger Danny Jauregui used in his recent post.


Step 1
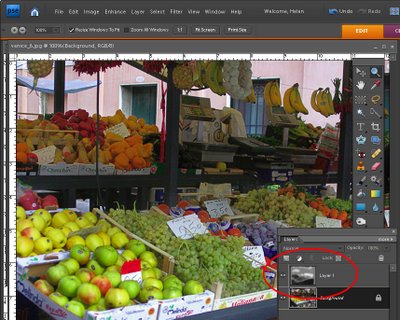
Open your image in Photoshop Elements (or Photoshop) and add a new layer by choosing Layer > New > Layer and click Ok.

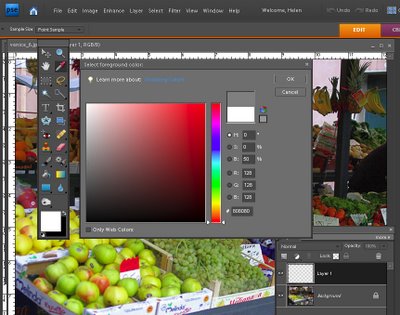
Click on the foreground color swatch and set the R, G, and B values each to 128 and click Ok.


Step 2
Click the Paint Bucket tool in the tool list and click on the image to fill the layer with the gray color. You can also press Alt + Backspace (Option + Delete on the Mac) to fill the layer with the foreground color.


Step 3
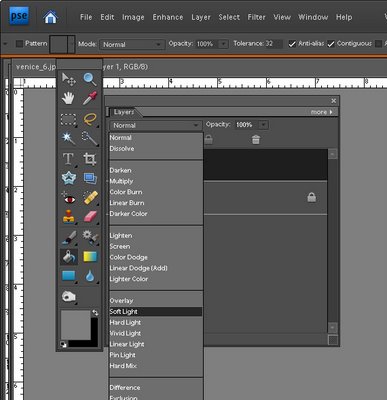
Set the layer's blend mode to Soft Light. The result will be that you will see your image just as it was when you opened it.

The Soft Light blend mode can be used to lighten or darken an image. If the color on the top layer is darker than neutral grey the image on the layer below is darkened and if it is lighter than neutral grey the layer below is lightened. When you blend with neutral grey, nothing happens. Here we have filled the layer with neutral gray (each of the RGB values are 128) so you see no change to the image.

So, if we now paint on this top layer with white the image will be lightened and if we paint with black it will be darkened. This is the equivalent of dodging and burning on the image.


Step 4
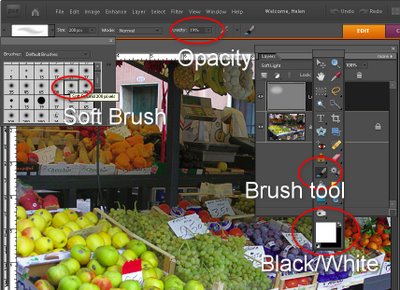
Select the Brush tool and select a circular soft edge brush adjusting its Opacity to around 25 percent. Adjust its size by pressing the [ or ] key on the keyboard. Set the foreground and background colors to white and black by pressing the D key and then the X key. Paint over the image on this top layer in white in those places that you want to lighten the image below.

For those parts of the image that you want to darken, paint over them with black.

If desired you can create one layer for burning and a second one for dodging. This will allow you to alter the opacity of each layer separately so you can subtly adjust the strength of the lightening or darkening applied.

To ensure that the fix remains changeable, save your image in a format that saves the image layers such as .psd.

Labels: , , , ,

Tuesday, August 18, 2009

An Adjustable Black and White Conversion


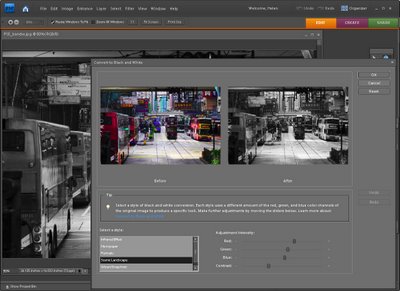
Most photo editing programs offer multiple ways to convert to black and white and Photoshop Elements is no exception. In fact it has a great Black and White conversion tool which is marred by the very small preview images you get to work with. Additionally, there is no zoom feature so you're stuck with seeing your image in miniature (see image), or you find another way to make the conversion.


Here's an alternative method of converting to black and white in Photoshop Elements which lets you work on the image at any size so you can see what you're doing. It also works in Photoshop:


Step 1
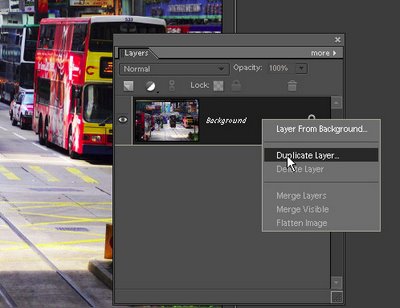
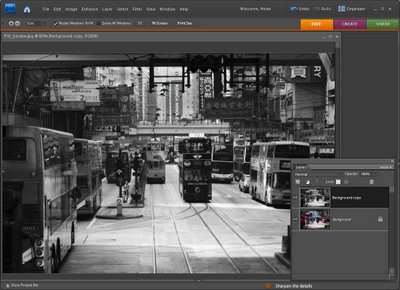
Open your image Photoshop Elements and duplicate the background layer. Do this by first displaying the Layers palette by choosing Window > Layers, right-click the Background layer and choose Duplicate Layer.


Step 2
Select the topmost layer and choose Enhance > Adjust Color > Remove Color. This converts the image to a black and white image.


Step 3
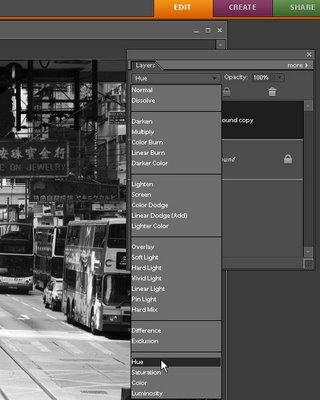
From the Blend mode dropdown list in the Layer palette, select the Hue blend mode. This ensures the top layer's hue (color) shows but uses the layers below to provide the lightness and saturation for the image. We can now adjust the bottom layer to change the black and white image.


Step 4
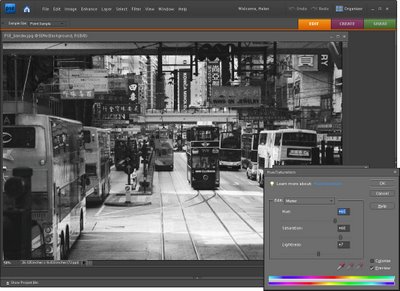
Select the bottommost layer in the image and select Enhance > Adjust Color > Adjust Hue/Saturation. This opens the Hue/Saturation/Lightness dialog. You can now select any of the sliders and drag them in either direction and you'll see as you do so that the black and white image changes.

For example, adjusting Lightness will adjust the lightness and darkness of the image itself. Adjusting Saturation will also make the image darker or lighter. Use the Hue slider to change the colors in the underlying image with the result that different colors will tend towards being light and others tend towards being dark. For example, in this image, changing the Hue made a significant difference on some of the signs over the street – at one position the text was all the same shade of gray and in another position the text was lighter against a dark sign. Pick a slider position that works best for your particular image.


Step 5
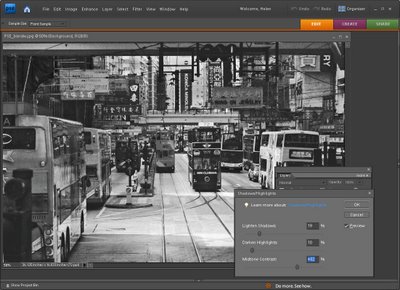
To adjust the contrast in the image, with the bottom layer still selected, choose Enhance > Adjust Lighting > Shadows and Highlights. Drag on the sliders to adjust the tonal range in the image. You can darken the lighter areas, lighten the shadows and add some contrast to the midtones this way. With the preview option enabled, you will see the results at full size on the image as you work. You can also do the same with the Levels adjustment – again apply it to the bottom layer of the image.

When you are done, flatten the image by selecting Layer > Flatten Image.

This process allows you to convert an image to black and white while previewing the results at full screen size while you work and with quite a bit of creative control. I find it gives me a better appreciation of what my image will look like than using the very small dialog previews in the specialist black and white conversion tool.

Labels: ,

Friday, June 26, 2009

Photoshop Elements: Spot sharpening with a faux layer mask


One of the features on the wish list of most advanced Photoshop Elements users is Layer Masks. It is one of the key features that separates Photoshop Elements from Photoshop - but it doesn’t have to be that way. It is possible to create faux layer masks in Photoshop Elements if you know how – and today, I am going to show you how.

One of benefits of this approach to creating faux layer masks in Elements is that it uses features built into Elements and it doesn't rely on a third party plug-in so it works with most versions of Photoshop Elements.

A bit of background
While Photoshop Elements doesn't support layer masks for regular layers, it does provide them for all its adjustment layers. This faux layer mask solution takes advantage of this by forcing an adjustment layer's layer mask to behave like a layer mask on a regular layer just as it does in Photoshop. The trick is to apply an adjustment layer to the image which does nothing to the image at all – so you get the benefit of the layer mask but without forcing any unwanted change on the image. Once you've done this you have a layer mask you can borrow.

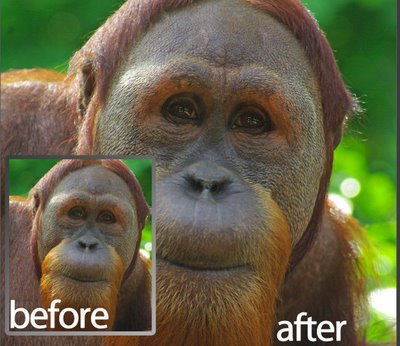
In this step by step example, I'll show you how to use the mask to paint some additional sharpening onto an image. What I'll do is oversharpen an image – well beyond the level of sharpening which the image should have and then I'll remove the sharpening with the mask and paint is back over selected parts of the image – again using the mask.

While this technique is shown using Photoshop Elements you can use the same technique in Photoshop – only in Photoshop you won't need to use the fake mask as you can add a layer mask to the oversharpened layer itself.


Step 1
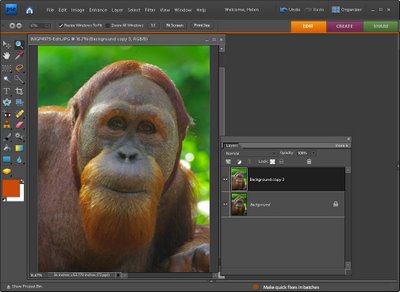
Finish editing your photo. If you have multiple layers, create a flattened version of image by selecting the topmost layer and press Ctrl + Alt + Shift + E (Command + Option + Shift + E on the Mac). This creates a new composite layer without flattening the layers.

Duplicate this layer by right-clicking it and choose Duplicate Layer. You should now have two identical image layers at the top of the layer stack.


Step 2
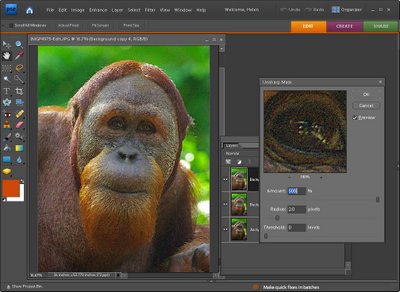
Select the topmost layer and choose Enhance > Unsharp Mask and apply excessive sharpening to the image. What you want is an extremely oversharpened image. You don’t want halos, just very heavy sharpening. In this example, I’ve used a radius of 2, a threshold of 0 and the full amount of 500. Click Ok.


Step 3
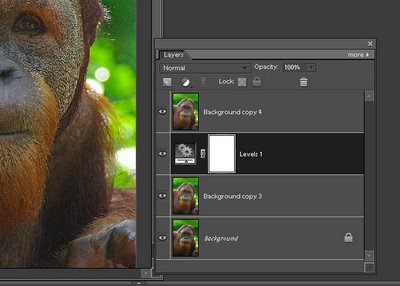
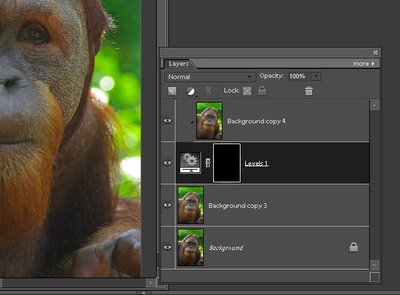
Add an adjustment layer by choosing Layer > New Adjustment Layer and choose either Levels or Brightness/Contrast or Hue/Saturation – you need an adjustment layer that doesn't do anything to the image if you don't alter its settings. Click Ok and don't make any changes to the adjustment layer settings. Drag the adjustment layer so it sits between the two image layers.


Step 4
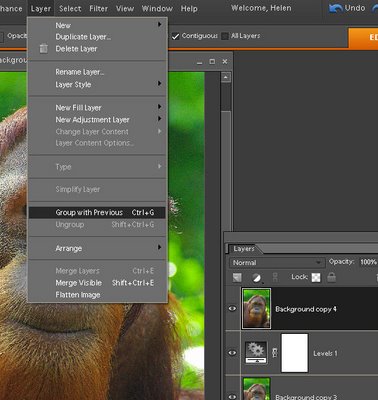
To create the fake layer mask, select the topmost oversharpened layer and choose Layer > Group with Previous. This attaches the oversharpened layer to the adjustment layer below limiting the effect of this layer to the area that is white in the adjustment layer mask – right now that is all the top layer.


Step 5
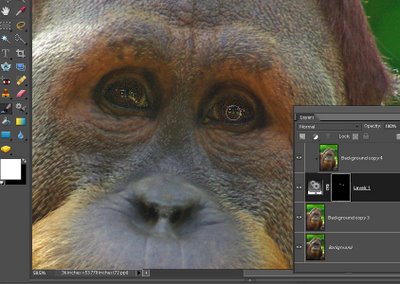
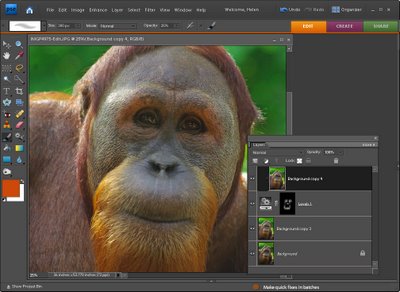
Click on the adjustment layer and click on the layer mask thumbnail which is the white box on the right side of the layer in the Layers palette. You should see a double border around it indicating that it’s selected. Fill this mask using the paint bucket tool with black. The entire oversharpening effect is immediately removed from the image.


Step 6
Select the brush tool and select a soft round brush. Adjust the opacity to around 25 percent and select white as the foreground color. With the layer mask thumbnail still selected, paint over the areas of the image that you want to apply additional sharpening to. In my case, I wanted to oversharpen the eyes on the orangutan.


Step 7
As you paint, the sharpening effect will built up – if you paint somewhere by mistake, set black as the foreground color and paint out the mistake. This is how a mask works - you paint with black to remove the effect on this layer (in our case you paint in black to remove the sharpening effect form the layer above because the two layers are grouped together) and you paint with white to reveal the effect.

When you are done, you can flatten the image or save it as a layered PSD file.

In future whenever you need to use a layer mask in Photoshop Elements, simply apply an adjustment layer to the image, drag it under the layer it should control and group the layers together.

Learn more: If you're interested in learning more about sharpening, check out my very popular post on Understanding the basics about Sharpening.

Labels: , , , ,