Articles | Photoshop blog | Photography blog | about me | e-mail

Helen Bradley - MS Office Tips, Tricks and Tutorials

I'm a lifestyle journalist and I've been writing about office productivity software for a long time. Here you'll find handy hints, tips, tricks, techniques and tutorials on using software as diverse as Excel, Word, PowerPoint, Outlook, Access and Publisher from Microsoft and other applications that I love. My publishing credits include PC Magazine, Windows XP mag, CNet, PC User mag, SmallbusinessComputing.com, Winplanet and Sydney Morning Herald.

Wednesday, July 1, 2009

PowerPoint: Custom slide navigation with Action buttons


While many people make their presentations in the presence of an audience and they move from one slide to the next, not all presentations are delivered this way. Many slide shows are viewed by people at their desk and when you are creating presentations for display this way, you can create a custom navigation scheme for the user to use to progress through the show.

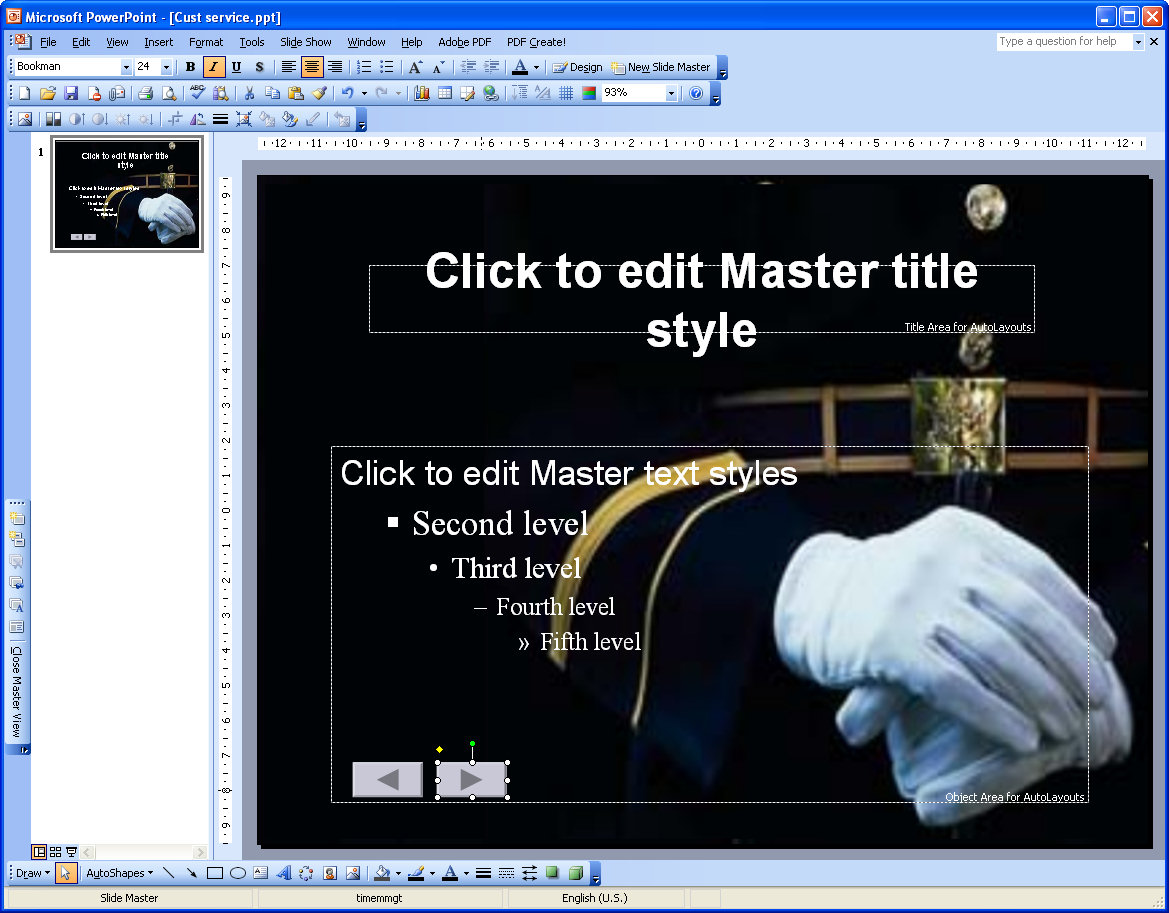
To do this, start by choosing View > Master > Slide Master to move to the Slide Master view. In PowerPoint 2007 select the topmost slide in the layout pane. Choose Slideshow > Action buttons and select the Action Button: Back or Previous. Click and drag the Action button on the slide – the Action Settings dialog shows Hyperlink To: Previous Slide - click Ok.

Repeat and this time add the Action Button: Forward or Next. This Action button is hyperlinked by default to the next slide.

Add an Action button that goes to the first slide by choosing Slideshow > Action buttons > Action Button: Home.

To size the Action buttons Control + Click on each of them in turn, right click and choose Format AutoShapes. Select the Size tab and adjust the width and height for all at the one time.

Click the Draw button on the Drawing toolbar, choose Align or Distribute > Distribute Horizontally to create even spacing between each button. Drag the shapes into the footer area so they are clear of the area covered by the slide content. Click Close Master View to return to your presentation.

Any shape can be configured to perform like an Action button. Add the shape to the slide, right click and choose Action Settings from the menu. You can hyperlink the shape to any slide, Office document or web page.

Labels: , , , ,

Add to Technorati Favorites

Thursday, April 16, 2009

Send to PowerPoint missing? Not really!


In Word 2003 you could create an outline in Word and then send it to PowerPoint where it would be converted to a PowerPoint slide show. Level 1 became the slide title and level 2 the first level bullet points and so on.

I hear a lot of grumbling that this feature has been removed from Office 2007 – not so! It just isn’t quite where you expect it to be. In fact, you have a few options in PowerPoint 2007 and Word 2007.

Option 1
You can add the Send to PowerPoint button to the Word 2007 Quick Access toolbar by clicking the Office button and choose Word Options > Customize and from the Commands not in Ribbon collection choose the Send to Microsoft Office PowerPoint option and click Add to add it and then Ok. Now you can click it to send the outline file to PowerPoint.

Option 2
You can also approach the task from PowerPoint 2007 which is really the better option. One alternative is to open the Word outline file in PowerPoint and the slides will be automatically created for you. To do this click the Office button and choose Open and from the Files of type list choose All Files so you can see and open your Word file.

Option 3
This is my fave!

Open PowerPoint 2007 with a new slide show and make sure your Word 2007 outline file is closed.

Choose the Home tab on the Ribbon and click the little arrow on the New Slide button. This opens a menu which includes the option Slides from Outline – select this and open your Word 2007 outline file. The slides are automatically created for you.

So, the option to Send to PowerPoint is not there in Word 2007 but you have so many more ways to complete the task now.

Labels: , , , ,

Add to Technorati Favorites

Friday, April 3, 2009

PowerPoint - Create a Custom Show


Did you know that one PowerPoint presentation can be reused over and over again, in different configurations for all sorts of purposes. A large presentation can be broken up into shorter presentations and a regular presesntation can be reworked to be used as a Kiosk presentation at a tradeshow. You can do all this without creating additional files or duplicating slides which means that you can make changes to all the shows in one step.

Create the new show
1 To create a new custom show from an existing presentation, open the presentation and, in PowerPoint 2003, choose Slideshow > Custom Shows and in PowerPowerPoint 2007 click the Slide Show tab > Custom Slide Show. Click the New button and type a name for your custom show – use a name that identifies what it contains or the audience you will present it to.

Add the slides
2 From the Slides In Presentation list click each slide that you want to include in the shortened or custom slideshow and click Add to add it to the slides in custom show dialog.

Organise the slides
3 Use the arrow buttons by the Slides In Custom Show pane to rearrange the slides to a different arrangement in the custom show if desired. When you are done, click Ok to create your custom show.

Selecting a custom show
4 If you click Close you’ll be returned to your original presentation but you can select the custom show at any time by choosing Slideshow > Custom Shows, select the custom show by name and click Show. Now if you run the slide show you'll see the slides in the selected custom show only and in the desired order.

Customising the show
5 To customize the setup for your custom show, choose Slide Show > Set Up Show. Select the Custom Show option in the Show Slides area and click your show name in the dropdown list. Select whether the show will be given by a speaker, at a kiosk, or browsed by an individual and then set the show options. Click Ok to confirm your choice.

Things to watch out for
There are a couple things to be aware of when you are using custom shows. If you have the custom show selected, while you can still work on other slides - even those not in the custom show - if you choose to view the show you’ll see only slides in the custom show and not necessarily those you've been working on.

To view the entire show, choose Slide Show > Set Up Show (in PowerPoint 2007 choose Slide Show > Set Up Slide Show), and select All from the Show Slides list. Now when you run your presentation you’ll see all the slides in your presentation.

Labels: , ,

Add to Technorati Favorites

Wednesday, March 11, 2009

PowerPoint slide show file - PPSX vs PPTX


What is in a name? Is there a difference between a PowerPoint 2007 PPSX and a PPTX file? (or a PPS and a PPT file in PowerPoint 2003 and earlier versions?)

The simple answer is, of course, yes there is a difference.

The long answer explains that difference so sit tight, here's the long version:

The PowerPoint Slide Show files (PPSX and PPS) are files you can double-click on in Windows Explorer and the presentation will launch and start to display automatically bypassing PowerPoint itself. When you exit the presentation you will be taken back to Windows rather than left in PowerPoint with the presentation layout visible on the screen.

On the other hand, when you double click to open a PPTX or PPT file, it opens inside PowerPoint ready for editing or presenting. When you're done, you get dumped back in PowerPoint with, you guessed it, your presention visible on the screen - not very professional if your audience is watching.

To save a presentation as a PPS file in PowerPoint 2003 and earlier, choose File > Save As and from the Save As Type dropdown list choose PowerPoint Show (*.pps) and click Save. In PowerPoint 2007, choose File > Save As > PowerPoint Show and the correct format will be automatically created for you.

PPSX and PPS files can be edited in PowerPoint in the same way as PPTX and PPT files can - you just have to open PowerPoint first and then choose File > Open to open the PPSX or PPS file as you can't double click to open it.

So, now you know.

Labels: , , , , , ,

Add to Technorati Favorites