|
|
||||||||||||||||||||||||||
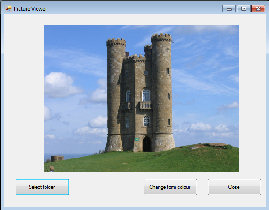
Visual Basic Express Create an image viewerHelen Bradley I'll show you how tocreate a simple image viewer application.Since the early days of computers, enthusiastic hobbyists have bypassed custom made applications and gone the DIY route. Some of the earliest computers, in fact, came with little more than a programming language and an operating system so most owners at least dabbled with programming in one version or another of the Basic language. So, in the spirit of everything that is old is new again, here's how to write an image viewer application using the free Visual Basic Express. When you create a program in a language such as Visual Basic, you create a standalone program that will run when you double-click on its filename. The program will be compiled as an executable file and you can even upload it to your dedicated server and distribute it for others to use. The program does not require any special application software to be installed on your computer so it is not, for example, like viewing a PowerPoint show which requires PowerPoint to be installed. In fact what you're doing is creating the equivalent of a program like PowerPoint - albeit a very cut down version! One of the benefits of using a programming language to create a standalone program is that you can create a custom solution that does what you want it to do. You're not constrained to having to find a program that someone else has created and you have the freedom to do it yourself. Of course the downside to this is that you'll need to invest time and effort into learning the programming language so that you can make the computer do what it is that you want it to do. For this project I'll use Visual Basic 2010 Express Edition. There are some reasons for this. One of them is that the program is free so it makes it a very cost effective way to get up and running writing your own programs. The program is also based on Basic so that you will find that many of the same commands and concepts can be migrated to programming in Visual Basic for Applications inside Microsoft Office products such as PowerPoint, Word, and Excel. The skills that you'll learn in writing Visual Basic programs can be adapted to writing your own macros and adapting those we give you and those you find on the web. Another reason for using Visual Basic 2010 Express Edition is that it is a very handy way to write programs. The interface is quite easy to learn and use and the program itself offers quite a lot of help to new users. About the projectOne of the simplest ways to learn a program is by doing something with it so here I'll get you up and running with Visual Basic 2010 Express and provide you with a fun project in the process. The program you'll write has some redundancy built in, so there are some features that may not represent good program design - however they've been included to show you some of the ways that you can control objects with VB. The coding is also, very deliberately, short - so you don't have to do lots of typing. To follow this tutorial you will need to download and install Visual Basic 2010 Express Edition which you can find here: Visual Studio (which includes VB Express). Install and launch the program and you will see an interface very much like a web portal with a Start Page visible on the screen. The program we'll create is a graphic file viewer. It will include a single form with a picture box on it that will display a default image when the program loads. The user will be presented with four buttons only three of which will be initially visible. The first button invites the user to choose a folder on their disc that contains images that they would like to view. Once this button has been selected and a folder chosen, a new button appears on the screen allowing the user to choose the file to view. This is not particularly good programming practice but it provides you with an example of how you can create objects like buttons on a form that are only visible in certain circumstances which you control. When the user selects the file to view, it will be displayed in the picture box on the screen. The third button runs a small cosmetic feature which lets the user rotate around four possible background colours for the form. The final button on the form is a Close button which simply exits the project and closes the form. The Start Page contains links to a lot of handy information on Visual Basic including some video tutorials. Create the formThis is a simple and functioning program that you should be able to complete and use in around 30 minutes. To get started creating it, choose File, New Project to start a new project and, from the New Project window, select Windows Forms Applications and, in the name area, type the project name, PictureViewer and click Ok. On the screen you will see a small form and two tabs, one of these is the Form1.vb [Design] tab and the other is the Start Page you saw when you first launched the program. You can switch between Form Design and the Start Page by clicking the tabs at the top of the window. With the form view in front of you, click the Toolbox icon on the toolbar to open the toolbox. Click to open the Common Controls selection of tools as these are the tools that you will use in the project. You can click the Auto Hide button to make this toolbar appear permanently on the screen.
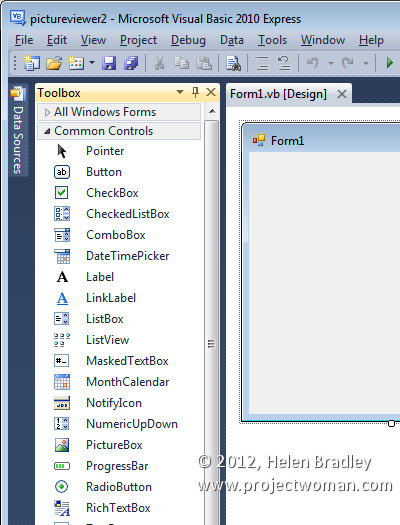
The toolbox contains a myriad of controls that you can include in your programs. Select the form so that the sizing handles appear around it and enlarge it to a good size - it needs to hold four buttons and a large image preview area. Choose View > Other Windows > Properties window to display the Properties panel - you will use this to set certain properties of the form and its controls. Properties are characteristics that the form has such as its colour, its title bar, whether it has borders around it, etc. Choose View > Other Windows > Solution Explorer to view the Solution Explorer panel. This shows the current project PictureViewer with the My Project and Form1.vb links below it. Across the top of this Solution Explorer area are two buttons of particular interest, the View Code button and the View Designer button. Clicking the View Designer button shows the form in Design view and clicking the View Code button will display the form coding area. The coding area is where you put the Visual Basic statements that actually make the project perform the tasks that you want it to perform. Return to Form Design view, click the Button icon in the toolbox and drag a button across the bottom of the form. Repeat this process to add three more buttons so that you have four buttons in total. These should be labelled, left to right, Button1 to Button4. Click the PictureBox control in the Toolbox and click and drag a large PictureBox onto the form. You also need two controls from the Toolbox, Dialogs collection. Open the collection and drag and drop the OpenFileDialog and the FolderBrowserDialog onto the form. When you do, these dialogs will appear on a special area at the foot of the area displaying the form dialog - this indicates that they are now accessible to your project - they don't actually appear on the form. You now have all the controls in place that you need to make your project work. Configure the propertiesNow you need to adjust the properties for these controls. Following the guide in the table, select each control in turn, and set the named property to the value indicated in the Properties area on the right hand side of the screen.
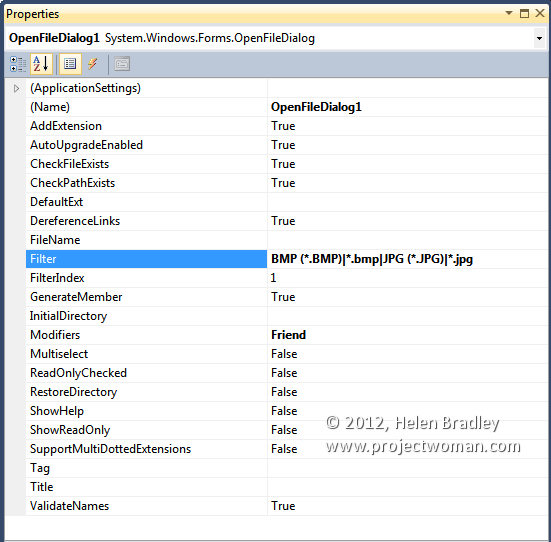
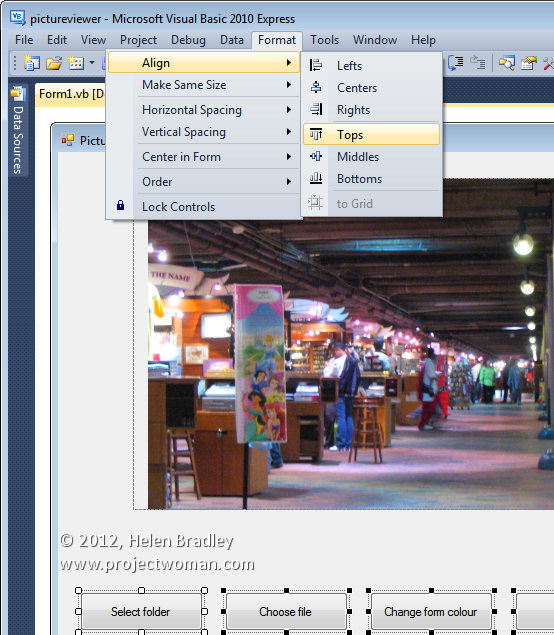
For each control you can configure its properties using the Properties pane, here we've entered the filter for the OpenFileDialog. With the PictureBox1 selected, click the Image option in the properties dialog and click the ellipsis to open the Select Resource dialog. Click the Local Resource icon, click Import and locate a file on your disc that you want to be the opening image for the program. This image will appear every time you launch the program. Click Ok. Select the FolderBrowserDialog1 and locate its SelectedPath property. Click the ellipsis to navigate to your My Documents folder or another folder you want to use as your default image folder. Now the buttons have their labels in place, size them all to the same size by first sizing Button3 to the size it needs to be to display its text. Now click Button3, and hold Shift as you click on the other three buttons (you must select the largest button first). Choose Format > Make Same Size > Both to size all buttons the same size. Choose Format > Horizontal Spacing > Make Equal to arrange them equally across the form and choose Format > Align > Tops to align them all so their tops are on the same level.
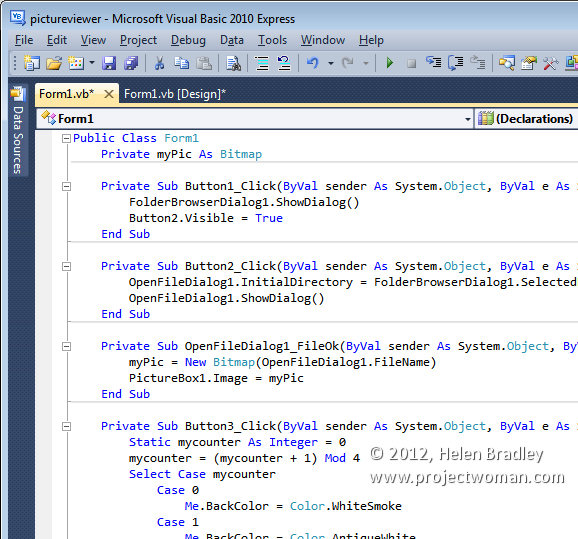
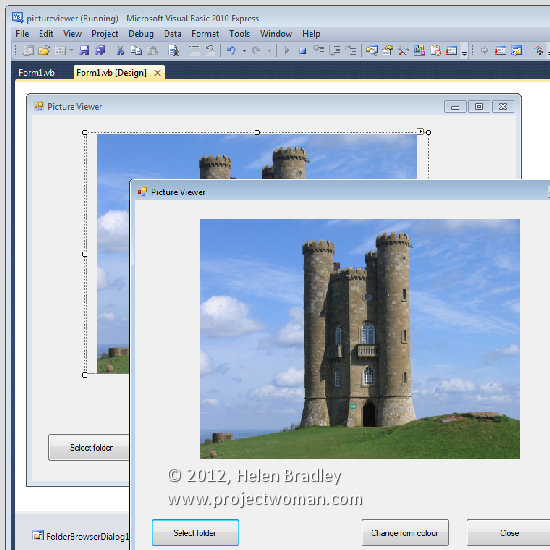
Use the Format options to configure the size and placement of the four buttons. At this point you should have an image on a form on your screen. You can test the program by clicking the Start Debugging button on the toolbar. This runs the program and you will see the PictureViewer form on the screen. You should also see three of the four buttons. Nothing on this form will actually do anything at this stage because you have not programmed it yet. However you can move the form around on the screen, you can resize it and you can click its close button - the one in the top right hand corner of the window. Close it now and you're ready to continue. Add the codeYou're now ready to add the code to the project. Before you do this save the project so that you will not lose the work done to date by choosing File > Save All and click Save to save the project. The View Code tab is where you type the code that does the work of displaying the chosen picture in the dialog. To add the code to the project double click the Select Folder button (Button1) and type this code between the Private Sub and End Sub statements: FolderBrowserDialog1.ShowDialog() Button2.Visible = True Double click the Choose File button (Button2)and enter this code between the Sub and End Sub statements: OpenFileDialog1.InitialDirectory = FolderBrowserDialog1.SelectedPath OpenFileDialog1.ShowDialog() Double click the Change Form Colour button (Button3), and enter this code between the Sub and End Sub statements: Static mycounter As Integer = 0 mycounter = (mycounter + 1) Mod 4 Select Case mycounter Case 0 Me.BackColor = Color.LightSlateGray Case 1 Me.BackColor = Color.PaleGoldenrod Case 2 Me.BackColor = Color.PaleGreen Case Else Me.BackColor = Color.LightCoral End Select Switch back to the Form Design view and double click the Close button (Button4) and type this code between the Sub and End Sub statements: End Return to Form Design view and double click the OpenFileDialog1 button at the foot of the screen and type this code between the Sub and End Sub statements: myPic = New Bitmap(OpenFileDialog1.FileName) PictureBox1.Image = myPic Finally, in the Code window underneath the line which reads Public Class Form1, type this line of code: Private myPic As Bitmap Save your project again. Run the project by clicking the Start Debuging button and test to ensure that the project works. You should be able to change the background colour to one of four colours by repeatedly clicking the Change Form Colour button. Use Start Debugging to test that the program works as you expect it to. When you click the Select Folder button you can select a folder on your computer that contains images to display on the form. When you do this the Choose File button will become visible allowing you to select a file from the folder. Notice that the files of type list gives you the option of displaying jpeg or bmp files - it does this because you configured this as the value for the Filter property of the FileOpenDialog. When you select a file it appears in the PictureBox area on the form. Click the Close button to exit the project. Program housekeepingTo view and run your completed project from outside the VB 2010 interface, choose File, Save All and then close your project by choosing File, Exit. You will find your project in your My Documents\Visual Studio 2010\Projects folder. Open the folder containing your project which has the same name as your project and locate the Bin\Debug folder. Your project's executable file will be found in that folder. To open your project so you can work on it again, launch the VB 2010 Express program and click File > Open, navigate to your My Projects folder, open your project folder and then click the project's .sln file. This opens your project in the program window - you will find your form and code accessible from the Solution Explorer area. How it worksHere's how the project works. When you click the Select Folder button, it launches the folder browser dialog which is one of the built-in Windows dialogs that you can access using VB. When you select a folder from the dialog it is stored in the SelectedPath property of that dialog. The second button on the form is then made visible so that it is clickable. When you click the Choose File button, the directory for the OpenFile dialog is set to the path that you chose when you selected a folder. The OpenFile dialog is then displayed on the screen so you can choose a file. When you choose a file and click Open, the OpenFile dialog's code loads the selected file as a bitmap image into the variable called MyPic. Then the PictureBox object's image property is set to this variable so the picture appears in it. The third button simply uses a static counter to rotate through a series of colours for the background colour of the form. This is similar code to the code used in the change case macro for PowerPoint that is also on the cover disc. When the Close button is clicked, the End statement forces the project to close. In this project you have seen how to create a new project and how to place various objects on the form and set their properties so that their default values are configured. You have also seen how it is possible to programmatically alter these default values - this happened when you made Button2 visible, when you set an initial directory for the FileOpen dialog and when you set the image value to the image to display in the PictureBox object. You've also seen one of the methods that can be used to make choices in a program in the use of the Select Case statement. Finally, you learned how to save and reopen your project and where to find the executable file for it. VB TerminologyEvent driven language- VB is an event driven programming language. You use it to create programs that respond to input from the user ("events") such as clicking a button or selecting a file.Object- A thing such as a button or a form that the user can interact with.Event- Something that happens to an object such as clicking it, holding your mouse over it. In VB, events are used to trigger code to be run.Property- A characteristic of an object such as the colour of a button, the title on a form.Control- A tool used to create an object on a VB Form, you choose these from the Toolbox. The term Control is sometimes used interchangeably with the term Object.
|
||||||||||||||||||||||||||
|
(c) 2019, Helen Bradley, All Rights Reserved. |