|
|
|
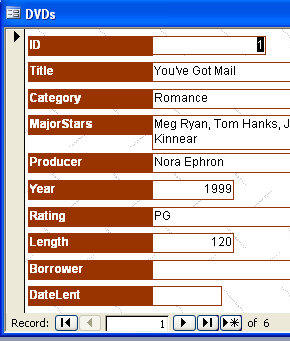
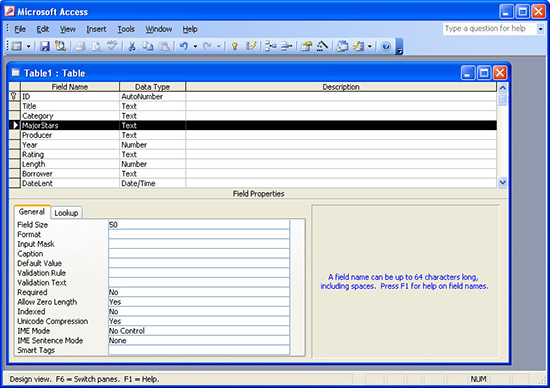
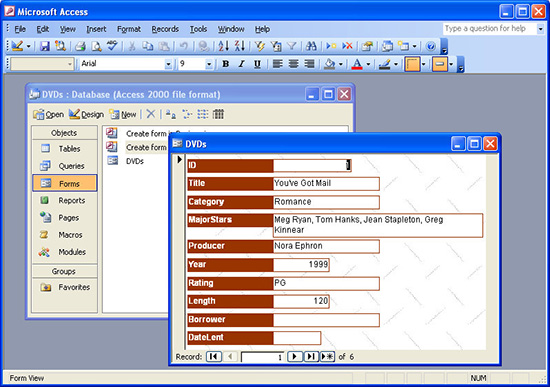
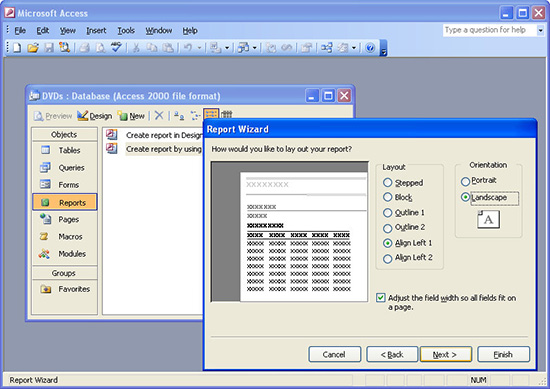
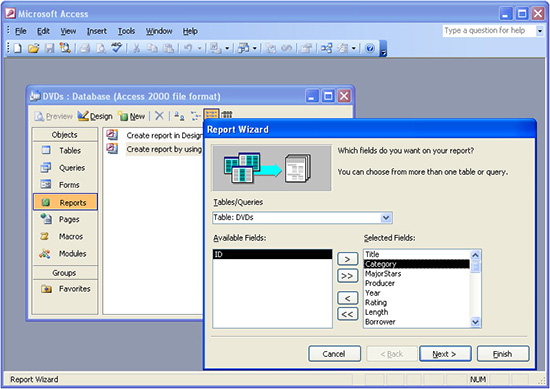
Microsoft Access - Create a DVD catalogHelen Bradley Learn how to restore order to your DVD collection with a database. I'll show you how to get started tracking a DVD collection (or any other collection) using your own custom designed Microsoft Access database.You have probably heard of Microsoft Access, but you may never have used it fearing that it is complicated and more than you need for simple lists. While it is true that Access is a powerful database program, it is also useful for recording and managing simple lists of data. In fact, Access in spite of its size, is relatively easy to use and offers features such as Wizards which step you through typical processes such as querying the database and creating data entry forms. I'll show you how to create a simple database table to store information about your DVD collection – although the process is similar for any type of collection. Along the way you will learn how to create the database, record information and query the data file – all the basic skills needed to manage any data file. Getting startedConsider this scenario; you have a lot of DVDs and you'd like to keep track of them. If you lend your DVDs to friends you can track this data to so you know where they are. To create a database to store the details of your collection, start by determining what data you need to record. To do this work out what information you expect the database to provide you with. For example, to know who has borrowed a DVD you will need a field to record the title of the DVD and one to record the name of the person you have lent it to. This is a sample list of fields you may use to record your DVD collection: ID, Title, Category, MajorStars, Producer, Director, Year, Rating, Length, Borrower, DateLent Create a data structureTo create a database for this, launch Access, choose File, New, Blank Database, type a name for your database (DVDs) and click Create. When the Database dialog appears, click Tables in the Objects list and click Create table in Design view. Here you enter the column headings for your table and each Data type. Use the fieldnames ID, Title, Category, MajorStars, Producer, Director, Year, Rating, Length, Borrower, and DateLent. All are character field types except ID which is an AutoNumber field, Year and Length are Number fields and DateLent is a Date/time field. To enter a field, type the field name, press Tab, type or select the field data type and then continue to the next field. Continue until all the fields are entered. When you're done, click the box to the left of the field name ID to select this row. Right click and choose Primary Key to set this field as the data table's primary key for sorting data. Click the View button at the far left of the toolbar and, when prompted, save your table and call it DVDs. The first step is to create a structure for recording your data. Enter your dataYou're now ready to enter some sample data into the file. Type the details for five or six of your DVDs into the list by typing the details into one column, and press Tab to move to the next column to enter the data there. If there is too much data to fit into one column, for example, you may have too much information to go into the MajorStars column, you can make the column wider. To do this, click the View button in the top left of the window to return to Design view. Select the field and, in the General tab, increase the value in the Field Size area to allow more room. When you are done, return to Datasheet view by clicking the View button and continue to enter your data. Notice that the ID field is an AutoNumber field so Access automatically increments the numbers for you as each record is entered. When all the data is entered, close the table by clicking the Close button in the top right corner of the window. This returns you to the Database dialog where you will see your table listed in the Tables area of the dialog. To open the table at a later date, click it and click Open. Create a Data FormA data form can make it easier to enter DVD details into your data file. Once you have entered the details of a few DVDs into your data file you might have realised that the Datasheet view is not particularly easy to work with. Not only is there a lot of data showing here but, if you move across to the right to enter details into one of the last columns – you can't any longer see the data from the first few columns. In all, its not a very easy method of entering data. In fact a simple form that shows only the current record – in our case a DVD – would be easier to use. Access lets you create forms for entering data and these can be designed with colour and neat headings so they're good looking and functional. To create a form in Access use the Forms Wizard. Click on Forms in the Objects area of the Database dialogue box and double click Create form by using wizard. In the first step of the wizard, your table will be selected. Click the double chevron to add all the fields in your table to the form. Click Next. Choose Columnar as the form layout and click Next. Choose an attractive Style from the list and click Next. Type the name DVD Data as your form name and click the Open the form to view or enter information option. Click Finish. The new form appears on the screen – to enter another DVD, click the New Record button on the toolbar and type the data. Forms are an attractive way to enter data and view successive records. Printing your data fileIt's one thing to put data in a database, sooner or later you'll need to get it out too. Step 1: Start the Report WizardClick Reports in the Objects list and double click Create report by using wizard. Select the fields to include in the report and click the chevron button to move each of them into the Selected fields pane. Click Next. Click a field to use it to group the data, for example, Category. Click Next.
Step 2: Choose your layoutChoose the field to sort your data on, such as Title. (In other situations, for example, when working with names you may need to sort on two fields, set the first field to Last name, and the second field to First name.) Click Next. Choose a layout such as Aligned Left 1 and Landscape orientation and click Next.
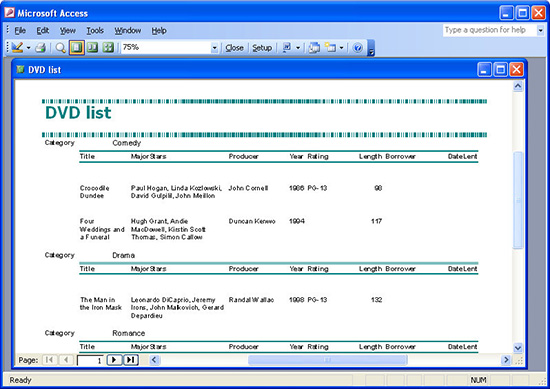
Step 3: View your reportChoose a report style to use, click Next and type a name for your report, select Preview the report and click Finish. Your report appears on the screen and you can print it by clicking the Print button or adjust its layout and design by clicking the View button.
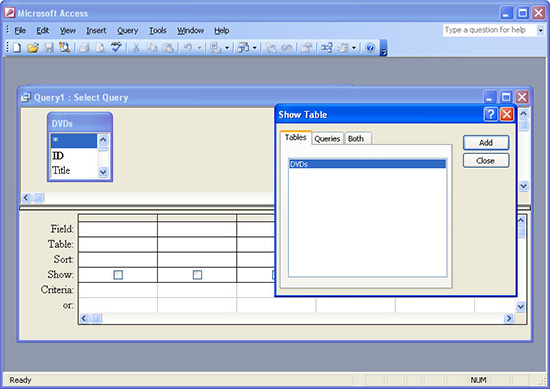
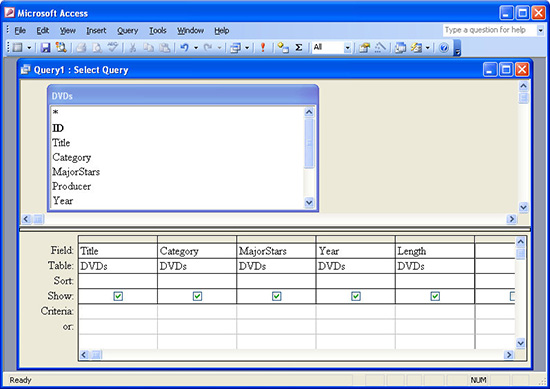
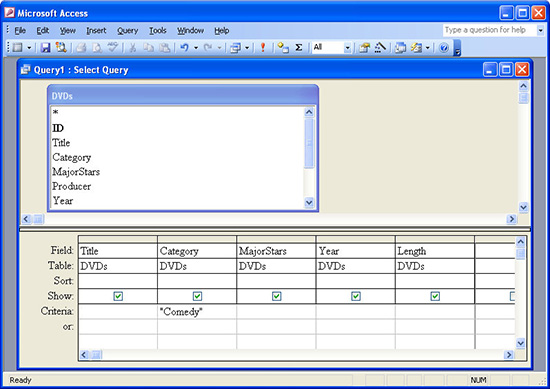
Finding a DVD in your collectionThe Access Query Design tool makes finding data in your DVD file a simple process. Step 1: Start your queryTo find information in your file, for example, to find all the Comedy DVDs, create a query. Click Queries in the Objects list and double click Create query in Design view. In the Show Table dialog, choose the DVDs table, click Add and then Close.
Step 2: Select the fieldsThe query is created using the on screen grid. Drag every field you want listed in the results into a column in the grid (you can also double click a field name to move it automatically there). Choose all the fields you want to see - include the Genre field too.
Step 3: Specify a Search valueTo locate all the Comedy movies, type "Comedy" (including the quotes) in the Criteria line under the Genre field name. Click the Run button on the toolbar (it has an exclamation mark on it) to run the query. Click the Design button to return to your query.
Short Cut and Quick TipsTo copy a field's value from the previous record (saving retyping it), press CTRL + ' (apostrophe). Add a pictureAdd a picture to a form in Design View by clicking the Image button and drag to create the shape, choose the image to use and click Ok. Force field completionTo force a field to be completed, in table Design view click the Field and in the Field Properties area set Required to Yes. Default dataTo place default data in a field (eg country UK), in table Design view, click the field and click the General tab and type the entry in the Default Value area. Hyperlink dataTo include hyperlinks in a data file, create a field using the Hyperlink data type. In Datasheet view, right click the field and choose Hyperlink, Edit Hyperlink. Find data in a fieldTo find data in a field such as Tom Hanks is the MajorStars field where he is only one of a number of stars, enter in the Criteria area for that field: Like "*Hanks*" |
|
|
(c) 2019, Helen Bradley, All Rights Reserved. |