|
|
|
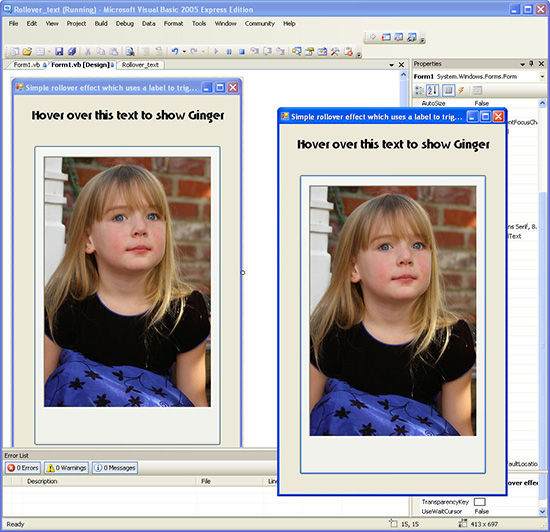
Visual Basic Express - create cool rollover effectsHelen Bradley How to add functionality to Visual Basic Express applications by adding Image Rollover and Text Rollover effects to them.One typical application that all new users of JavaScript learn is how to create rollover effects on web pages. A rollover is an element on a web page that changes when your mouse pointer hovers over that element or rolls over another element on the page. It is possible to borrow the concept of web page rollovers from JavaScript and to code the same effect in Visual Basic. Here I'll show you how to create three simple types of rollovers in Visual Basic. A simple rollover effectI'll start with a simple rollover which uses a label on a form to trigger the effect. When the user rolls their mouse over the label, a picture will appear, when they move it away, it disappears. Start by adding a label to a form. The text property of the label should be a prompt to the user to hold their mouse pointer over the label to display the image. Add a PictureBox to the form and in the Properties dialog, click the Image property and add an image to the PictureBox. Locate the PictureBox1 Visible property and set it to False. If your label is Label1 and your image is PictureBox1, this code will run your application: Private Sub label1_MouseEnter(ByVal sender As Object, ByVal e As System.EventArgs) Handles label1.MouseEnter PictureBox1.Visible = True End Sub Private Sub label1_MouseLeave(ByVal sender As Object, ByVal e As System.EventArgs) Handles label1.MouseLeave PictureBox1.Visible = False End Sub The code uses the Label’s MouseEnter and MouseLeave events so that when the user places their mouse over the label the MouseEnter event fires and the PictureBox Visible property is set to True. When the mouse leaves the label, the MouseLeave event fires and the PictureBox Visible property is set back to False to hide it. A picture rolloverA more sophisticated rollover involves rolling the mouse over an image and having the image change as you do this. This time the PictureBox’s own events need to trigger the rollover effect rather than having a secondary object do the work. To create this effect, create a single PictureBox on a form. You will need to add your two images to the Resources list by clicking the ellipsis to the right of the PictureBox Image property in the Properties dialog. When the Select Resource dialog appears, click the Project Resource File option and click Import. Select the two images to use (these should be the same size) and click Open. The two images should appear in the list. Click the image that you want to display in the PictureBox by default and click Ok. Double click the PictureBox and add this code to the PictureBox’s MouseEnter MouseLeave events. Private Sub PictureBox1_MouseEnter(ByVal sender As Object, ByVal e As System.EventArgs) Handles PictureBox1.MouseEnter PictureBox1.Image() = WindowsApplication1.My.Resources.Resources.ginger2 End Sub Private Sub PictureBox1_MouseLeave(ByVal sender As Object, ByVal e As System.EventArgs) Handles PictureBox1.MouseLeave PictureBox1.Image() = WindowsApplication1.My.Resources.Resources.ginger1 End Sub Note that, in my case the images I used are called Ginger1 and Ginger2 with Ginger1 being the image that appears in PictureBox1 by default – you will need to change the file names to match those of the images in your resources file. Replace WindowsApplication1 in both cases with the name of your project. A simple rollover can be created using a label to show or hide an image on a form.
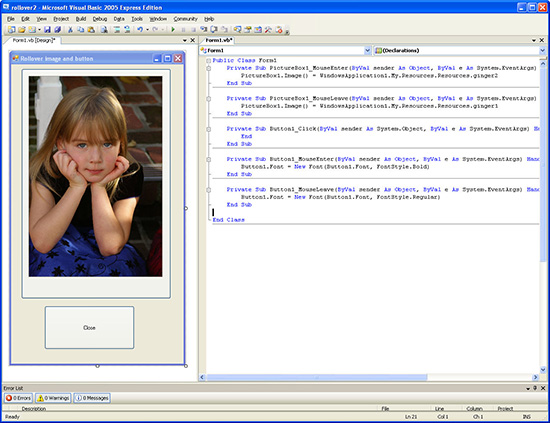
Rollover text effectAnother option for a rollover is to have a text element on the form change when the mouse pointer is held over it. For example, if you have a Close button you can make the text on the button change from regular text to bold as the mouse pointer is held over the button. On the same form as you are now working on, add a button and set its text property to Close. Set its Enabled option to True and double click it and type the word End as the code in its Button_Click event. This ensures that when the button is pressed the program will end. You can now type this code into the button’s MouseEnter and MouseLeave events: Private Sub Button1_MouseEnter(ByVal sender As Object, ByVal e As System.EventArgs) Handles Button1.MouseEnter Button1.Font = New Font(Button1.Font, FontStyle.Bold) End Sub Private Sub Button1_MouseLeave(ByVal sender As Object, ByVal e As System.EventArgs) Handles Button1.MouseLeave Button1.Font = New Font(Button1.Font, FontStyle.Regular) End Sub You might notice that the code for turning the font on the Cancel button to bold is not quite what you might expect. The Button1.Font.Bold property is a read only property and, while you can read it to determine whether or not the text on the button is bolded, it cannot be used to set the font. Because of this, when you need to change the font property of the button you need to create a new font based on the existing font and alter the property that you want to change for this new font. In my case I used the Button1.Font value as the basis for the new font and used FontStyle.Bold to make the text bold while the mouse pointer is hovered over it. Of course, if the mouse is removed from the button before the button is pressed, to complete the effect the font must be returned to the regular style and this is done by creating yet another font based on the existing button font, this time with the FontStyle.Regular attribute. When you’re done, test the form. Clicking the Close button should close the program and holding the mouse pointer over the Close button should not only highlight the button which is the standard Windows behaviour but also the font should appear in bold an attribute which will disappear when the mouse is removed from the button. You can incorporate these rollover effects or your customised versions into your own Visual Basic programs. This second rollover works when the user’s mouse is over the image to switch to another image and it includes a rollover effect for the button text too.
|
|
|
(c) 2019, Helen Bradley, All Rights Reserved. |