|
|
|
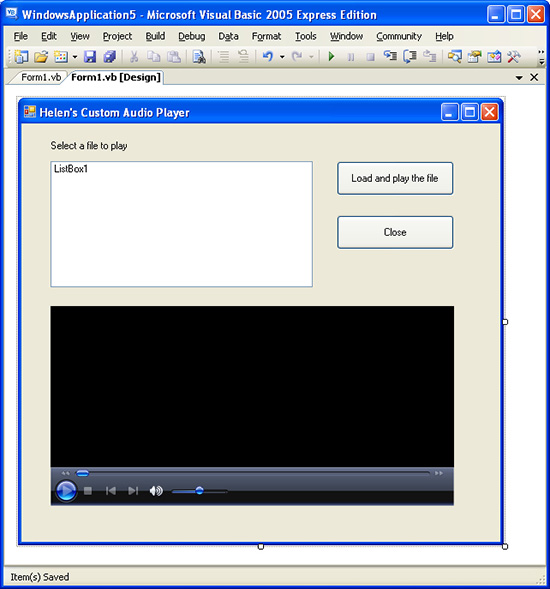
Visual Basic audio file player - Part 2Helen Bradley How to add functionality to the audio file player in Visual BasicYou've ripped music from CDs to your My Music folder and now you want a simple application to play the files. Look no further than Visual Basic, it's a simple process to build your own player and configure it to look in your preferred location for the tracks to play. In this second part of my tutorial, I'll take the bare bones of the player from Part 1 and turn it into a WMA track player. There are two features of Visual Basic that make this application simple to create. One is the WindowsMediaPlayer control and the other is MyNamespace. The WindowsMediaPlayer control gives you all the features of the Windows Media Player accessible on a form using a single control and My Namespace lets us access and get the contents of the My Music directory with a single line of code. The player has the same basic design as the one in Part 1 – the project comprises a form, a label, two buttons, the WindowsMediaPlayer control and a Listbox. Here are the text properties you should set for each control: Form1 Audio Player Label1 Select a file to play Button1 Load and play the file Button2 Close To find the WindowsMediaPlayer control, right click the Components entry in the Toolbox, choose Choose Items > COM Components tab and locate the WindowsMediaPlayer control. Enable its checkbox and click Ok. This adds the WindowsMediaPlayer control into the Components collection. Drag and drop the player control onto your form. This is the basic form that controls the music player.
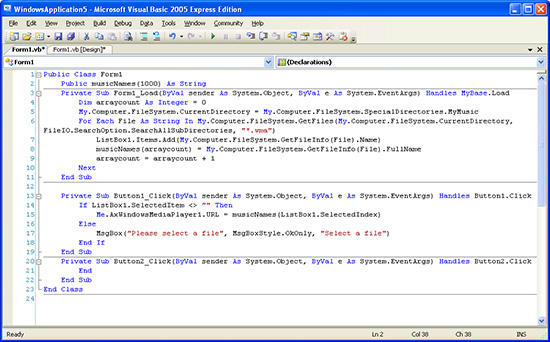
Accessing the music filesWe will use the My.Computer.FileSystem.SpecialDirectories.MyMusic property to find the music files stored in the My Music folder and in its subfolders. In last month's solution only the current directory's contents were searched but in the case of music tracks stored in the My Music folder, the solution will be more useful if it offers us all the music tracks in all the subfolders of the My Music folder. Additionally, in the first part of this series we searched for and played just WAV files whereas this time we'll search for and play WMA format files – this is the format used when Windows Media Player rips music from CDs. So, this player can find and play music you have ripped using Windows Media Player. This statement should appear in the Form1 Declarations section: Public musicNames(1000) As String
This code should be added to the Form1_Load event: Dim arraycount As Integer = 0
My.Computer.FileSystem.CurrentDirectory =
My.Computer.FileSystem.SpecialDirectories.MyMusic
For Each File As String In
My.Computer.FileSystem.GetFiles(My.Computer.FileSystem.CurrentDirectory,
FileIO.SearchOption.SearchAllSubDirectories, "*.wma")
ListBox1.Items.Add(My.Computer.FileSystem.GetFileInfo(File).Name)
musicNames(arraycount) =My.Computer.FileSystem.GetFileInfo(File).FullName
arraycount = arraycount + 1
Next
The statement declaring an array of 1,000 items will be used to hold the music file names. We're assuming there are no more than 1,000 WMA files in your My Music folder and, if you have more, you will encounter a program error. If you have a lot of music files, increase the array size to, for example, 10000. This array is used to store both the filenames and the associated file paths of all the WMA files retrieved. The filenames only of these files are displayed in the Listbox. To avoid confusion, the array has the same ordering as the listbox so each filename that appears in the Listbox has an associated entry in the musicNames array. The array is required because although we're are only displaying the filename in the Listbox, both the filename and the path must be passed to the WindowsMediaPlayer control in order to play the file. We could display filename and path in the Listbox but it would look pretty messy if we did so. In this Form1_Load event, the Listbox is populated with the filenames and, at the same time, the array is filled with filenames and paths. This code should be added to the Button1_Click event: If ListBox1.SelectedItem <> "" Then
Me.AxWindowsMediaPlayer1.URL = musicNames(ListBox1.SelectedIndex)
Else
MsgBox("Please select a file", MsgBoxStyle.OkOnly, "Select a file")
End If
When a user selects a file in the Listbox and clicks the button, the code sends the filename and path of the selected file to the WindowsMediaPlayer control. It identifies the selected track from the Listbox1.SelectedIndex property which contains the location in the Listbox of the selected item. This is used to determine the array element containing the filename and path of that track which is then sent to the WindowsMediaPlayer control. When the WindowsMediaPlayer control receives a URL it automatically plays the track. This is the code for the Button2_click event: End
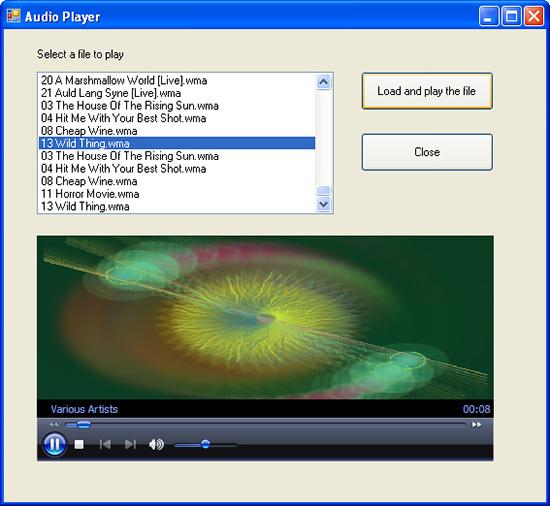
If you completed part 1 of the project you'll realize this code is more complex. In Part 1, the Listbox was populated with filenames only because we knew exactly which folder the files came from. When we needed to provide these filenames and the path to the file to WindowsMediaPlayer control we simply hard coded this into the URL we sent. This month because we are searching subfolders we won't know which folder the selected file came from so we need a way to find it. Storing this data in an array when the form is loaded is one possible solution and the one we're using. The code for the project includes an array to store the filename and path of the music tracks. Once you've created your project, save it and build it by choosing the option on the Build menu. The player plays ripped WMA files stored in your My Music folder.
|
|
|
(c) 2019, Helen Bradley, All Rights Reserved. |