|
|
|
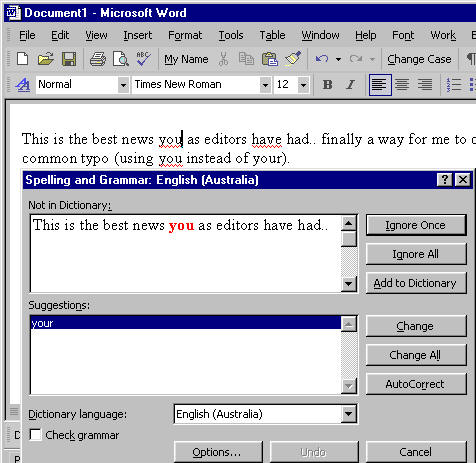
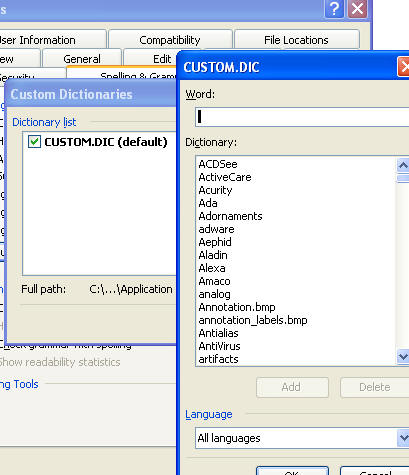
Spelling in Microsoft Word All you ever wanted to know about Spell Checking in Word (but were afraid to ask!). Helen Bradley ventures into the bowels of the Microsoft Word Spell Checking tool to answer every query you've ever had about it. If you're anything like me you'd be hard pressed living without your spell checker. It's not that I don't know how to spell its just that it's all too easy to hit the wrong keys when you're in a hurry and it's difficult to properly proof a document when reading it on the computer screen. Your spell checker is a handy, although flawed, adjunct to the proofing process, for example it won't pick up a correctly spelled word used incorrectly (eg inn for in). While you may think that spell checking is as simple a process as pressing F7, then you may be interested to know there's more to this tool than first meets the eye. Quick spellWhen you're typing with Automatic spell checking turned on, you can alter an underlined word by right clicking it. The popup menu will give you options to chose from including alternate spellings. When you're done, continue editing your document or press Alt + F7 to move to the next error. If you're using the Spelling and Grammar dialog (press F7 to spell check the document), you can move between the dialog and your document to make edits by pressing Control + Tab and then, when you're done, click Resume in the dialog to continue with the spell checking. Spelling optionsIf you're annoyed by Word's squiggly red and green lines you can stop them from appearing by disabling automatic spelling (red) and grammar checking (green). Choose Tools, Options, Spelling & Grammar and disable the Check spelling as you type and Check Grammar as you type checkboxes. In some cases you'll want Word to spell check your document but not certain parts of it, for example you won't want to check HTML or computer code. To flag this text so it isn't checked, select it and choose Tools, Language and enable the Do not correct spelling or grammar checkbox. Now, when the document is spell checked this text will be skipped. If you need to use this option frequently, consider creating a style called NoSpellCheck and save it to your default template. Then you can apply the style anytime you need to exclude text from being checked. In a similar way you can mark text to be spell checked using another language. For example, if you're preparing a document for a customer in the USA you may choose to apply US spelling to the document (to trap words like colour, labour etc.). To do this, select the text, choose Tools, Language and select the language to use to proof the text. Provided the requisite language support is available (you'll be prompted to install it if it is not), the correct dictionary will be used to check the text and Word will swap from one to another if the change takes place in the middle of a document. Often you'll have spell checked a document and you may have chosen Ignore Once or Ignore All in response to a reported error. If this is the case, the word won't be reported as a spelling error when you run a second spell check, although it will if you close the document and Word and start both up again. If you need a fresh spell check, choose Tools, Options, Spelling & Grammar and click Recheck Document. This clears the current list of words to ignore and they'll be identified as problems by the spell checker. Custom DictionariesWhen you click Add to Dictionary, Word adds the current word to a user dictionary which, if you haven't specified an alternate one, is called Custom.dic. This file is a simple list of words which you've added to your dictionary and it is editable (see the step by step walkthrough). However, Word's own dictionary is not able to be edited, although as you'll see shortly you can flag words to be excluded from it. It is possible to have more than one custom dictionary and to have different dictionaries for different uses. For example if you work in a medical practice you can buy a dictionary of common medical terms to add functionality to your spell checker. Alternately you can build your own specialty dictionary as you work - by adding correctly spelled words to it every time one is stopped by the spell checker. This is less convenient but it's free - you just need to regularly back up your dictionary so you don't lose it. Also ensure that the 'Suggest from main dictionary only' option in the Spelling & Grammar options is disabled so that possible corrections can include words from your custom dictionary. You can manually add words to the Custom.dic file (or any custom dictionary) by typing the word in a document, check its spelling and click Add to Dictionary. Alternately you can add words using the same process that you use to remove misspellings. Word 2002 has a custom dialog for this and, in Word 2000 and 97 you can simply add the word into the correct place (alphabetically in the list). However, you'll probably find the spell check method as simple as any to use. If you need to create a new dictionary, choose Tools, Options, Spelling & Grammar and click the Custom Dictionaries button. Click New to create a new dictionary or click Add to add one you have purchased or downloaded from the Internet. Excluding wordsOne frustrating aspect of Word is your inability to access Word's own dictionary. So, for example, if you frequently use a word in the wrong context but if the spelling you use isn't a technical misspelling (eg you use affect when you should use effect), it isn't possible to 'remove' the word 'affect' from the dictionary so you'll always be prompted to check it. However, you can create an exclusion file with the word or words in it and they'll be flagged as misspellings. This isn't easy but it's not hard to do either. The tricky part of the technique is finding the filename and location to use. Choose Start, Find, Files or Folders and search for Mssp*.lex. This will show you the current lexicons that you have installed any of which may be being used. You'll need one exclusion file (.exc) for each .lex file. In Word 97 the .lex and the .exc files should be in the same folder, in Word 2000/2002 put the .exc files in the same folder as your custom.dic file. If you're unsure where custom.dic is, use the Start, Find process to locate it, and if there are multiple versions, choose the one with the most recent date on it. To create your .exc file create a plain text file (use Notepad or Wordpad or Word but save the file as plain text) and type one excluded word per line in this file. Save the file with the correct name and location (you may need to save it multiple times with different names to create one .exc file for each .lex file). Now close and restart Word to test the result. What should happen is that the words in your exclusion file should be flagged as potential spelling errors so you can check them visually every time they occur. You can only choose Ignore Once and you can't choose Ignore All and you also can't choose Add to Dictionary. If you change your mind and want to stop these words from being excluded, remove them from the .exc files.
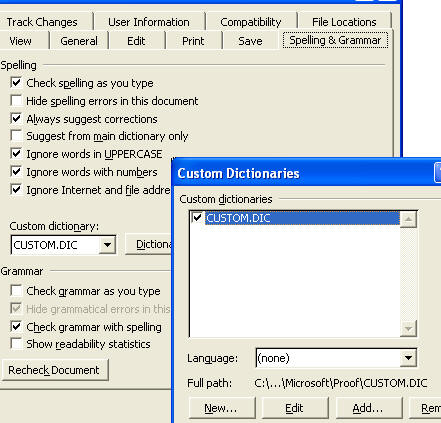
Status bar optionsIt is possible to set Word to check spelling in the background while you work but not to display the problems it finds on the screen. To do this, in the Spelling & Grammar options dialog select the Check spelling as you type checkbox and check the Hide spelling errors in this document checkbox too. You can do the same for the Grammar options. Word will now work in the background but not display the wavy lines which indicate errors have been encountered. When you're ready to view the Spelling and Grammar problems, double click the indicator in the Status bar (it's an open book with a pencil or X on it). You'll see the wavy lines appear on the screen and Word will select the nearest error and display a shortcut menu for you. From here you can select a replacement word or other options such as Ignore and Spelling. To return to where you were, right click the icon and choose Hide Spelling Errors to hide them again. The Spelling and Grammar icon on the status bar shows the current state of the document you're working on. When it shows a moving pencil over the book it is checking spelling as you type. When you see the book with an X on it this indicates that there is a spelling error flagged in the document. If, instead, the book has a checkmark over it the document is error free. As you can see, spell checking is anything but simple and there are plenty of tools and techniques you can use to make Word's spell checker work smarter. Oops! I made a mistakeIt's sure to have happened to you, you thought you clicked Change but you clicked Add to Dictionary instead and now Word won't pick up that misspelled word any longer. When this happens, don't panic, here's how to fix the problem: Word 2002-3 editingIf you are using Word 2002 or 2003, you can edit your dictionary by choosing Tools, Options, Spelling & Grammar, click Custom Dictionaries, click the default dictionary and click Modify. A list of words appears on the screen, select the one to remove and click Delete. Click Ok three times to exit.
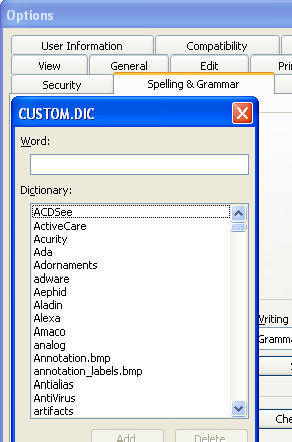
Earlier Word versionsThe process is a little different if you’re using Word 97 or 2000. Choose Tools, Options, Spelling & Grammar, click Dictionaries and choose the dictionary to modify (there's probably only one dictionary in this list), then click Edit. A new word document opens with a list of the words you've added to your Custom.dic file.
Correcting the errorLocate the misspelled word, select it and press the Delete key (you should remove the entire line which the word appears in). Now save and close the file, answer Yes to any prompt which appears warning about possible formatting losses. If you had Automatic Spell Checking enabled before you edited the file turn it on again (choose Tools, Options, Spelling & Grammar tab).
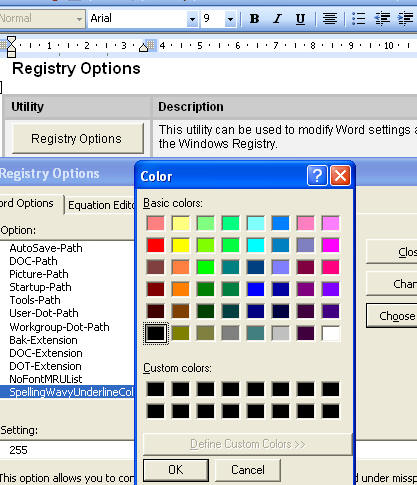
Spell checking in Excel Spell checking an Excel workbook? Select all the sheets before you start the spell checker to check all of them at the one time (right click a tab and select Select All Sheets). When you're done, right click the tab again and choose Ungroup Sheets to return to where you were. How do I spell…?If you've ever wondered how to spell a word, your spell checker can help. For example, if you're unsure a word is spelled with an i or an e, (eg, definite) type the part you do know and use a question mark in place of the bits you don't know (eg defin?te), select the word and press F7 (spell check). Word will attempt to find words which match this pattern and offer them as alternate spellings. The question mark is called a wildcard and you should use it to replace one missing character in a word. Change the color of wavy underlines in WordSpelling errors are shown on the screen in red but they don't have to be red - you can make them any color you want. To do this, locate and open the file Support.dot - use the Windows Search to find it on your computer. On mine it is in the Program files\Microsoft Office\Office11\macros folder. Open it in Word and then click the Registry Options button to open the dialog. At the bottom of the list are these two settings: SpellingWavyUnderlineColor for highlighting spelling errors GrammarWavyUndlineColor for highlighting grammatical errors Click the setting to alter, click Choose Color and choose a color to use. Click Ok. when you're done, click Change to write the change to the Windows registry and then close and restart Word to view your changes.
If you can't find your copy of support.dot, check out this Knowledge Base article to see how to install it: Install Support.dot. |
|
|
(c) 2019, Helen Bradley, All Rights Reserved. |


 Helen Bradley