|
|
||||||||||||||||||||||||||||||||||||||||||||||||||||||||||||||||||||
Access Queries - getting to your dataHelen Bradley More important than getting data into your database is how to get it out.The most likely reason for creating a database is to make it easy to extract information from the data stored in it. However, getting data out of a database isn't always as easy as getting it in. So, herewe'll address this issue and look at some ways you can extract data from a database as well as methods you can use to calculate data using a query. We'll also look at how you can create a form to display a query's results. By the time you've finished with this tutorial you should be able to create a query for just about any purpose using any database. We've used Access 2000 for this tutorial but you will be able to get similar results using any version of Access -- you may, however, find some of the menu options are a little different. We'll start with some quick simple queries so you can follow the tutorial even if you're new to Access, then we'll move quickly into more complex ones. Before you beginTo follow the tutorial you will need some sample data. I'll use the data from a recent column on creating an Access database (Issue 174). The data is a simple table but contains enough detail to create even complex queries. If you don't have it from the previous column take a minute to create a table called Members, with this structure and enter this data into it:
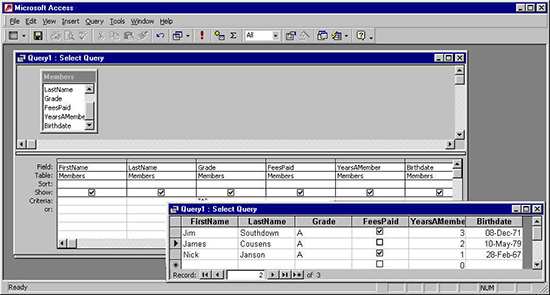
Extracting matching dataTo create a very simple query, for example, to list everyone who plays A level cricket, click the Queries option in the Objects list and chose Create query in Design view. In the Show Table dialog, choose your table's name and click Add and click Close. The Select Query dialog appears and you can create your query using the grid displayed on the screen. To list the fields to display in your query, drag each field you want to display from the list in the top half of the dialog and drop into a column in the grid (or double click its name and it will move automatically). For now, add all the fields individually (you could add them all by dragging the asterisk * entry but don't do this because you can't then specify individual criteria for them). To find everyone who plays A grade cricket, type A in the Criteria line under the Grade fieldname and press the Run button (it has an exclamation mark on it) to run the query. To sort the data in the query results you can select the field to sort on and click either the Sort Ascending or Sort Descending button on the toolbar. To return to your query design click the Design button in the top left of the toolbar.
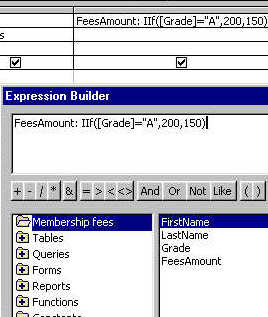
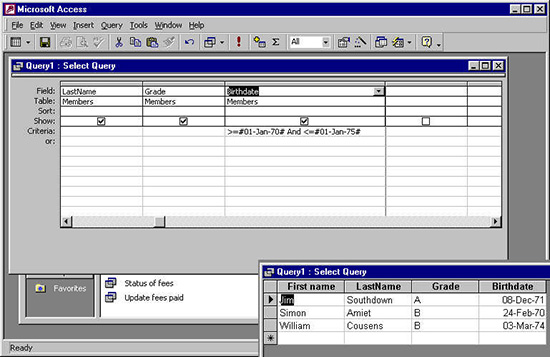
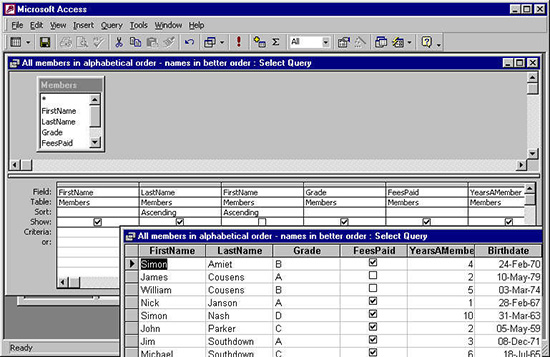
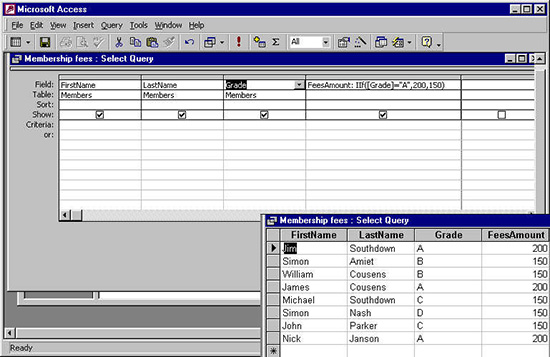
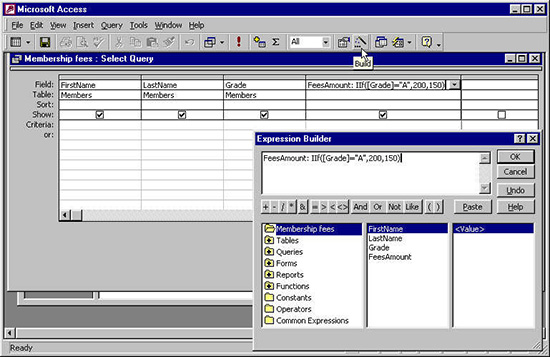
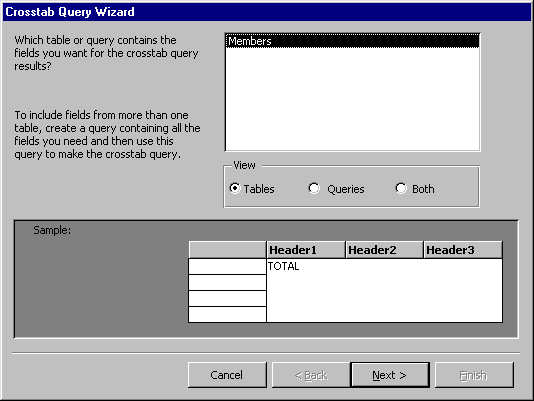
You can create a simple query by entering the criteria to match in the Criteria line in the Query dialog. And and Or queriesYou can make a query on two different criteria by entering them onto the same Criteria line (for an And query) or different lines (for an Or query). So, for example, to extract everyone who plays A or B grade cricket you would type A in one Criteria row under Grade and B in the line below. To list everyone who plays A grade and who has been a member for 2 years or less, type A in the first criteria row below the Grade, and <=2 under YearsAMember in the same row. This will list only those players who both play A grade have been members two years or less -- it's an AND search. This AND query allows you to locate matching records for which the birthdates are between two dates. To list everyone who's either been a member 2 years or less or who plays A grade put the criteria in different rows (this is an OR search). If you want to test a single field for two criteria, for example list everyone who was born between 1/1/1970 and 1/1/1975 you would enter >=#1/1/1970#and<=#1/1/1975# as the criteria under the Birthdate field (notice that the hash symbols are used to identify the data as being date data). Sorting query dataIf you know ahead of time you can specify a sort order for your data by clicking in the Sort cell for the field you will sort by and choosing Ascending or Descending depending on your preference. If you want to sort on more than one field, then ensure the columns are ordered so that the first field to sort by is on the left and the second is on the right. Let's see how this works by sorting all the cricketers in name order in such a way as two people with the same last name will appear in order by first name. Begin by dragging the LastName field to the left of the FirstName field as we'll sort by last name first -- you can do this by clicking the bar above the field in the grid to select it then drag it to the new position. Now set both LastName and FirstName fields to sort in Ascending order. Now, so you can check it's working, remove any other criteria you may have entered so your query will display all entries in the database, and click Run. Using calculated data in a queryWhile the results of the sorted query work just fine, having data in last name, first name order isn't particularly attractive. To work around this, you could approach the task one of two ways. One way is to hide the existing FirstName field so it doesn't display in the final results and then to add another FirstName field to the left of the LastName field. You can't move the existing FirstName field or you'll mess up the sort order (it will always go from left to right across the columns). Because queries are sorted from left to right you may sometimes have to create and hide duplicate fields to get acceptable results. To try this approach, disable the Show checkbox in the FirstName column and drag another FirstName entry from the box in the top of the Select Query dialog and drop it to the left of the LastName field. Run this query to prove that this approach works. An alternate method is to hide both the last name and first name fields and to add a third field which displays the first name and last name in one column. This is done by concatenating or joining the data from two fields. To do this, remove the extra FirstName field by selecting it and pressing the Delete button on your keyboard. Deselect the Show checkbox for both the LastName and FirstName fields. Now add a new column by clicking where the column is to appear and choose Insert, Column. In the Field area of this new column type: Name: [FirstName] & " " & [LastName] This creates a new field in the query results window called Name and includes in it the contents of the FirstName field, a space and the contents of the LastName field. This new field is a calculated field and it only exists in the query itself and not in the underlying table. Using a calculated field to concatenate data like is only one of a multitude of possible uses for calculations in queries. Here's a calculated field which calculates the value of a person's fees depending on whether they play A grade or not. If they play A grade their fees are £200 and if they play another grade their fees are £150: Fees Amount: IIf([Grade]="A",200,150) The IFF function is similar to Excel's IF function, and it contains the test, [GRADE]="A", which tests the contents of the Grade field for each record. The first value is the one used if the test is evaluated as True (200) and the second is the one used if the text evaluates to be False (150). Calculated queries can involve logical tests like this one which uses an IIF test to calculate the membership fees based on the Grade played. If you had a database with details of products in your inventory with a field called CostPrice containing the cost price of an item and a field called InStock with the current stock numbers, this expression would calculate the value of these items: Value: [CostPrice]*[InStock] If you are having trouble seeing the full extent of a formula in the Select Query view you can open the Expression builder dialog by clicking the Build button on the toolbar. The results are exactly the same but it's often easier to use the Expression builder not only because there's more room, but also because Help is closer to hand. The Expression Builder gives you more room to create you expressions and makes it easier to get Help when you need it. Formatting the resultsWhen you create calculated fields like the one for Membership fees, you may want to display the data neatly formatted, for example, displaying currency symbols. To do this, click in the calculated field in the Select Query view and click the Properties button on the toolbar. Choose the General tab and click the dropdown list in the Format area. From here you can select a format to be used to display the data in the calculated field, for example, currency. You can also change the field name used to display a field in the query results. For example, in place of LastName you may want the field heading to appear as Last Name. To do this, in the LastName column, in front of the fieldname type the name to display at the top of the column followed by a colon. For example, the LastName entry could look like this: Last name: LastName The data won't change, but the column heading will look neater and easier to understand. An alternative solution which is more permanent, in the sense of not requiring you to make the alteration for each query, but which doesn't alter the actual fieldname (which may have repercussions for other areas of your database) is to use the Caption property in the table's design view. To set a caption for a field, open the Table in Design view, click the field to use and type an alternative name in the Caption area. This name will be used as the heading for a Query's results and in both Reports and Forms, in place of the field's actual name. Saving and reusing queriesMost queries can be saved and reused at any time in the future. Because of this, it's handy to create queries which can be easily reused and one way to ensure this is to use a parameter query. For example, instead of having a query which extracts details of players who play A grade, why not create one which extracts details of players who play any grade you specify at the time you run the query. Queries like this are called Parameter queries and are simple to create. There is one parameter query used in the Forms example in the step by step instructions. In addition to simple matching queries like the one used in that example, you can create parameter queries for multiple criteria. For example, if you want to be able to extract people born between certain dates, you would enter this into the Birthdate field: Between [Type earlier date] and [Type later date] This will prompt you to type two dates and it will then display all entries between those dates. Top entries To do this, you create a regular query, for example one displaying the FirstName, LastName and Birthdate fields for all the members in the club. Instead of simply choosing Run to run the query, click the Top Values button which is currently displaying All on the toolbar. From this you can select 5 to display the top 5 entries in the database. Then set the Sort order for the data to Ascending or Descending on the Birthdate field. If you choose Ascending, the data will be arranged from smallest date to largest, i.e. oldest to youngest and the top 5 will be the oldest members of the club. If you want the youngest 5 members, sort the Birthdate field in Descending order. You can also choose to extract a percentage of entries, for example the top 25%. If you want to use a certain number or percentage which isn't listed in the dialog, type the number to use yourself. To return to viewing all matching entries you must choose All from the Top Values list. If you set a Top Value it will be saved with your query when you save it and because the setting is only visible on the toolbar and not in the Query Design view it's very easy to overlook that it's been set. Accessing totalsInstead of seeing the data itself, often all you'll want is a raw number of entries, for example, you may want to know how many members have paid their fees and how many are unpaid. To do this, create a query containing the FeesPaid field only. When this field is inserted in a new query, choose View, Totals and you'll see a new row called Total is added and its current entry for the FeesPaid field is Group By. Now add a second copy of the FeesPaid field and, in place of Group By, choose Count for the Total entry. Run the query and notice that this displays the number of members whose fees are paid and those which are unpaid. One column is used to list the two options (paid and unpaid) and the other to display the count for each. While this query is simple and effective, it would be easier to use if the checkboxes were replaced with the words Paid and Unpaid. You can do this, if you replace the FeesPaid entry in the Field for the first column with this expression: Fees Status: IIf([FeesPaid],"Paid","Unpaid") The query results will then be more easily read. Whatever your needs, you'll find getting a handle on queries will make it easier for you to extract the data that you've taken so much time and effort to store in your database. Analysing data with a CrosstabA Crosstab allows you to analyse the data in your file by grouping it together. For example, let's analyse how the number of years a person has been a member relates to the Grade they're playing: Step 1Click the Create query by using wizard option and click New, from the New Query dialog choose the Crosstab Query Wizard option and click Ok. In the Crosstab Query Wizard dialog, choose the Members table as the source table and click Next.
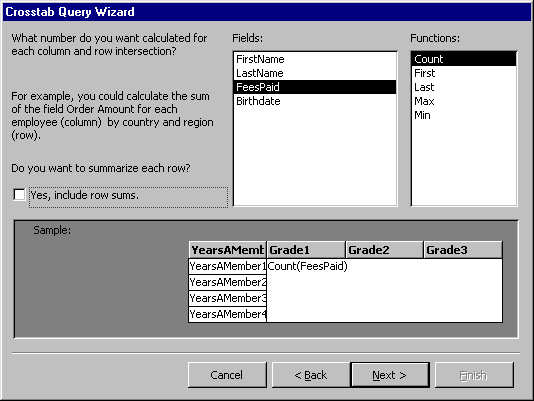
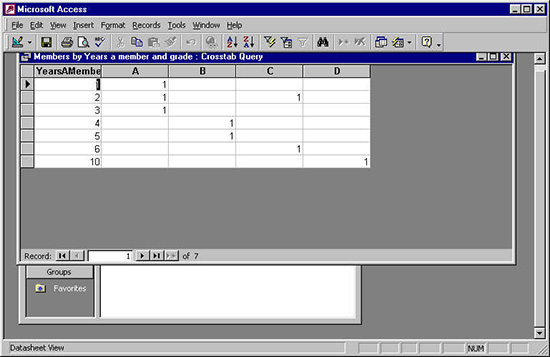
Step2When prompted for a field for the row headings, choose the YearsAMember field and click the chevron to move it to the Selected Fields list. Click Next to continue. When prompted for the column headings choose the Grade field and click Next. When prompted for the calculation to make, choose the FeesPaid field and click Count in the Functions list. Disable the Yes, include row sums option.
Step 3Click Next, choose the View the query option and click Finish. You can now see the spread of data in the file. For example, there are three Grade A players (reading down the column) and, of these, they have been members 1, 2 and 3 years respectively.
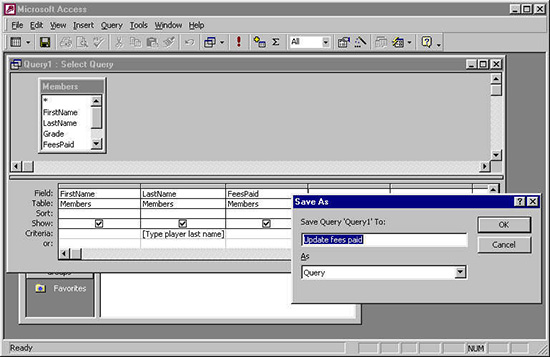
Create a form based on a queryIt's often handy to create a form based on a query, for example, this form example makes it easy to update the database when a player pays their fees. The form lists the player's name and allows the user to check the fees paid box. Step 1Create a query using design view which will display each player's FirstName, LastName and FeesPaid fields. To allow a user to limit the query so it displays only those results for a particular player click in the Criteria area under the LastName entry and type [Type player last name]. Save your query.
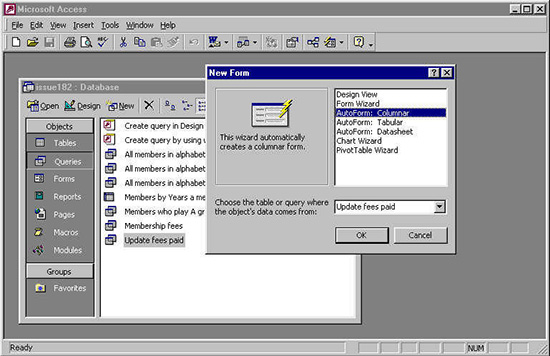
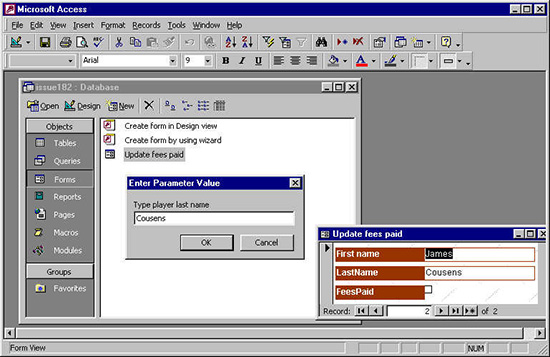
Step 2With the query selected, choose Insert, Form, choose AutoForm: Columnar and click Ok. When you're prompted to type the last name of a player, type Amiet and click Ok. A form containing that player's details will appear on the screen. Save this form.
Step 3Now, whenever you want to updated the payment of fees details for a player, double click the form you've created to open it and type the player's last name when prompted. You can then scroll through players with that same last name to locate the one to update, click the FeesPaid field to change it and close the form.
|
||||||||||||||||||||||||||||||||||||||||||||||||||||||||||||||||||||
|
(c) 2019, Helen Bradley, All Rights Reserved. |