|
|
|||||||||||||||||||||||||||||||||||||||||||||
Access - creating Relational Databases
|


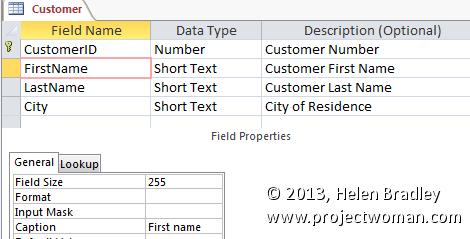
| Field Name: | Data Type: | Description: | Field Size: | Caption: |
| CustomerID | Number | Customer Number | N/A | Customer Number |
| FirstName | Short Text | Customer first name | 20 | First Name |
| LastName | Short Text | Customer last name | 20 | Last Name |
| City | Short Text | City of Residence | 20 | City of Residence |
To set the Primary key for the database, click in the margin opposite the CustomerID field to select it, right click and choose Primary Key from the menu. A key will appear in the column to the left of the field indicating the key has been set.
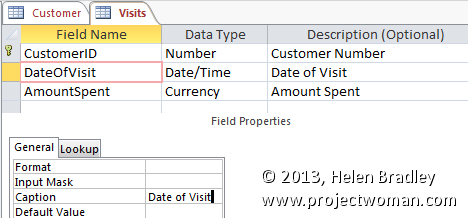
Click Create > Table and repeat these step to create a second table, called Visits. It should have these fields and captions.
| Field Name: | Data Type: | Description: | Field Size: | Caption: |
| CustomerID | Number | Customer Number | N/A | Customer Number |
| DateOfVisit | Date/time | Date of Visit | N/A | Date of Visit |
| AmountSpent | Currency | Amount Spent | N/A | Amount Spent |
Do not set a primary key for this table so, if prompted to do so, answer no. If the Primary key is created for you automatically, as it is in this example, below, right click the row and deselect the Primary key so it is removed. Close and save both tables before continuing.
Create the Relationship
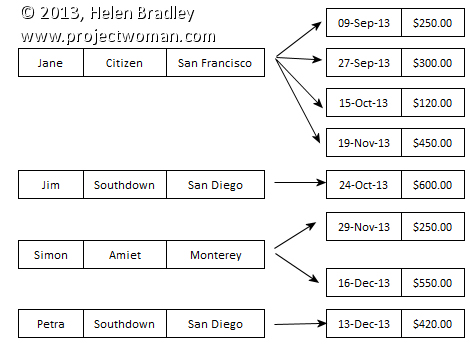
Once the tables are created you must tell Access how they are related so it can manage the data for you. It will ensure that, for example, you don't try to add a visit for a customer that does not exist.
To create the relationship choose DataBase Tools > Relationships. When the Show Table dialog appears, click Customer and click Add, then click Visits and click Add and then click Close.
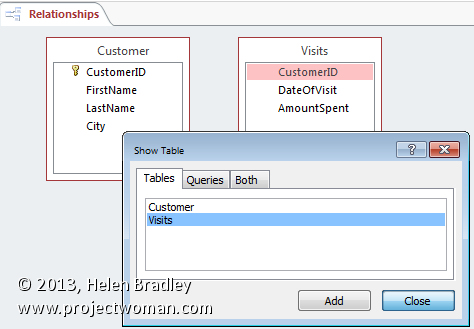
You'll see two lists on the screen displaying the fields in each table. Click on the CustomerID field in the Customer table and drag it over the CustomerID field in the Visits table and let go.
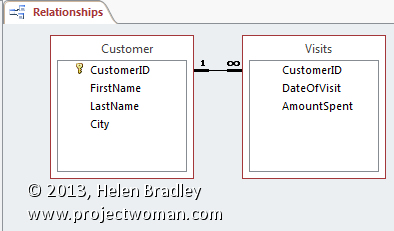
When the Edit Relationships dialog appears click the Enforce Referential Integrity checkbox and Access will protect your data against you deleting or making changes to one table that will affect the data in the other table. Click Create to continue.
You can now close the dialog and answer Yes when prompted to save your changes.
Entering data
Now the tables have been created, you can enter your sample data. To do this, open each table in turn and choose Home tab > View > Datasheet View so you're viewing the table in editing mode. Enter this data into the Customer table:
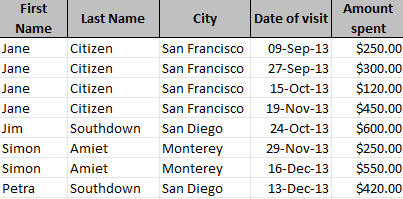
CustomerID     FirstName        LastName        City
2001           Jane             Citizen         San Francisco
2002           Jim              Southdown       San Diego
2003           Simon            Amiet           Monterey
2004           Petra            Southdown       San Diego
Enter this data into the Visits table:
CustomerID        DateOfVisit       AmountSpent
2001                09-Sep-13       $250.00
2001                27-Sep-13       $300.00
2001                15-Oct-13       $120.00
2001                19-Nov-13       $450.00
2002                24-Oct-13       $600.00
2003                29-Nov-13       $250.00
2003                16-Dec-13       $550.00
2004                13-Dec-13       $420.00
Working with your data
Once the data is entered into the tables you now see how to view it. Below you will see short step-by-step walkthroughs showing you how to create a form to make it easier to enter data into your tables and also how to create a report containing the data from both tables.
In addition to these, you'll also find plenty of use for Queries which allow you to extract information from the data you have stored.
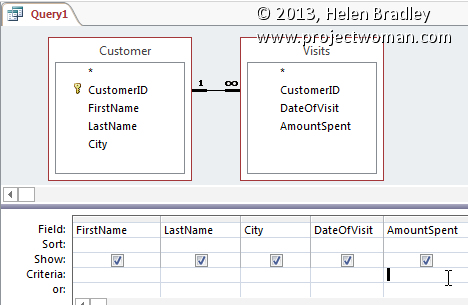
Consider the situation where you want a list of the customers who visited your store and the date of these visits. To do this, from the Objects list choose Create tab and click Query Design. In the Show Table dialog choose the Tables tab and select each table in turn and click Add and then Close.
In the Customer table box, double click the FirstName, LastName and City fields in turn to add them to the Query area below.
Repeat this for the Visits table and add the DateOfVisit and AmountSpent fields to the grid below.
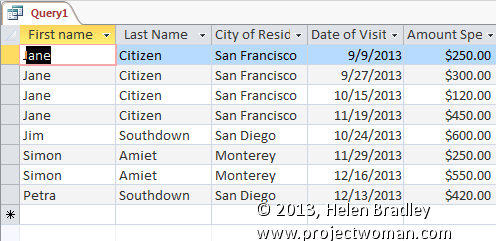
Click the Run button (it shows as an explanation mark) and you'll see this list appear:
Sort the Query Results
To order the list so the query results appear in order by the date of the visit, click the Home tab and View > Design View. In the DateOfVisit field column, click in the Sort cell to display the menu and choose Ascending.

When you click Run to run the query again, notice that this time the list appears in order by the date of the visit.
To save this query so you can run it again at anytime, click its Close button and answer Yes when you're prompted to save the query. Type a name for it (e.g. Customer details by date of visit) and click OK.
Totals and calculations in queries
You can total results of a query. For example you can total all the amounts spent by each customer for the month of September.
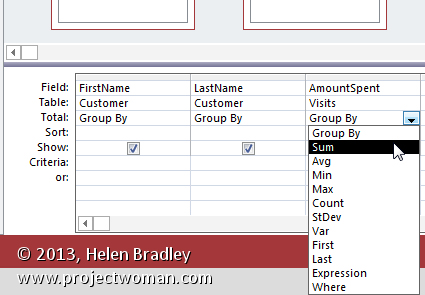
To do this, create a new query using the same process as detailed above this time containing just the fields FirstName and LastName from the Customer table and the AmountSpent field from the Visits table.
Choose Query Tools > Design > Totals and a Total line will appear in the query grid. From the Group By dropdown list under the AmountSpent field name choose Sum.
Now run this query.
You can see that you have almost all the information you need, you just need a way to limit the data to visits that took place in September.
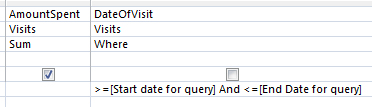
To add this function to your query, return to the query design view and add the field DateOfVisit as the fourth column of your query (note that the order of the field names in the columns is critical).
Disable the Show checkbox for the field DateOfVisit as you don't want the data displayed on the screen. From the Group By dropdown list for this field, choose the option Where and in the Criteria area for the DateOfVisit field type this line:
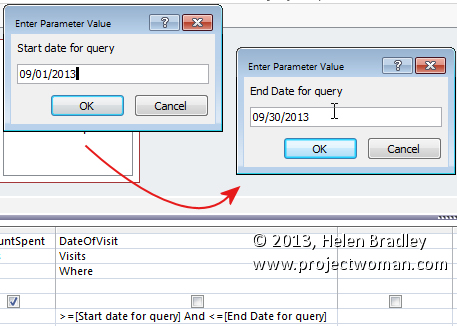
>=[Start date for query] and <= [End Date for query]
The square brackets tell Access to ask you for the start and end date before the query results are displayed.
The symbols for 'greater than or equal to' (>=) and 'less than or equal to' (<=), ensure when you type the start and end date that any purchases made on those dates are included in the summary.
Now run the query. You will be prompted to enter the start date which, for the month of September, is 09/01/2013 and then the end date which is 09/30/2013.
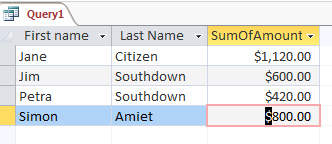
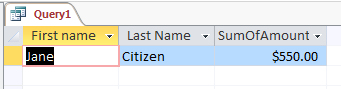
The result of the query will appear on the screen showing each customer and the amount in total that they spent for the month of September.
Note that rather than asking the query to extract the data for September you have asked it to ask you which dates to use every time you run the query. This allows the query to be used to extract the amount spent by each customer for any period of time, for example use 09/01/2013 to 10/31/2013 to get the total amount for September and October.
It's a good idea to create queries like this that can be used over and over again without needing to be altered.
This sort of query is also good for users who aren't familiar with Access - it lets them find information without having to write a custom query to do it.
You can save this query for reuse by clicking its Close button, answer Yes to the prompt to save it and give it a name like 'Customer spending summary by user inputted date range' and click OK.
Creating a Form for a Relational Database
To make it easy to enter data into a relational database you can create a form to handle the data entry.
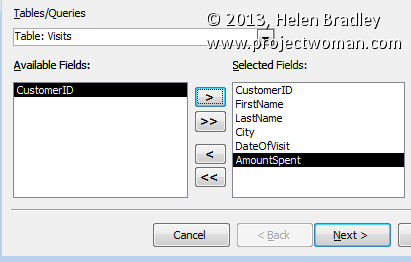
To do this, choose Create > Form Wizard. From the Tables/Queries dropdown list choose Table:Customer and click the double chevron (>>) to move all the fields into the right pane.
From the Tables/Queries dropdown list choose Table:Visits, add the DateOfVisit and AmountSpent fields to the right panel. Click Next.
When prompted with "How do you want to view your data?" choose 'by Customer'. Click the Form with subform(s) option and click Next.
Click Datasheet and click Next.
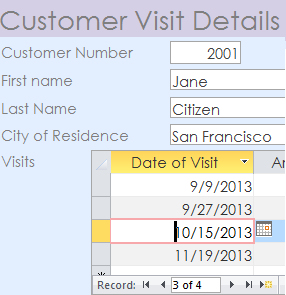
Name your form Customer Visit Details and choose the Open the form to view or enter information option and click Finish.
The form will appear on the screen and you can use this to view the data in the table by clicking the navigation options at the foot of the screen.
Notice that, for each Customer, there is a subform containing the data from the Visits table.
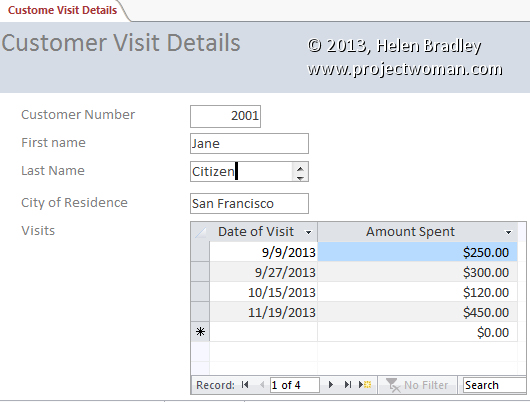
You can enter new customers and new visits using this form. So, test it by entering a new customer: Customer ID 2005 – Francie Machin of San Deigo and record her first visit on the 12/06/2013 when she spent $430.00.
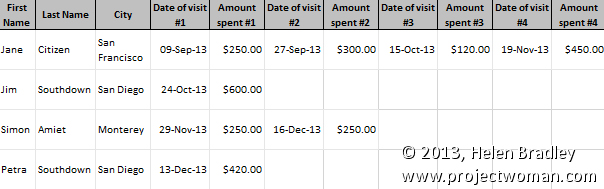
Reporting on Relational data
Access makes it easy for you to gather the data from related tables into a single report. You can also get some handy summary statistics.
To create a report listing the information from the Customer and Visits tables choose Create > Reports and then Create > Report Wizard.
From the Tables/Queries dropdown list choose Table:Customer and click the double chevron (>>) to select all the fields. Now, choose Table:Visits and add the DateOfVisit and AmountSpent fields. Click Next.
When prompted with "How do you want to view your data?" choose 'by Customer', and click Next.
Choose to group your data by City and then click Next.
Choose DateOfVisit as the sort field from the dropdown list.
Click Summary Options, select all the checkboxes and click OK. Click Next.
Choose Blocked and Landscape and click Next.
Name your report 'Customer Visit Details', choose Preview the report and click Finish.
Wait while the report is compiled and the results displayed on the screen.
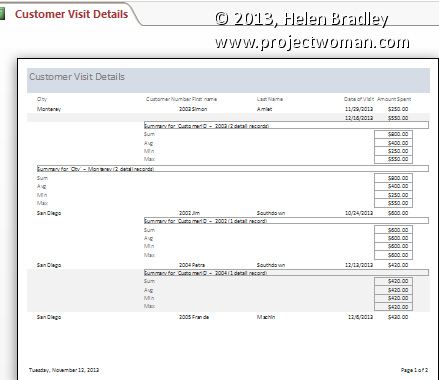
If the text boxes containing the data on the report require adjustment to display the data more clearly, click Home tab > View > Design View, make your changes and return to the report preview to view the results.
When you're satisfied, close and save the report so you have it available to use again in the future.
(c) 2019, Helen Bradley, All Rights Reserved.