|
|
|
Organizing Text in Word
Helen Bradley How to organize text in columns in Microsoft Word.Microsoft Word columns help you to create a better looking document when that document is text heavy. Columns not only help you to organize text in a newspaper style format where text runs through a series of narrow columns but they are also useful for step by step documents and even some reports and brochures. Here I will show you how to organize text in columns in Word and how to create a document that looks like it is formatted in columns but, in fact, uses tables instead. Finally, I'll show you how you can get the look of columns using linked text boxes are useful when you want text to flow around a document. I'll explain each of these features and explain when you should use each and when. Column BasicsThe Word columns tool lets you divide the page vertically into two or more columns in such a way that text that you type into them runs down the first column until it is full and then it snakes over to start again at the top of the second column. When this column is full, the text snakes up and begins to fill the third column, if there is one. If not, a new page is begun and the text begins to fill the first column of the new page. This column feature is also known as newspaper columns and they are obviously handy for newsletters but they also work well for training documents. You may find you get more text on the page if you use columns and it looks neater and more professional. In addition, text is more easily read when in columns because the line of text is shorter.
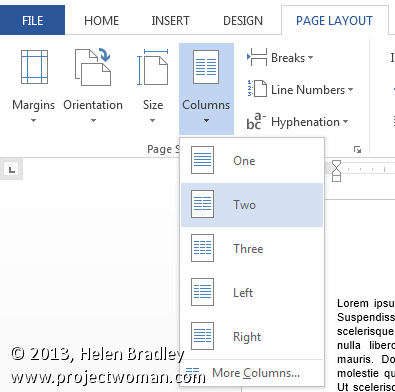
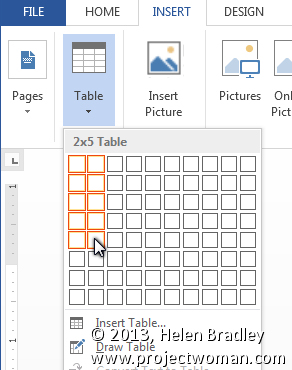
Use the columns feature to create a newspaper type document in Word. Columns are best viewed in Print Layout view so you should switch to this view before using columns - do this by choosing View > Print Layout. You can create columns before typing text or after it is typed. To format a document with columns, choose Page Layout > Columns and select the number of columns to use. Typically, for A4 or Letter size paper two or three columns is plenty. Use two columns for training materials and two or three for newsletters.
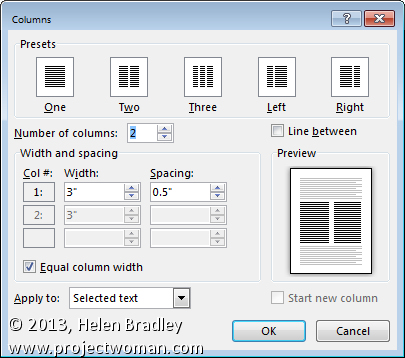
By default columns are created equal in width but if you want to change this, choose More Columns from the dropdown list to view the Columns dialog. Here you can disable the Equal Column Width checkbox and, instead, set your own column widths and custom inter column spacing. Make sure to allow enough spacing between columns to make a clear visual distinction between them - otherwise the lines of text will run into each other and they will be hard to read.
The columns dialog also has an Apply To setting which lets you specify where the columns start. This is an important setting, particularly where you want a heading of the document to be the full width of the page and the columns to begin under the heading. In this situation, place your cursor where you want the columns to begin (after the heading, for example), then choose Page Layout > Columns > More Columns and set the number of columns and, From the Apply To list choose This Point Forward so that the columns begin at the cursor position, after the heading. If you want a vertical line between the columns, check the Line Between checkbox. This line will be black and it is a fixed width which can't be altered. When you are done, click Ok to confirm your settings. If you have the Ruler visible on the screen you will see column markers on the ruler line. To view the ruler, choose View > Ruler. If you set up columns ahead of typing the document you can now go ahead and start typing. As you do so, the text will scroll around to fill the column. When you reach the end of the page the text will then snake around to fill the next column on the page. When the page is finished then a new page will begin. Managing text in columnsTo finish a column of text before you reach the bottom of the page you can press Enter once (to get a new line), then choose Page Layout > Breaks > Column. The text will then jump to the top of the next column even though you haven't yet reached the bottom of the page.
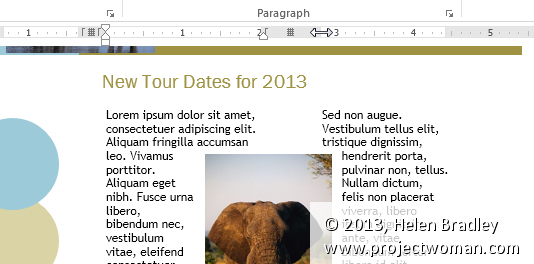
You can view the column break as you would any other special Word code by clicking the Show/Hide¶ button on the Home tab of the ribbon. Column breaks can be deleted like any other Word code by placing your cursor just in front of the column break and press Delete. When you do this the column break will disappear and the text will realign down the first column to fill it and only overflow into the second once the first column is full. When you're working with columns and if you need to move between columns you can either click with your mouse or use these keyboard shortcuts: To move to the next column: press Alt + Down Arrow To move to the previous column: press Alt + Up arrow These commands will only work where there is text in a column. So, if the second column is empty, pressing Alt + Down arrow won't do anything. Adding picturesWhen you are working with columns you can create pictures and Clip Art objects that span the space (gutter) between two columns. For example, choose Insert > Picture and choose an image to insert into the document. Click the image and from the Picture Tools > Format tab set the Wrap Text option to Square or Tight. You can now drag the image over the gutter between two columns and it will push the text out of the way so it scrolls neatly around the image.
Remove columns from a documentTo remove columns from a document, select the text that is the subject of the columns and choose Page Layout > Columns > One. This will remove the columns reinstating the text to a single column which spans the full width of the page. Limit Columns to a portion of the document onlyTo format a small portion of a document as columns, first select just the text that should appear in columns. Now choose Page Layout > Columns and select the number of columns to use. This time only the selected text will appear in columns and text above and below it will remain unchanged. Adjusting column settingsWhen you have text formatted in columns you can adjust the column width either using the Columns dialog or from the Ruler Bar. To use the Ruler bar, drag on the markers at either edge of a column to make it wider or narrower. If the column markers won't move when you drag on them, hold the Alt key and they will all size together. You may need to do this if you have configured columns to be equal in width.
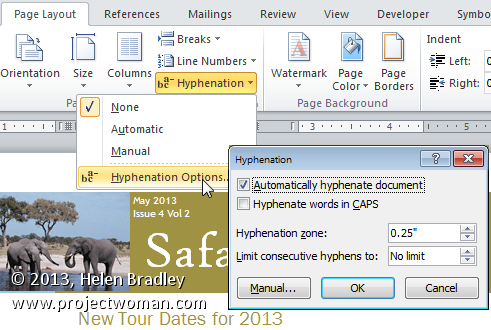
Balance Newspaper style columnsYou can also balance newspaper style columns so that the same amount of text appears in each column. You would do this, for example, when you have finished entering your text and where the last column is not full. To do this, choose Page Layout > Break > Continuous. This adds a section break at this point in the document evening out the columns even though the end of the page has not yet been reached. Should you wish to start a new page at this point, choose Page Layout > Break > Page or you can simply begin a new set of columns. Adding tables to columnsIt is possible to add a table to a column layout by choosing Insert > Table and create the table as you would any regular table. A table can span two columns much as an image does. To do this, click in the table and drag the table move button (which appears outside the top left corner of the table) to move the table over the gutter between the columns. Like an image, the table pushes the text out of its way so it wraps around the table . HyphenationWhen you format text in columns the lines of text are much shorter than they would otherwise be and some lines don't look very neat if a long word has been forced to the next line. You can even up lines of text if you hyphenate those words which appear at the end of a line of text. To do this, select the text to hyphenate and choose Page Layout > Hyphenation > Hyphenation Options. Check the Automatically Hyphenate Document checkbox and set the Hyphenation zone and the value for the Limit Consecutive Hyphens To setting and click Ok. Word will now automatically hyphenate your text so the margins will be more even.
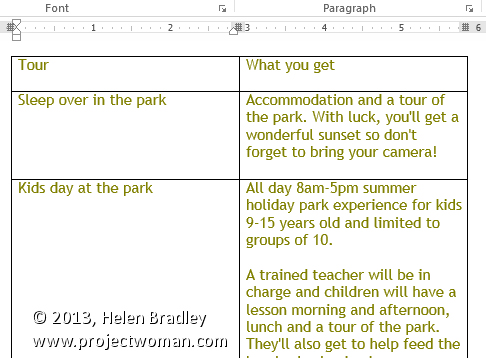
When lines of text are too short hyphenate the text to even up the margins. Another alternative for column text is to use Justify alignment option on the Home tab of the Ribbon. This stretches the text to the full width of the column so both edges are even and straight. Alternatives to ColumnsSometimes columns are not the best solution to the task at hand. Here are two situations where columns aren't the best answer. Side by side paragraphsWhen you need paragraphs of text to appear opposite each other but in such a way that, when you add text to one paragraph this does not affect the text opposite it on the page, use a table instead of columns. To do this, click where the table should appear and choose Insert > Table and create a table with one row for each matching set of paragraphs. So, if you need 5 paragraphs or lines of text on the left of the page then make a 5 row, 2 column table.
Click in the first cell and type the text for the first paragraph in your series of 'columns'. Press the Tab key and type the text that should appear opposite this. Continue to press the Tab key and Word will take you to the next cell. If there are insufficient rows then pressing Tab will add a new row. As you enter information into the table notice that the text in opposite cells each cell full of text will stay in a fixed position opposite the text in the cell opposite it.
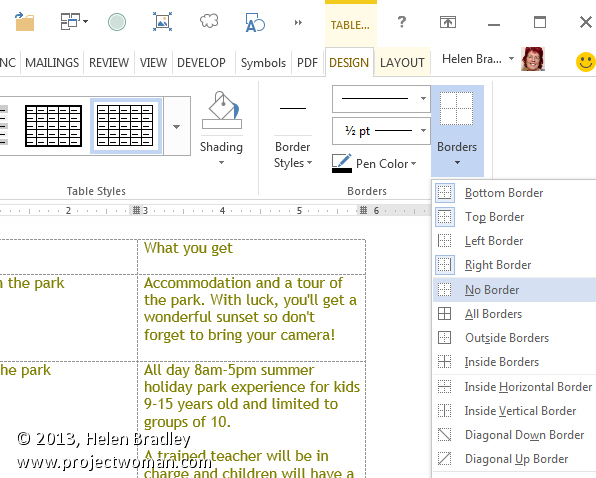
When you are done select the Table and then choose Table Tools > Design tab and then Borders and click No Borders. This removes the borders so you get the impression that columns are being used but at the same time making the layout of your text very stable. The doted guides which remain won't be visible on the printed version.
Text boxes as columnsWhen you want text to flow through a document but where you don't necessarily want it to be placed neatly in snaking columns you can use text boxes. One benefit of text boxes is that they let you place text on multiple pages of a document exactly where you want it to be. To create linked text boxes, choose Insert > Text Box > Draw Text Box and drag to create a text box on the page.
Type the text into the text box. If there is too much text to fit in the text box click Insert > Text Box > Draw Text Box and draw a second textbox. It doesn't matter where in the document you do this, except that the second text box mush appear somewhere after the first. You can then link the two text boxes together. To do this, click in the first text box and, from the Drawing Tools > Format tab click the Create Link icon. Then click in the middle of the second text box - the mouse should show as an upturned pitcher and when you click in the second text box it will be filled with the text that would not fit in the first text box.
|
|
|
(c) 2019, Helen Bradley, All Rights Reserved. |