|
|
|
Tables 101 - Organizing data using Word tables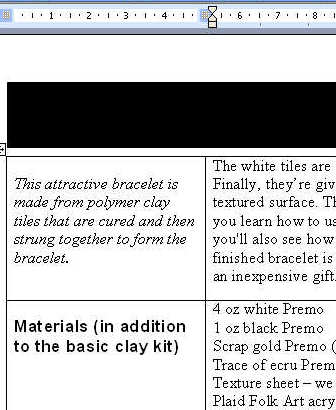
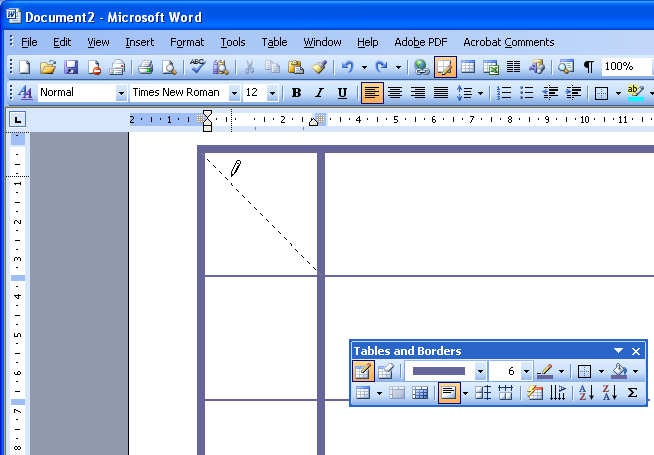
Helen Bradley How to work with tables in your Word documents.All around you from the bus timetable to the performance figures for your superannuation fund you'll find data organised in tables. Tables with their grid like arrangement of columns and rows make it simple to layout complex data so it can be easily viewed. If you've ever designed a web site you'll also know that tables are good for laying out information. While you might not be making a web site in Word, you can still use tables to hold data invisibly in place in your document – your reader won't know they're there but, behind the scenes, they'll be doing much of the work. Here you'll learn how to create and use tables in Word. I'll also show you how to move and select data in tables and some handy table keystrokes. Create a tableYou can create a table in a Word document a number of different ways. One is to choose Table, Insert, Table and then set the number of columns and rows and a format to use (this is optional), and click Ok. Another method involves drawing the table – choose Table, Draw Table and use the Draw Table tool with your mouse to draw the table on the screen – you can subdivide cells by drawing horizontal or vertical lines and erase a border and join two cells together by choosing the Eraser tool then draw over the line to erase.
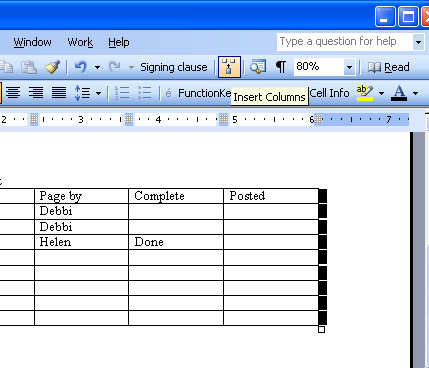
Using the Table Draw option you can draw the table and its cells using your mouse. Another method of creating a table is to use the Insert Table button on the toolbar, here you can drag over a grid to select the number of rows and columns for your table. The result, however you create it, is the same basic table structure in your Word document. When you're creating the table, it's more important to get the number of columns right than the number of rows as adding more rows is a simple task later on. To add more rows, click in the bottom right corner of the table and press the Tab key – when you do this a new row is added to the table – it's that simple. To add a new column, hold your mouse pointer to the right of the right most column of the table and slightly above the top row. The mouse pointer will change to a down pointing arrow and, when it does so, click once to select the end markers for the rows. Now choose Table, Insert, Column or click the Insert Columns button on the Formatting toolbar – the Insert Table column becomes an Insert Columns button when you make this selection. You can also join cells in a vertical or horizontal direction or a block of cells by selecting them and choose Table, Merge Cells.
To insert a new column into a table, select the end of row markers and click the toolbar button. Selecting table elementsWhen you've created a table, select the table by clicking on the small box that appears in its top left corner. To alter column widths, click somewhere in the table and hold your mouse over a column divider until the mouse pointer changes to a set of parallel lines with arrows to either side. Click and drag to narrow or widen the column. Make sure, when you do this, that you don't have an actual table cell selected, if you do, then the border of that cell only will be adjusted and not the entire column width. You can also alter column widths using the markers on the ruler bar. The width of a column and its impact on the columns to its left varies depending on whether you drag the marker or if you hold Control or Shift as you drag on it. In a similar way you can alter the height of a table cell if you drag on the border between it and the cell below or you can use the markers on the vertical ruler. Holding Shift or Control as you drag on a marker has a different effect on the overall size of the table and the size of the table rows below the one you're working on. To select a table row, move your mouse pointer to the left of the row until it changes shape to an arrow and then click. If you hold the mouse button and drag downwards you will select multiple table rows. To select a column, position your mouse pointer at the top of the column until the pointer shows as a black down pointing arrow and click once to select the column, click and drag to select multiple columns. You can also use the Shift + right click keyboard shortcut to select the current column. To select a cell, position the mouse pointer over the bottom left corner of the cell until it turns into a black arrow that points up to the top right corner of the cell and click once to select it. Click and drag to select a range of cells. To select a table, either click the small box above its top left corner or turn off the Number Lock key on the numeric keypad and press Alt + 5. To select rows or columns in a table that aren't side by side (they aren't contiguous), select the first one then hold the Control key and select the others in turn. This feature is supported in Word 2002 and 2003. To move rows around a table, click somewhere in the row and press and hold Shift + Alt keys and use the Up and Down arrow buttons to move the row up and down. Select multiple rows and you can move them all at once. If you move a table row to the top or bottom of the table it will eventually split off from the table to form a separate table. If you move this separate table into another table in the document it will be incorporated into it. Nesting tablesIt is possible to nest tables inside each other and to arrange them side by side in Word 2002 and 2003. To nest a table inside another table, click in the cell to add the table to and then choose Table, Insert, Table and add another table inside this one. To arrange tables side by side you'll need to make your existing table smaller than page width – which is the default size when you use the Table, Insert, Table command, for example. To do this, adjust the column widths until the table is smaller than the width of the page, then use the Table, Draw Table option to draw the second table beside the first. Quick takesThere are a few handy keystrokes you can use when working with tables that will make your work much easier to do. When you need to move to the next tab stop in a table, press Control + Tab to do this – pressing Tab as you might do outside the table simply moves you forward to the next table cell. To align dollar amounts in a column, select the cells containing the numbers and click the tab indicator to the left of the ruler line until the decimal tab icon appears, now click on the ruler where the decimal tab should be – the numbers will be automatically lined up with the tab even though you didn't include a tab when you typed them. To number the cells in a table, select the cells to number – in general this will be a single column in the table. Click the Numbering button on the Formatting toolbar and all the cells in that column will be automatically numbered. Repeat the process to remove the numbers. When the cells are numbered, altering the order of the rows will automatically reorder the numbering so you don't have to do this manually. When the headings for a table are too wide for the table cell width, consider placing the headings vertically instead of horizontally. To do this, select the cells containing the headings and choose Format, Text Direction and select one of the two vertical text directions. To delete a table, select the small box in its top left corner and press the Backspace key to remove the entire table. To simply delete its contents, but leave the formatting intact, select the same small box and press the Delete key. To show or hide the gridlines for the table on the screen, choose Table, Hide Gridlines (or Table, Show Gridlines depending on whether they're currently hidden or showing). Of course, if the table already has border lines you'll see these regardless of the Gridlines setting – all tables have single line borders around all cells by default. To sort data in a table use the Table, Sort option and select the table column to sort the data on and the order to use. Select whether your table has a header row or not – you won’t want it sorted if you have one – and click Ok to begin the sort. While this tool looks like it's limited to tables, it actually works with all text in tables or not. When a table runs over more than one page, you may want the heading row to appear at the top of each page. To do this, first select the heading rows and then choose Table, Heading Rows Repeat. When you have a series of rows or columns which aren't all the same size, make them the same size by choosing Table, AutoFit and then choose Distribute Columns Evenly or Distribute Rows Evenly and they'll all be resized to the same size but the overall table depth or width will not be altered. To centre, left or right align the table, select the table and choose Table, Table Properties, Table tab and select the alignment from the Alignment options shown there. In this same dialog you can configure text to flow around the edge of a table, or not. Formatting tablesTo format a table using a preset table format, place the cursor in the table and choose Table, AutoFormat. You can now choose one of the built in formats to apply to the table. From the Apply Special formats to options, select to apply formats to the Heading Rows, First column, Last Row and Last Column. Choose the Heading row option if the first row of the table contains a set of headings but do not enable this option if it simply contains table data. Likewise if the last column and last row contain special totals, for example, you may want them to be specially formatted, if they don't then disable the options and they'll be formatted like the remainder of the rows. Tables for paragraphsWhile the data in a typical table will be represented by only one or two words or numbers there are other occasions when a table can enable you to position larger blocks of text side by side on the page. When you place the large text blocks in a table, the text will remain correctly positioned even if you edit the text and it won't needing major reformatting to keep it aligned. If you don't want the table cells to be visible on the printed document, select the table and choose Format, Borders and Shading, Borders tab and click the None option. Ensure the Apply to option is set to Table and click Ok.
When you have paragraphs of text side by side, tables are a great way to display it so they don't move Images in tablesWhen you add an image to a Word table it will be inserted as an inline image and it will appear in the table cell and be confined to it. When you alter the wrapping on the image to Square, Tight, Through or Top & Bottom text will flow around the image but the image will still be contained within the table cell. If you set the image wrapping to Behind Text or In front of Text the image will be freed from the table cell and will float over or under it. What cell is that?Back in the days of Word 97 there was a macro shipped with Word that could tell you the reference of the table cell. Here's how to take a step back in time and get that macro for later versions of Word: Step1 Visit http://support.microsoft.com/kb/q172492/ and download the file Wdtlupd.exe which is referred to on this page. This is a self-extracting zip file which includes various documents, the one we're using is not version specific. Run this file and select a location to save the extracted files into. Step 2 Open the folder containing the extracted files and double click the file macros8.dot. When prompted to do so, click the Enable Macros button and the file will open automatically in Word. Now choose Tools, Macros, Visual Basic Editor. Step 3 Locate the Macros8.dot file in the Project list on the left of the screen and click to open its Modules collection. Locate the module called TableCellHelper and double click it open the code window. Select the code and copy it by choosing Edit, Copy. Step 4 Locate the file Normal in the Project collection and click its Modules collection. Choose Insert, Module to add a new module, double click to open this new module and choose Edit, Paste to paste the copied code into the module. In the Properties area (choose View, Properties Window to display this if needed), alter the module name to TableCellHelper and, when you're done, close the Visual Basic editor and close the file created using Macros8.dot. Step 5 Run the macro by clicking somewhere inside a table and choose Tools, Macro, Macros from the Macros in list choose Normal.dot and locate and run the macro called TableCellHelper. The macro will report the cell address and the total number of rows and columns in the table. Step 6 If you'd use this macro repeatedly, add it as a button to your Word toolbar by right clicking a toolbar and choose Customize. Click the Commands tab, select Macros from the Categories list and locate and drag the macro TableCellHelper on to the toolbar. Right click the new button and edit the name so it is shorter and more helpful. Close the Customize dialog. |
|
|
(c) 2019, Helen Bradley, All Rights Reserved. |