Articles | Photography Blog | Office Tips Blog | about me | e-mail

Helen Bradley - Photoshop and Lightroom tips and techniques

I'm Helen Bradley - I'm a photographer and Photoshop professional. In this Photoshop and Lightroom blog you will find powerful Photoshop and Lightroom tips, tricks and techniques that will help you get more out of both programs. You will also find step by step guides for working creatively with your photos in Lightroom and Photoshop and any other cool applications I know you will be interested in knowing more about.

Thursday, April 09, 2009

Stupid Photoshop Tricks #3: Faux Reflections - Pt 2
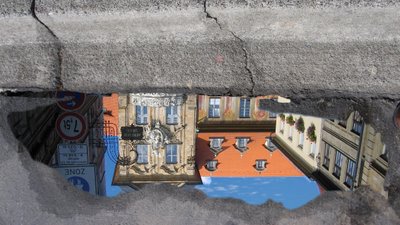

Reflections in Puddles
Creating a reflection that looks like a puddle on the ground is a fun technique. Start with an image of a pavement or brick and convert the background layer to a regular layer. Add a new layer on the image and, using black paint and a semi hard brush with 100% opacity, paint a puddle shape over the image.

Open the image to use as a reflection in the puddle and flip it vertically by choosing Image > Transform > Flip Vertical. Drag this layer onto the image with the black puddle in it and move it to the bottom of the stack. Control + Click on the layer thumbnail for the puddle to select it, add a feather to the selection and choose Select > Inverse to invert it. Hide the puddle shape layer.

Now click the original image layer and click the Add Layer Mask icon at the foot of the Layer Palette and a layer mask will be added to the image opening a hole in the pavement so you see the image through it.

Move the image into position and then darken the pavement if desired using the Burn tool or duplicate the pavement layer and apply the Multiply blend mode to the duplicate and then reduce the opacity to suit.

To edit the reflection paint with black or white on the mask layer. Painting with black will add the reflection in that area and painting with white will remove it. With some fine tuning you should have an interesting result, fig 1.
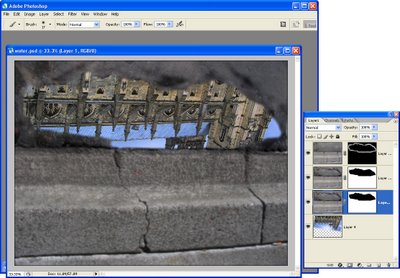

Fig 1 Create a reflection in a pavement image to show off your favorite sky or streetscape.

Mirror Reflections
Having said in part 1 that you should avoid using mirrors to create reflections, here is one way you can do it with a single image and without sacrificing reality – unless of course that's what you want to do.

Open an image of a reflective object – a car rear vision mirror is a good choice and it's easy enough to go out and shoot one if you don't have anything else to work with. Convert the background layer of the image into a regular layer by double clicking on it and click Ok.

Open an image with a scene that you want to show reflected in the mirror and drag the image layer from this image onto the image with the mirror in it. You can now close the second image.

When you look at objects through a mirror they are in revere so you should mirror any image that has type or signs etc, that will look wrong if not flipped. To do this, click the layer to flip and choose Edit > Transform > Flip Horizontal. Hide this new layer for now by clicking its Layer Visibility icon.

Click the bottom layer to make it active and make a selection around the area where the second image should appear inside the mirror. Feather the selection a little by choosing Select > Feather and apply a small feather value to soften the edge - in Photoshop CS3 and CS4 you can use Refine Edge to refine the selection edges.

With this selection in place, click the Layer Visibility icon for the topmost layer so it is visible again. Click the Add Layer Mask icon at the foot of the layer palette and, immediately you do this, a layer mask will be created that automatically places the image inside the mirror.

Notice that the layer mask is a black and white image and, where it is black, that part of the image is hidden and where it is white that part of the image shows. A final touch is to darken the inside edge of the mirror as it was in the original image, see fig 2.
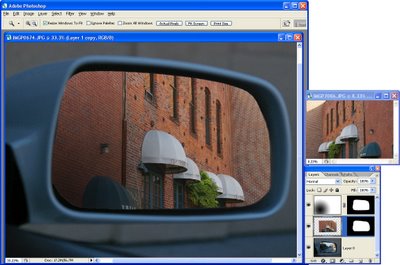

Fig 2. This simple reflection is created by placing a scene inside a reflective object such as a car mirror.

To adjust what portion of the image appears in the mirror, undo the link between the layer mask and the image (it is a small chain icon between them in the layer palette), move the layer into a new position and apply the link again.

If you're interested in seeing some great real life pavement reflections so you can analyze their characteristics to apply them to your images, visit Photochiel's wonderful Reflectins collection at Flickr: http://www.flickr.com/photos/photochiel/sets/140720/show.

Labels: , ,

Saturday, April 04, 2009

Stupid Photoshop Tricks #3: Faux Reflections - Pt 1


There's something very compelling about photos that capture reflections. These reflections can come from puddles on the ground but they're not limited to wet environments. In fact any shiny surface can reflect its surroundings.

If you’re not lucky enough to encounter a reflection worthy of capturing, you can create a faux version with Photoshop. The process is relatively simple and you can create results that vary from looking realistic to those that are playfully faux. In this article I'll show you three variations on the reflection theme including how to make a reflection in a mirror and how to create a puddle of water where there wasn't one before.

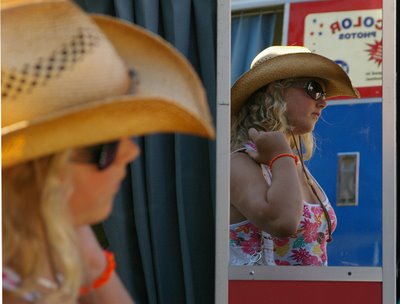
Before you start working with reflections, there are some things to be aware of. One of these is to avoid attempting the impossible, such as placing a person in front of a surface and creating mirror reflection of them in it. The problem here is that you typically need two images, one shot from each side of the person to create the mirror image because what is reflected in the mirror won't be what you're seeing in front of it, as shown in Fig 1.

The easiest reflections to create are where the reflective surface is below the object being reflected in it. Examples of this are reflecting a building or scene in a lake or pond. This type of reflection requires only one image to achieve a semblance of reality. Another type of reflection that it simple to achieve is where you show the reflection but not the original object – in this case, almost anything can be reflected.


Fig 1 This is a photo of a person reflected in a mirror, to recreate this digitally you'd need two images, one shot from either side of the person.

Water reflection
When you think of reflections, you'll probably think first of a scene or building reflected in a lake or large body of water. These reflections are fairly simple to create. Start with your image open in Photoshop and double click the background layer to make it into a regular layer.

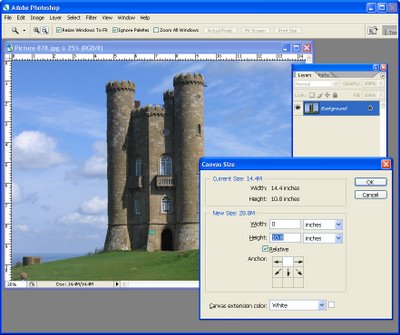
Enlarge the canvas so you have room for the reflection by choosing Image > Canvas Size and read the current size from the top of the dialog. You'll need to double the height so, to do this, click the Relative checkbox and the box in the top center of the 9 boxes in the Anchor preview. Type the value of the current height of the image into the dialog and click Ok, (see Fig 2). You should have lots of extra room below the image.


Fig. 2. Add more canvas to the foot of the image so you have room for the reflection.

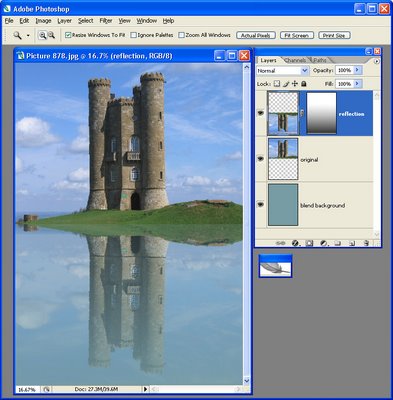
Duplicate the image layer by right clicking it in the Layer palette, choose Duplicate Layer and type a name for this layer – Reflection – and click Ok. Select and delete any portion of the bottom of the image you don't want to use. Click the layer name to select the layer and flip it by choosing Edit>Transform>Flip Vertical. Use the Move tool to drag the flipped version of the image down below the original image and align them carefully.

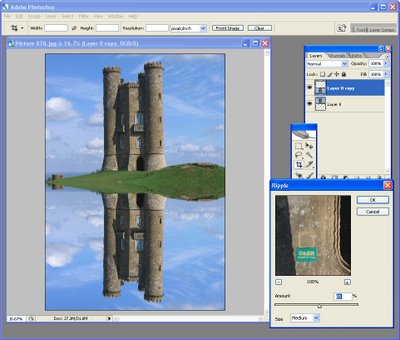
The reflection is in place but it's probably won't be particularly realistic. To add realism, add a ripple to the reflection layer by choosing Filter>Distort>Ripple and select a ripple amount of either Small or Medium. This adds a subtle distortion to the reflection and makes it look more like water, see Fig 3.


Fig 3 Add a ripple filter effect to make the reflected area look like water.

Because not all reflections will be perfect you can make the reflection disappear as it moves father away from the reflection line. To do this, add a new layer using Layer>New>Layer and fill the layer with black, muddy brown or blue/grey and drag it under all the layers. Return to the reflection layer and add a layer mask by clicking the Add Layer Mask icon at the foot of the Layer palette.

Click in the layer mask and click the Gradient tool on the toolbar. Select a White to Black gradient and set the style to Linear. Drag vertically on the image with your mouse to fill the mask with the gradient. It should be filled with white at the top and black at the bottom. If not, click the Reverse checkbox on the toolbar and repeat the gradient fill until you get a transition from fully opaque to partially transparent for the reflection layer. As you do this, the underlying black or brown layer will show through, see Fig 4.


Fig 4 The reflection has been made partially transparent so it's not as perfect and it’s more realistic.

Other fine tuning options include duplicating the reflection layer and blur this duplicate by choosing Filter>Blur>Gaussian Blur. Blend this layer into the one below by decreasing its opacity.

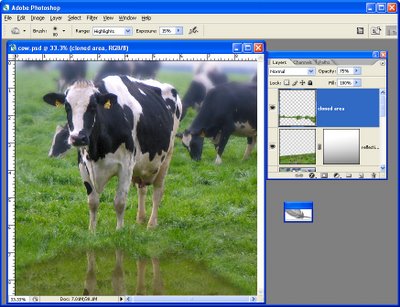
If having a reflection appear as a straight line along the image doesn't look good, you can clone elements from around the reflection to make it less obvious. To do this, add a new layer to the image and drag it on the top of all the layers. Select the Clone Stamp tool and ensure the Sample all Layers checkbox is selected. Now Alt + Click on an area to sample it and paint over the horizontal line to soften it. Cloning onto a new layer allows you to edit the cloned area separately from the original image. In fact, you may notice that nothing we've done in these steps has affected the original image.

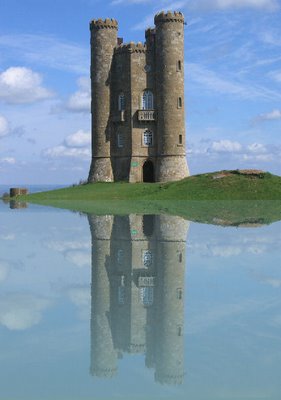
Crop the image to create a more interesting result. For example, crop so the line between the original and the reflection is along the top third of the image so you're showing more of the reflection and less of the original or crop so it's along the bottom third so you see just a little of the reflection, see Fig 5.


Fig 5 This image has the reflection line softened by cloning and it's cropped so only a little bit of the reflection shows.

Labels: , ,