Office tips blog |
Photoshop/Photography Blog |
About me |
e-mail

|
All about Relational DatabasesHelen Bradley 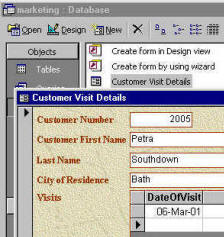
When you're ready to move beyond the basics of Access you're ready to learn about its relational database capabilities. Helen Bradley explains...You may have heard Access described as being a database capable of handling relational data, but what is relational data and what does it mean to you? The answer is – quite a lot. If you're familiar with the basics of creating tables, forms and reports in Access, understanding how to store relational data is the next big step to take in coming to grips with the power of Access.
In this column you'll see that much of the data you manage could, and should, be stored in a relational format. You'll see the benefits of using a relational database in terms of storing data neatly so it can be edited and updated very easily. You'll also see, step by step how to create tables that are related to each other and how you can access the information stored in multiple tables at the one time to query it and report on it. Even if you've never used Access before you'll find the step-by-step instructions easy to follow. What is relational data? If you followed our previous Master Class on Access (Issue 174) you'll have experimented in Access to create a simple table containing the information about a local cricket club. This table contained the members names, their grade, birthdays etc., and it was a simple enough application that a single table was all that was required.
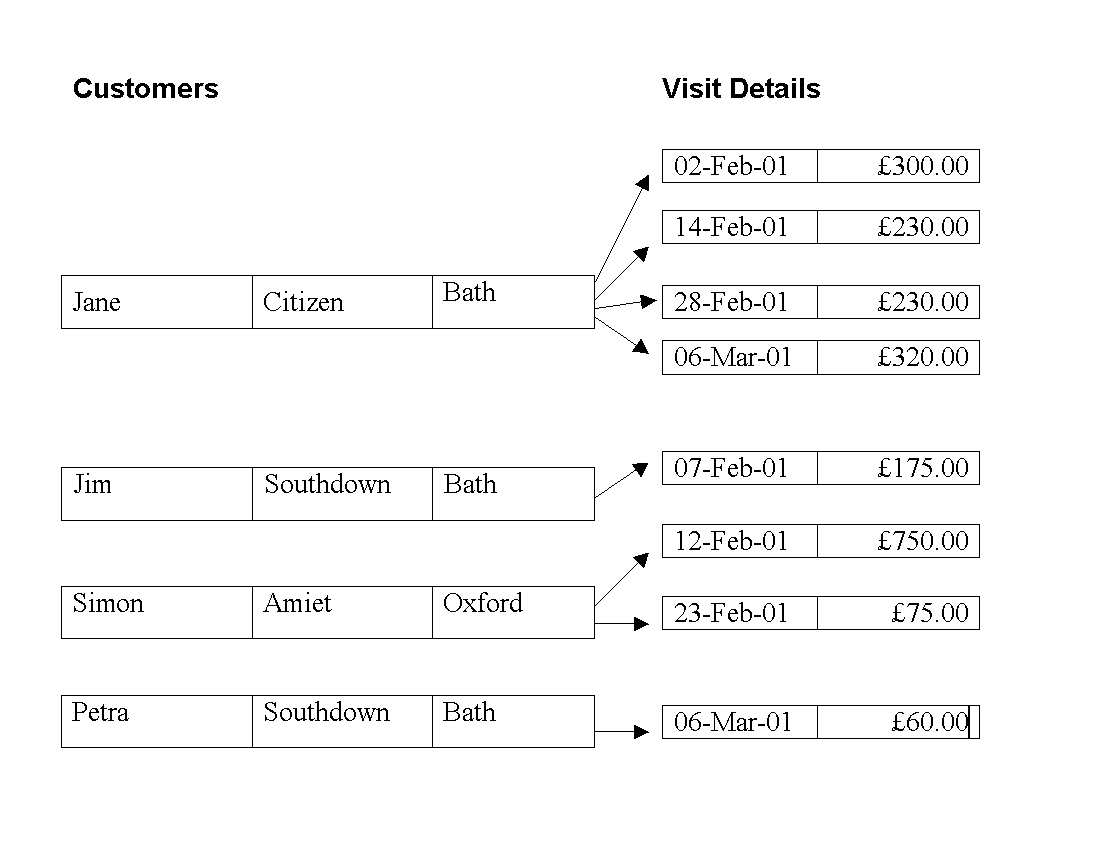
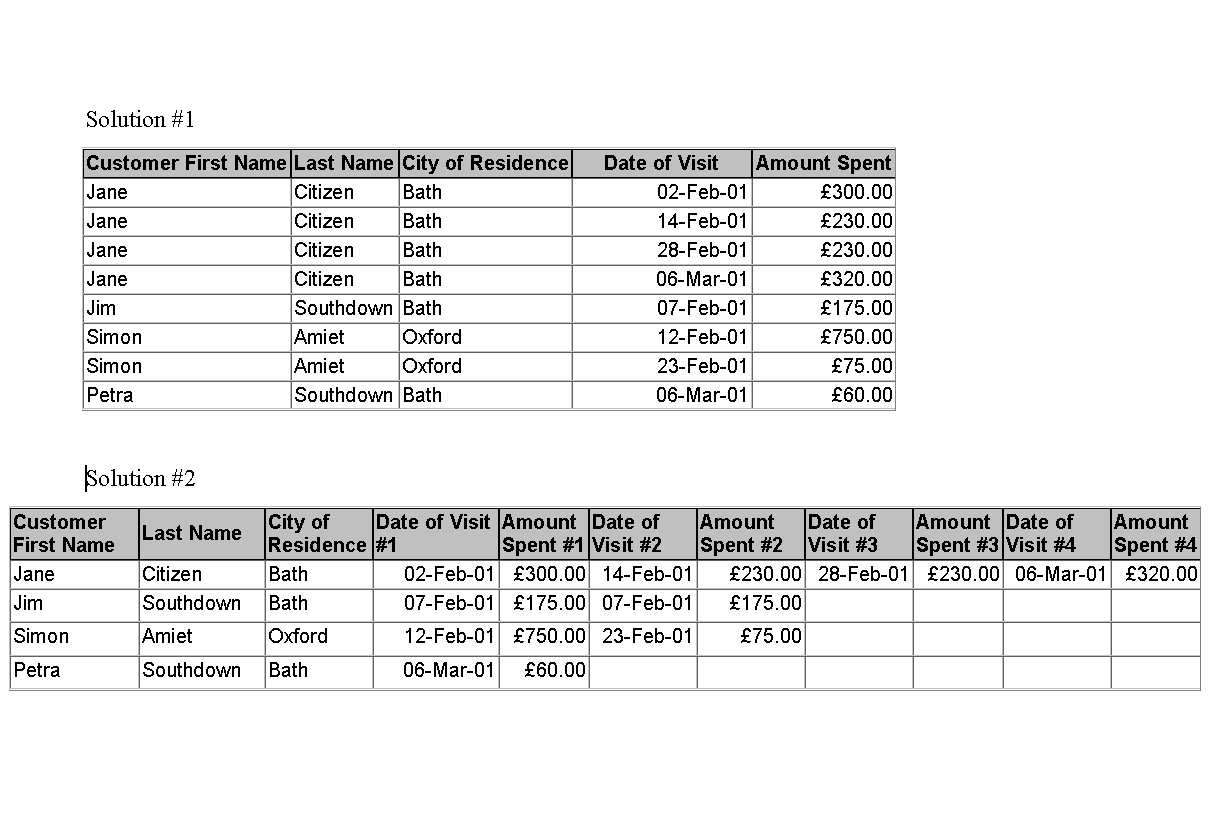
Consider however, this scenario. You run a small business and, for marketing purposes, you want to record information about your customers; who they are, how often they buy from you and what they spend. So, for customer Jane Citizen for example, you'll store her name and address details and each date that she purchases something from you and how much she spends. Using a single table you could do this in one of two ways: you could add a separate entry for every time she buys from you or you could add one entry for Jane and have different fields for each time she purchases.
Neither of these sample solutions works particularly well for recording details of customers and their spending patterns.
Notice that there are inherent problems with both solutions. In the first example, every time Jane Citizen buys from you, you have to enter a new row in the table containing all her personal details so you're typing a lot of duplicate information each time a customer visits. This is wasteful of your time and you have the problem of how you ensure that Jane's details are always entered correctly and in the same format. If you don't make the entries the same, you run the risk, when you send mail to all your customers that Jane will receive multiple mails because the entries aren't all identical. If Jane changes address, you have a lot of work to do to make sure that you make changes throughout your table and incorrect entries may also wreak havoc with any attempts you make to summarize your data.
In the second sample solution, the table can grow very big because you need two fields in the table for every time Jane Citizen visits. If Jane were to visit once a week, you'll need 104 fields to record one year's worth of data. It is also very difficult to get data out of this table, for example, how will you total the amount Jane has spent? You would have to write an expression to total the values in 52 fields to get information on her expenditure for just one year.
Creating the tablesTo see how you create and manage relational data like our sample data in Access, follow these step by step instructions for creating the tables you'll need. Because this project is more a familiarisation exercise than one you'll put to practical use, the tables are small so you can create them quickly. In practice you would want to store more information in your tables and to do this, you'd simply add an extra field for each piece of information you want to record.
The instructions which follow use Access 2000 but they'll work pretty much the same in Access 97 – just look around to find the option which matches the Access 2000 one.
Open Access and choose Blank Access Database from the dialog which appears and click OK. Give your database a name (Marketing) and select a folder to store it in. You'll see the Database dialog appear on the screen and you're ready to begin.
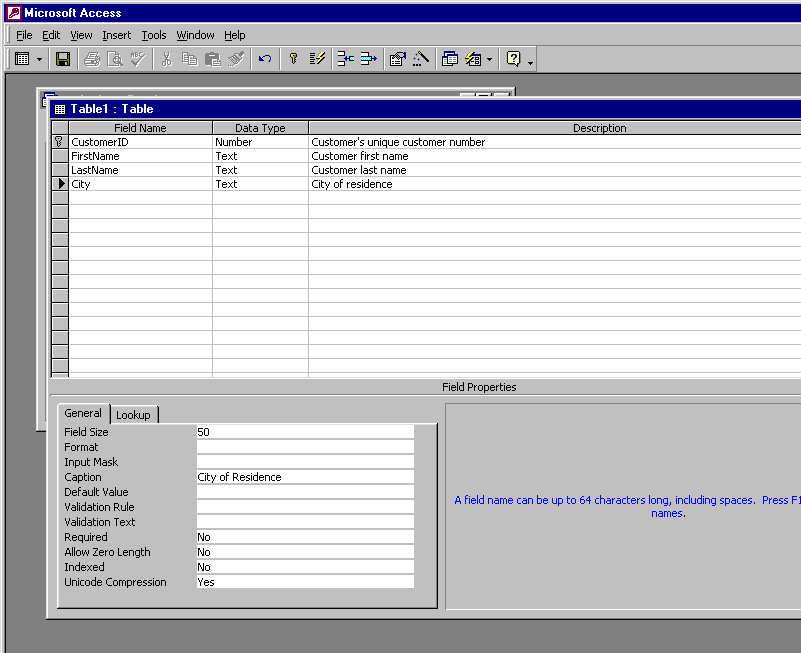
You'll create your table in Design view so, from the Objects list choose Table and double click Create table in Design view. Click in the first area and type the field name CustomerID, press Tab and you'll see Text appears as the default data type, press N so this changes to number, press Tab and type a description for this field which will be "The customer's unique customer number". In the area at the foot of the dialog locate the item called Caption and type the words Customer Number. Now click in the next line so you're ready to enter details about the next field.
Continue and add data for each of the fields that follow – make sure you select the correct data type from the dropdown list for each field:
Repeat this step to create a second table, this time with these fields and captions. Do not set a primary key for this table so, when you save it (and call it Visits) answer No when the prompt to add a primary key appears.
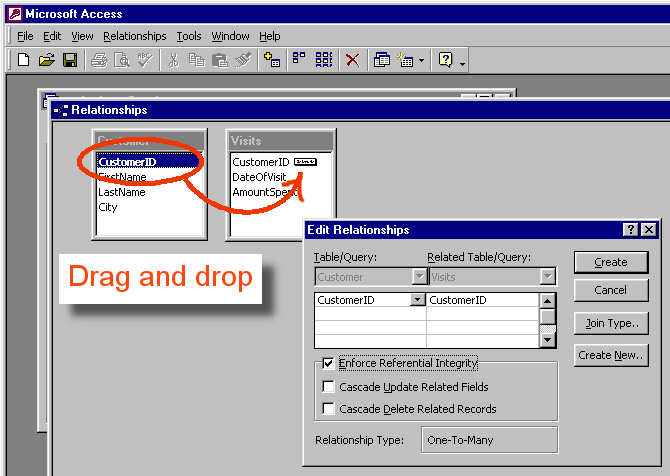
Creating the RelationshipNow that the tables are created you can tell Access how they are related. When you do this, Access will then help you manage your tables and it will ensure, for example, that you don't add a visit for a customer with a customer number which doesn't appear in the Customer table.
To create the relationship choose Tools, Relationships. When the Show Table dialog appears, click Customer and click Add, then click Visits and click Add and finally, click Close. You'll now have two lists on the screen displaying the fields in each table. Click on the CustomerID field in the Customer table and drag it over the CustomerID field in the Visits table and let go. The Edit Relationships dialog will appear and, in this dialog, click Enforce Referential Integrity checkbox so Access will protect your data against deletions or changes in one table which would affect the data in the other. Click Create to continue, close the dialog and answer Yes when prompted to save your changes. Entering dataNow the tables have been created, you can enter your sample data. To do this, open each table in turn and choose View, Datasheet View so you're viewing the table in editing mode. Enter this data into the Customer table:
CustomerID FirstName LastName City 2001 Jane Citizen Bath 2002 Jim Southdown Bath 2003 Simon Amiet Oxford
Enter this data into the Visits table:
CustomerID DateOfVisit AmountSpent 2001 02-Feb-01 £300.00 2001 14-Feb-01 £230.00 2001 28-Feb-01 £230.00 2001 06-Mar-01 £320.00 2002 07-Feb-01 £175.00 2003 12-Feb-01 £750.00 2003 23-Feb-01 £75.00
Working with your dataOnce the data is entered into the tables you can then investigate your options for viewing it. In the breakout boxes you'll see step-by-step walkthroughs showing you how to create a form to make it easier to enter data into your tables and also how to create a report containing the data from both tables. In addition to these, you'll also find plenty of use for Queries which allow you to extract information from the data you have stored.
From the Customer table, double click the FirstName, LastName and City fields in turn to add them to the Query area below. Repeat this for the DateOfVisit and AmountSpent fields from the Visits table. Now click the Run button (it has an explanation mark on it) and you'll see the list appear.
To order this list so the entries appear in order by the date of the visit, switch back to Design View and, in the column which contains the DateOfVisit field, locate the Sort cell and click in it. From the dropdown list which appears, choose Ascending and click Run to run your query again. This time the visits appear in date order so, for example, it's easy to locate everyone who visited on the 6th of March, for example.
To save this query so you can run it again at anytime, click the dialog's close button, answer Yes when you're prompted to save the query and type a name for it (e.g. Customer details by date of visit) and click Ok.
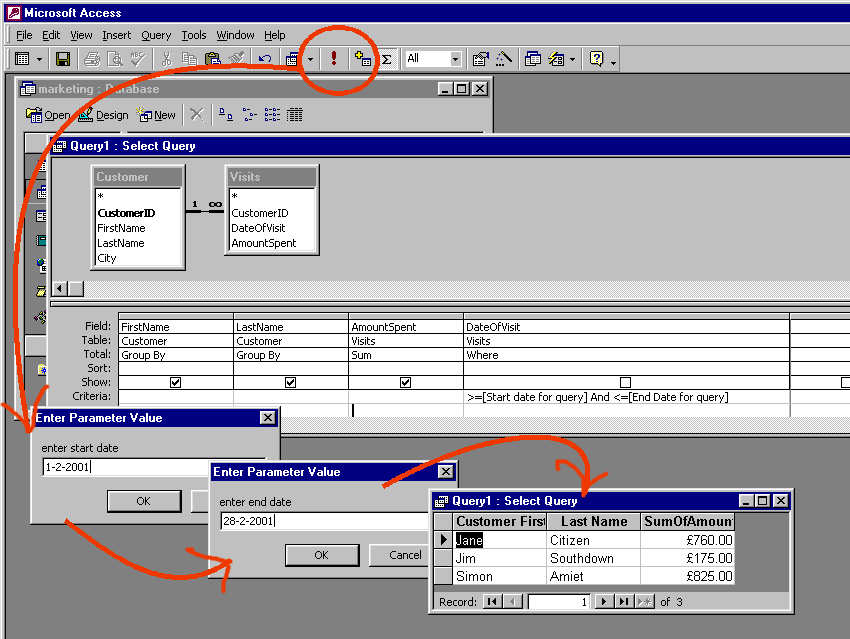
Another handy query is one which allows you to extract information from the data. For example you may wish to total all the amounts spent by each customer for the month of February. To do this, use the same steps you used for the previous query to create a new query containing just the fields FirstName and LastName from the Customer table and the AmountSpent field from the Visits table. Choose View, Totals and the Total line will now appear in the query area. From the Group By dropdown list under the AmountSpent field name choose Sum and run your query. You can see that you have almost all the information you need, you just need a way to limit the data to visits that took place in February.
To add this function to your query, return to your query design view and add the field DateOfVisit as the fourth column of your query (note that the order of the fieldnames in the columns is critical). Disable the Show checkbox for the field DateOfVisit as you don't want the data displayed on the screen. From the Group By dropdown list for this field, choose the option Where and in the Criteria area for the DateOfVisit field type this line:
>=[Start date for query] and <= [End Date for query]
The square brackets are important as they tell Access to ask you for the start and end date before the query results are displayed. We've also used the symbols for 'greater than or equal to' (>=) and 'less than or equal to' (<=), which will ensure when you type the start and end date that any purchases made on those dates are included in the summary.
Now run the query. You will be prompted to enter the start date which, for the month of February, is 1-2-2001 and then the end date which is 28-2-2001. The result of the query will appear on the screen showing each customer and the amount in total that they spent for the month of February. Note that rather than asking the query to extract the data for February you have asked it to ask you which dates to use every time you run the query. This allows the query to be used to extract the amount spent by each customer for any period of time, for example from 1-1-2000 to 31-12-2000 or for any other date range of interest to you.
By the time you've worked through these steps you'll be familiar with the fundamentals of Access' relational database tools. You'll find plenty of applications for your skills at work and at home and you will find additional information in the Access Help tool to assist you with managing your data and writing queries.
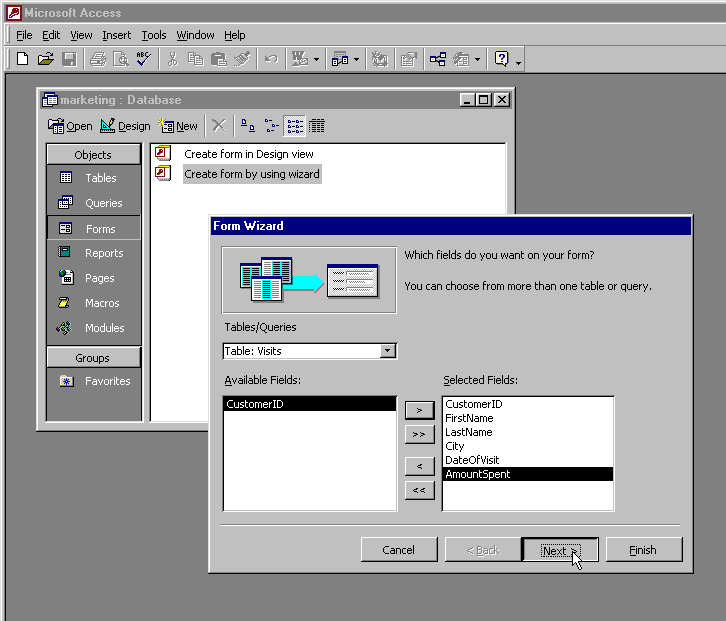
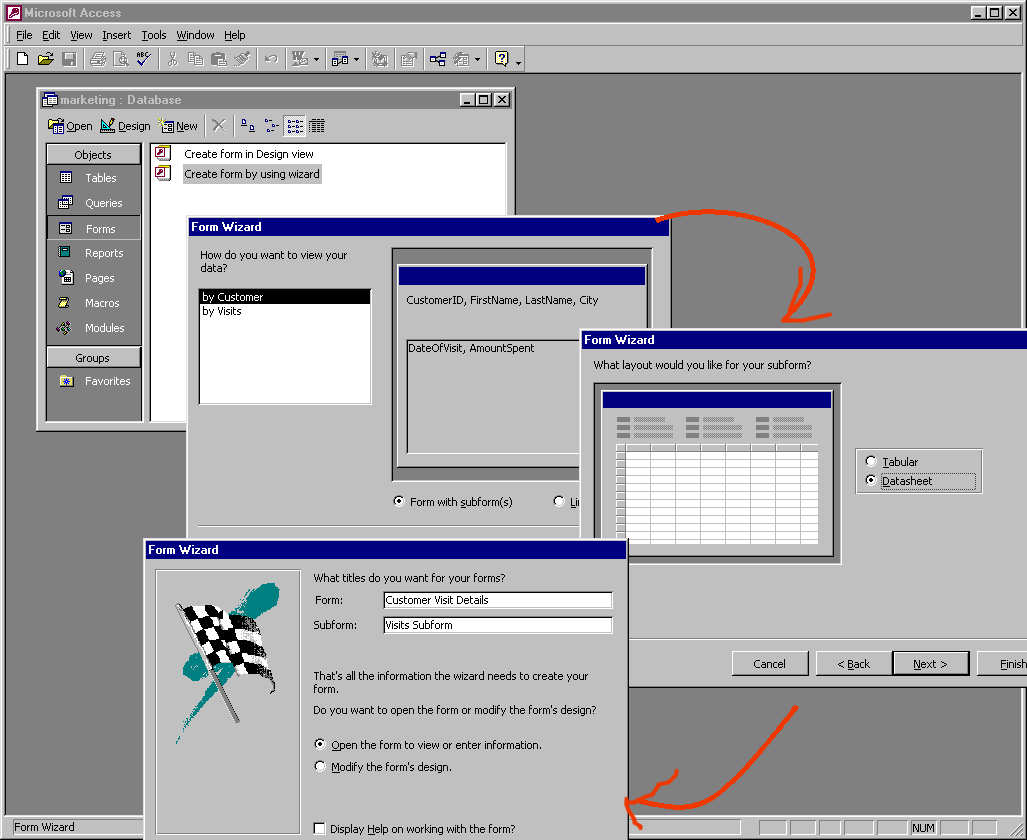
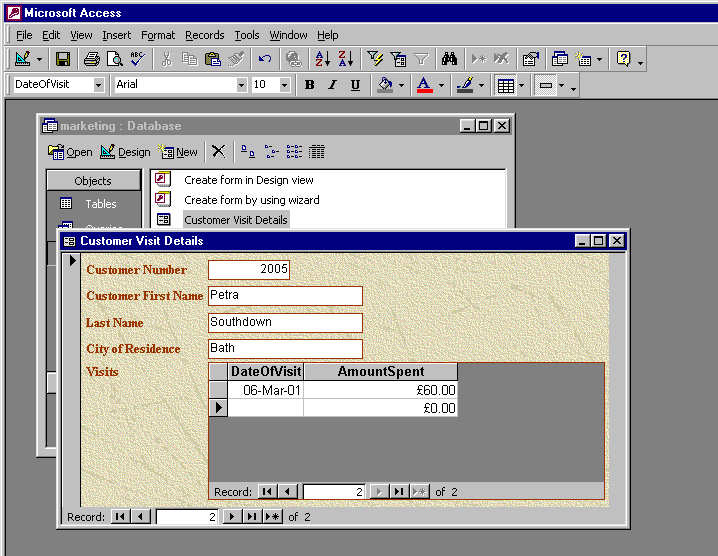
Creating a formAs an alternative to entering data in Datasheet view you can create a form which allows you to enter data into both tables at the one time.
Step 1
Step 2
Step 3
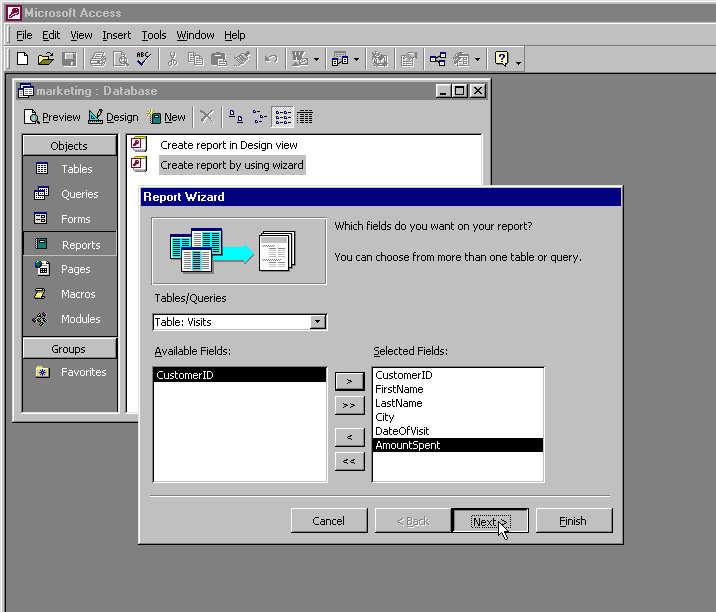
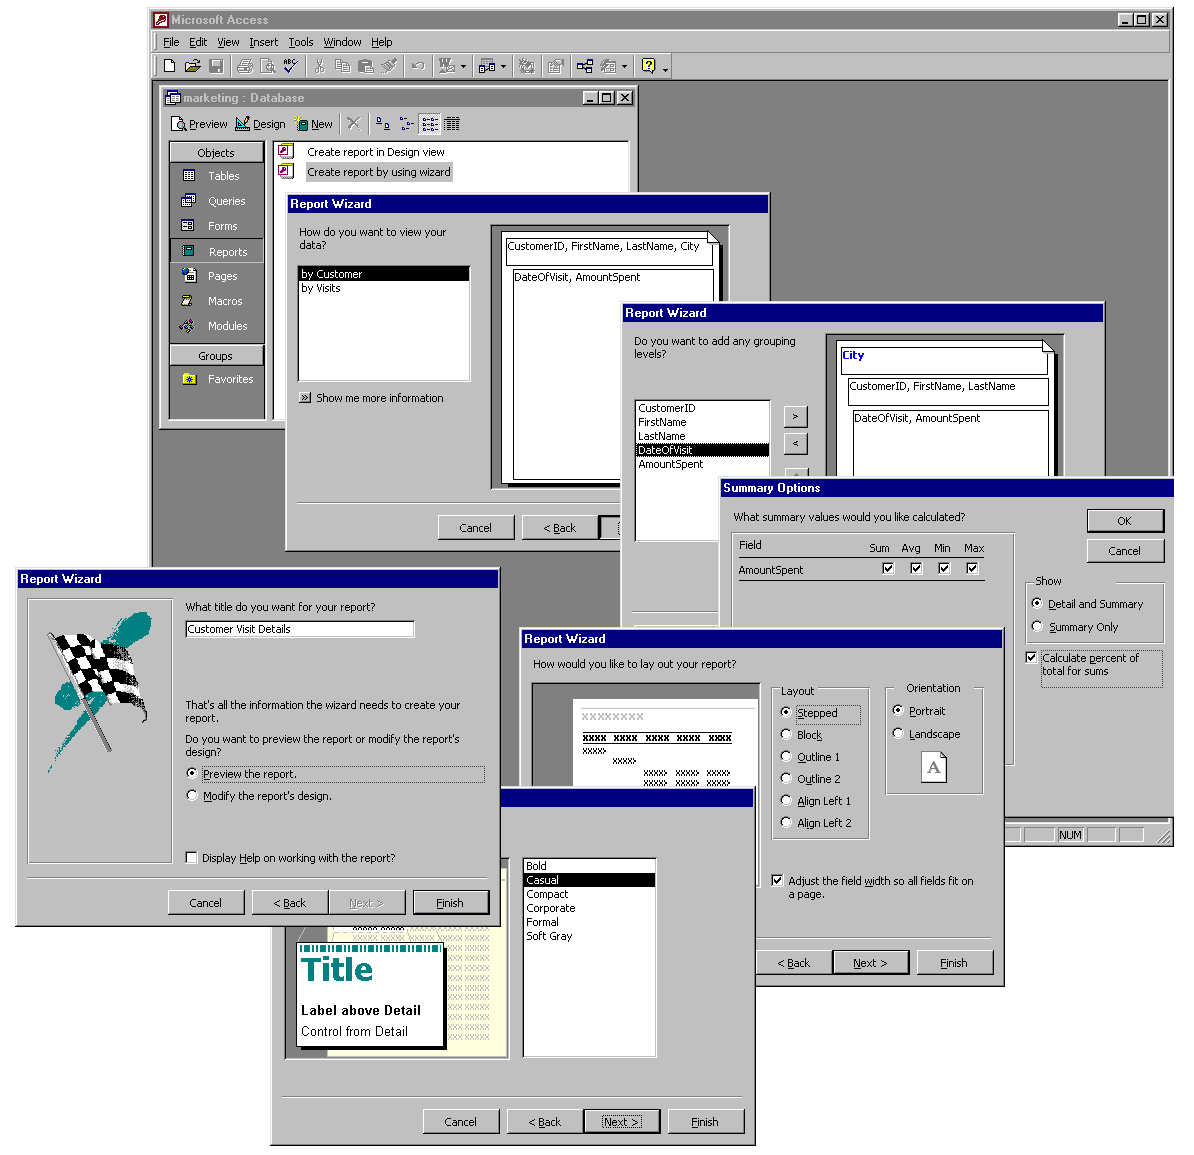
Reporting on your dataAccess makes it easy for you to gather the data from related tables into a single report. You can also get some handy summary statistics.
Step 1
Step 2
Step 3
(c) H Bradley, 2007-2009 |
|