Office tips blog |
Photoshop/Photography Blog |
About me |
e-mail

|
First steps with AccessHelen Bradley If you've never used Access before, He
|
 len Bradley
shows you, step-by-step, how to create your first database.
len Bradley
shows you, step-by-step, how to create your first database.|
First name |
Last Name |
Grade |
Fees paid |
Years a member |
Birthdate |
|
Jim |
Southdown |
A |
Yes |
3 |
8/12/1971 |
|
Simon |
Amiet |
B |
Yes |
4 |
24/2/1970 |
|
William |
Cousens |
B |
No |
5 |
3/3/1974 |
|
James |
Cousens |
A |
No |
2 |
10/5/1979 |
|
Michael |
Southdown |
C |
Yes |
6 |
18/7/1965 |
|
Simon |
Nash |
D |
Yes |
10 |
31/3/1963 |
|
John |
Parker |
C |
Yes |
2 |
5/5/1959 |
|
Nick |
Janson |
A |
Yes |
1 |
28/2/1967 |
The instructions which follow use Access 2000 but they'll work pretty much the same in Access 97 – just look around to find the option which matches the Access 2000 one.
Before you open Access
Before you even turn on the computer you should design your database on paper. To do this, begin by considering what you want your database to do. In this case the club president wants to be able to find quick answers to questions such as "Who hasn't paid their fees?", "Who are the A grade players?" and "Who is due for their 10 year pin this year?".
The president already knows the information he needs to store in the database because it's been recorded using a card system for some time. If this wasn't the case and if you are creating a database, for example, for your CD collection where you haven't had one before then you'll need to consider all the possible questions you'll want the database to provide answers to and the lists you'll want from it. In this case you might want a list of all your CDs by title or by musician. You might want to type in a singer or group and be able to get a list of all the CDs you have of theirs. It's up to you to decide the information your database needs to give you. It's not until you know what you need to get out of a database that you can determine what you must put into it!
It's worthwhile thinking about this for a minute; you design a database by looking at the end product first – what you want out of it, then you make sure you put into it the information that will allow you to get this out. This is an important step, unless you do it carefully you'll end up with a database full of data that you don't use or that doesn't allow you to get the information you need out of it.
When you have determined the data to put into the database to get the results you want, you need to determine how you'll organise the data. When you're storing people's names it is easier to manage these if you split these into first name and last name. If you do this you can search for a person by last name and create lists in alphabetical order. You can also use the mail merge option to send letters which read "Dear Mary," etc.. If you don't split people's names into first name and last name, then these tasks will be more difficult to complete or you'll end up with letters which read "Dear Mary Brown" or you'll have James Smith appearing before Xavier Brown in an alphabetical listing! If you are entering addresses, split these into Street name and number, Town, Country and Postal code so that you can use this information to create mailing labels and mail merge letters. If you split this information into multiple parts you'll be able, for example, to get a list of everyone who lives in Bath or in France.
Each individual piece of data, for example; last name, postal code, town, becomes one field (or column) in your database table. You need to give each field a name and to specify the type of data you're storing in each field - whether it is text, date, number, Boolean (yes/no), etc.. This is an important step as it will affect the way you get information out of your database later on and how you search it.
In Access, you'll also need a Primary Key which is a field (or a combination of fields) which are unique to each record. In our case, we couldn't use the last name as our Primary Key because there are some people with the same last name (so it isn't unique) but we could use a combination of first name and last name as that is unique for this data. If you don't have a field or combination of fields which are unique, you can add a counter field to your table which will allocate each entry a unique number – then you can set this to be the primary key field.
Our database is a simple two dimensional table but Access is capable of much more complex structures. For example you can have a database containing multiple tables which are related to each other. In our example, we could add a table with the player's statistics for each year they have been playing for the club and we could link this to the player table. When you create a database containing more than one table of data you must determine how your tables relate to each other and how they will be linked so that you can get information from more than one table. In our scenario there's only one table so we'll bypass this step for now.
At the end of the planning stage you should have a list of field names and data types something like this:
|
Field name |
Type |
|
FirstName |
text |
|
LastName |
text |
|
Grade |
text |
|
FeesPaid |
yes/no |
|
YearsAMember |
number |
|
Birthdate |
date/time |
Creating a table
Once you've planned your database you're ready to create it so open Access and choose Blank Access Database from the dialog which appears and click OK. Give your database a name (CricketClub) and select a folder to store it in. You'll see the Database dialog appear on the screen and you're ready to begin.
You'll create your table in what is called Design view which lets you enter all the field descriptions yourself. To do this, from the Objects list choose Table and double click Create table in Design view. You'll see the table Design view on the screen which allows you to enter the field names, the data type and a description for each field. Click in the first area and type the field name FirstName, press Tab and you'll see Text appears as the default data type, press Tab and type a description for this field and then press Tab again to move to the second field. Continue adding the data for each of the fields – making sure you select the correct data type from the dropdown list.
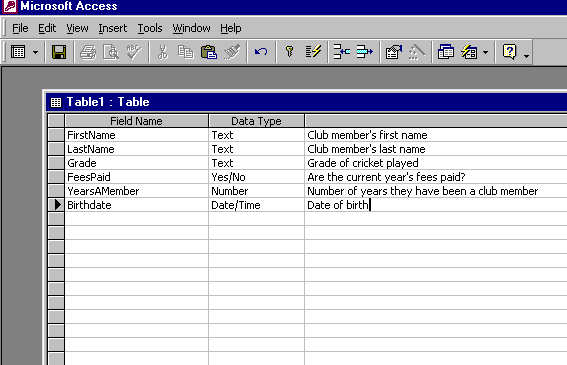
When you have entered the basic field descriptions for the database your screen should look like this.
The shortened names we've used for the fields will make some tasks easier to perform later on but they won't look very attractive if they appear in reports. We can solve this problem at this stage by adding captions for our fields. To do this, click in the FirstName field to select it and, in the General tab at the foot of the dialog locate the Caption area. In there type 'First Name' which is a clearer indication of what the field contains. Repeat this and add Captions for the other fields: "Last Name", "Current Grade", "Fees Paid?", "Years a member" and "Date of Birth".
To set the Primary key for the database, click in the margin opposite the FirstName field to select it and hold the Shift key as you select the LastName field. Now right click and choose Primary Key from the menu. You'll see a key appear in the column to the left of both fields indicating the key has been set. Now save the table by clicking the Save button on the toolbar and call the table "Club members" and click OK.
Entering data
Now that the table is created, you can enter your data into it. To do this, switch to the Datasheet view by choosing View, Datasheet View. You will now enter the data for your table one item per cell. Use the Tab, Enter or Right Arrow key to move to the next field in the row, type your dates in the format 31/12/1999 (using slashes) and, to enter the data in the Yes/No field, press the Spacebar for Yes and leave the checkbox unchecked for No .
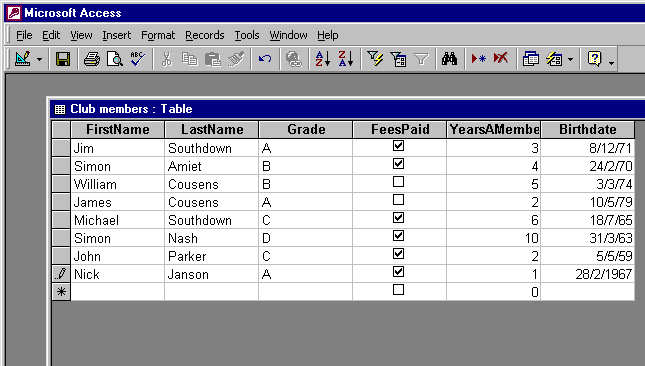
It is a simple matter to enter data into your new table by typing it and pressing Tab or Enter to move from one cell to the next.
When you've entered the data you can close the table by clicking the Close button in its top right corner. You'll be returned to the Database dialog and, you'll see that the Tables tab now contains your new Club members table.
Working with your data
You can open the Club members table at anytime by selecting it and clicking the Open button or by simply double clicking its name in the list. Do this now and let's see how you can change the order of the data using the Sort buttons on the toolbar. To do this, choose the column containing the Last Name by clicking the column heading to select it. Click the Sort Ascending button (it has AZ and an arrow on it) and watch as the data in the table is sorted in last name order. You can do this at anytime for any field in the data table.
You can also use the Find button on the toolbar to locate a person's record in the table. To find everyone with the last name Southdown, select the LastName column and click the Find button (it has a pair of binoculars on it). In the Find what text area, type Southdown and, from the Match dropdown list, choose Whole field and click Find First. You'll be taken to one of the Southdown's information. Click Find Next and you'll move to the next person, click Find Next again and note that there is not another matching record, figure 4.
At this stage you can also Filter your data so it displays only a small subset of the information it contains. You do this using the Filter button. To see how this works, move to the Grade field and click in the entry for one of the players who plays A grade. Now click the Filter by Selection button on the toolbar (it's a funnel with a lightening bold to its right) and you'll see only those records for members who play A grade. To return to viewing all the data in the table click the Remove Filter button on the toolbar (it is the button which is currently 'pressed in'). At this stage you're only working with a small amount of data so you could probably have located this information very easily just by looking at it, however, when you are working with a lot of data, tools like these are invaluable.
Printing the data
An Access reports is a way of committing the data in your table to paper. You can set up a report so it contains all the data in the table or simply a subset of it. To create a report listing the members grouped together by Grade, begin by choosing Reports in the Objects list and double click the Create report by using wizard option. From the Tables/Queries dropdown list you'll choose Club members so that the data for the report will be sourced from the entire table. You'll use all the fields in the report so click the double chevron (>>) to move all the fields from the left window to the right and click Next.
Now choose the field that the data will be grouped by, this is the Grade field so select it and click the right pointing arrow to move it to the window on the right. Click Next and choose the fields LastName and then FirstName as the sort fields from the dropdown lists. This will ensure that the members will appear in alphabetical order within the grade groups – they will be ordered firstly in last name order and, if two players have the same last name, they'll be sorted in first name order.
Click the Summary Options button and from the YearsAMember row enable the Avg, Min and Max checkboxes, click the Detail and Summary option button and click Ok then Next.
From the layout options choose Align Left 1, Landscape and enable the "Adjust the field width so all fields fit on a page" checkbox and click Next. Choose a style for your report, click Next, give the report the name "Club members grouped by Grade (all details)", choose the "Preview the report" option and click Finish. Wait while the report is compiled and the results displayed, figure 5. You can print this report or merely view it on the screen. Like a Query, a report's design is saved so you can create a report using these settings anytime by simply double clicking the report name in the Reports area of the database.
So, there's the Access 101 quick tour. Of course there's a lot more to Access than what is covered here, but you're off to a good start and you can now go ahead and confidently create your own database.
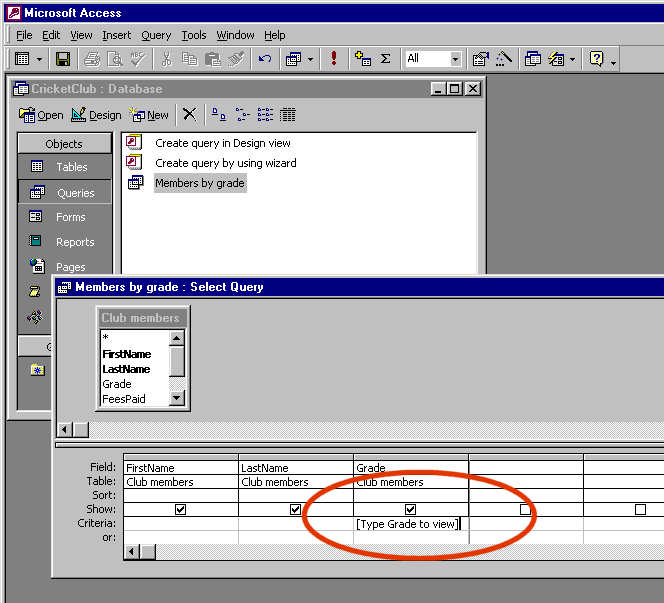
Querying your data
Queries allow you to ask questions about your data and you can store these so you can ask the same question at any time (the answers you get will vary as the data in your table changes). Follow these steps to create a simple query for this table:

Step 1
Click the Queries button in the Objects list and double click Create query by using wizard. This query will display only the first name, last name, and Grade for the members so select these three fields in turn in the left window and click the arrow key to move them to the right window. Click Next. Name the query "Members by Grade" and choose the "Open the query to view information" option and click Finish. You'll see a subset of the data from your table on the screen.
 Step
3
Step
3
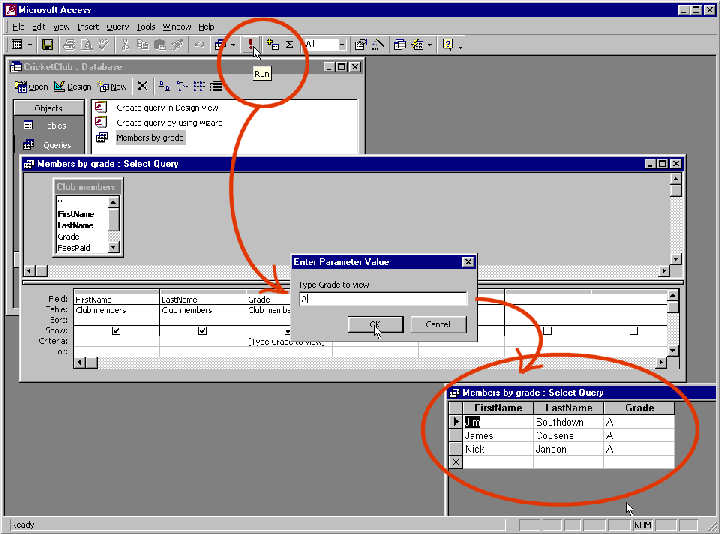
Let's change this so you can enter a Grade and see details of only those members who play that grade of cricket. To do this, choose View, Design View to move to the area where you can change the design of your query. In the column headed Grade in the Criteria row, type [Type the Grade to view]. The square brackets are important as they tell Access to ask you for the Grade before the query results are displayed.
 Step
3
Step
3
To see how this works, click the Run button (it has a red exclamation mark on it) and a dialog will appear prompting you to enter the Grade. Type A and click Ok. Now, the query will display information for only those members who play A grade cricket. You can close the query by clicking its Close button in its top right corner. To save the changes you've made to the query, click Yes when you are prompted to do this.
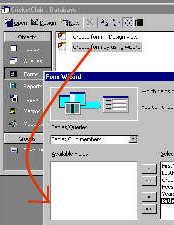
Creating a Form
While it is easy enough to enter your data into the table using the table datasheet view, it will look more professional if you use a form to enter your data. Follow these steps to create a data entry form for your table:
Step 1
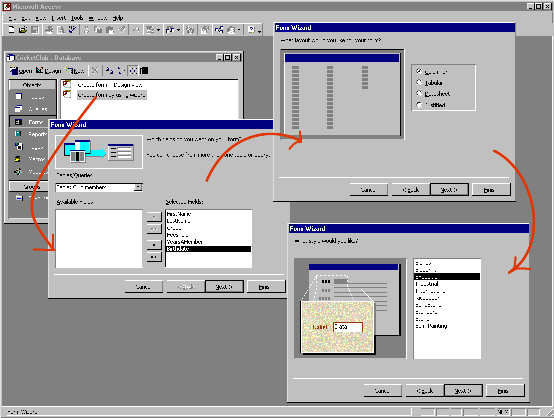 From the Objects list choose Forms and then double click the Create form
by using wizard option. From the Tables/Queries dropdown list choose
Club members and, as you'll be entering data for all the fields in the
table click the double chevron (>>) to move all the fields from the left
window to the right, click Next. From the list of layout options choose
Columnar and click Next. Choose a style and click Next, name your form
Club Members and select the Open the form to view or enter information
option and click Finish.
From the Objects list choose Forms and then double click the Create form
by using wizard option. From the Tables/Queries dropdown list choose
Club members and, as you'll be entering data for all the fields in the
table click the double chevron (>>) to move all the fields from the left
window to the right, click Next. From the list of layout options choose
Columnar and click Next. Choose a style and click Next, name your form
Club Members and select the Open the form to view or enter information
option and click Finish.
Step 2
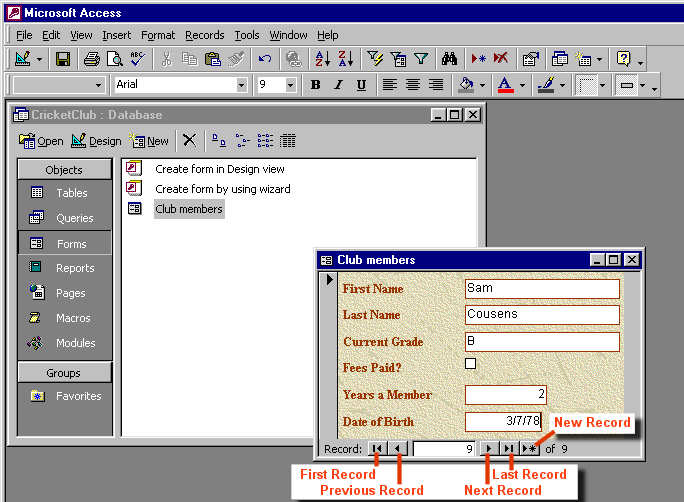 You
will see a form on the screen and you can use this to view the data in
the table. Use the navigation buttons (First Record, Next Record,
Previous Record, Last Record) to move through the records in the table.
You can also enter a new record by clicking the New record button. Do
this and enter data for this player:
You
will see a form on the screen and you can use this to view the data in
the table. Use the navigation buttons (First Record, Next Record,
Previous Record, Last Record) to move through the records in the table.
You can also enter a new record by clicking the New record button. Do
this and enter data for this player:
Sam Cousens, Grade: B, Fees unpaid, a member for 2 years born on 3/7/1978.
Step 3
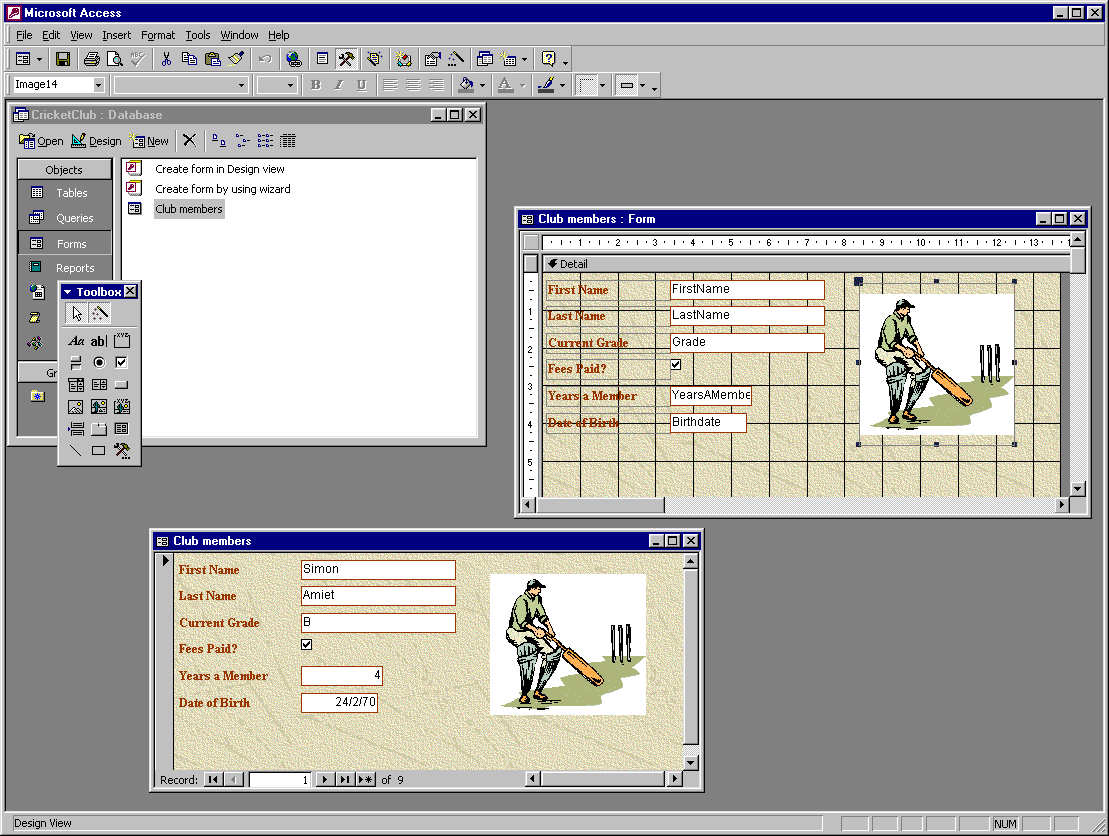 You
can add a logo or other image to the form by clicking View, Design View,
In the Toolbox, click the Image button and click on the form where the
top left corner of the image is to go. From the Insert Picture dialog
choose the image to use and click Ok. To resize the image, choose View,
Properties and click the Format tab. Set the Size Mode to Zoom and the
Picture Alignment to Top Left and then use the sizing handles to size
the image. Choose View, Form View to return to form view.
You
can add a logo or other image to the form by clicking View, Design View,
In the Toolbox, click the Image button and click on the form where the
top left corner of the image is to go. From the Insert Picture dialog
choose the image to use and click Ok. To resize the image, choose View,
Properties and click the Format tab. Set the Size Mode to Zoom and the
Picture Alignment to Top Left and then use the sizing handles to size
the image. Choose View, Form View to return to form view.
(c) H Bradley, 2007-2009
